24 Myths that are Making your Pitchers WORSE: Part 2

See part one of this series here

In this article, we’ll dive into items 12-24 on what you should NOT be doing if you want to develop high level pitchers.  

  1. Weighted Baseballs are More Stressful on the Arm

For starters, if you’re in the anti-weighted baseball group make sure your son does not pick up anything that does not weigh exactly five ounces. Throwing things like tennis balls, softballs, dodgeballs, rocks, whiffle balls, snowballs, and footballs could seriously put them at risk for getting hurt.

(Hint: Throwing balls that do not weigh exactly five ounces is perfectly okay.)

Now that we got that out of the way, let’s talk about what classifies as a “weighted baseball.” For one, saying “weighted baseballs” are bad is meaningless because any ball that has some sort of weight is a weighted baseball. How did we figure out that the five ounce one was the safest? Why does adding (overload) or subtracting (underload) an ounce from the ball all of a sudden make it dangerous? For all we know, the five ounce one seems to do the most harm…

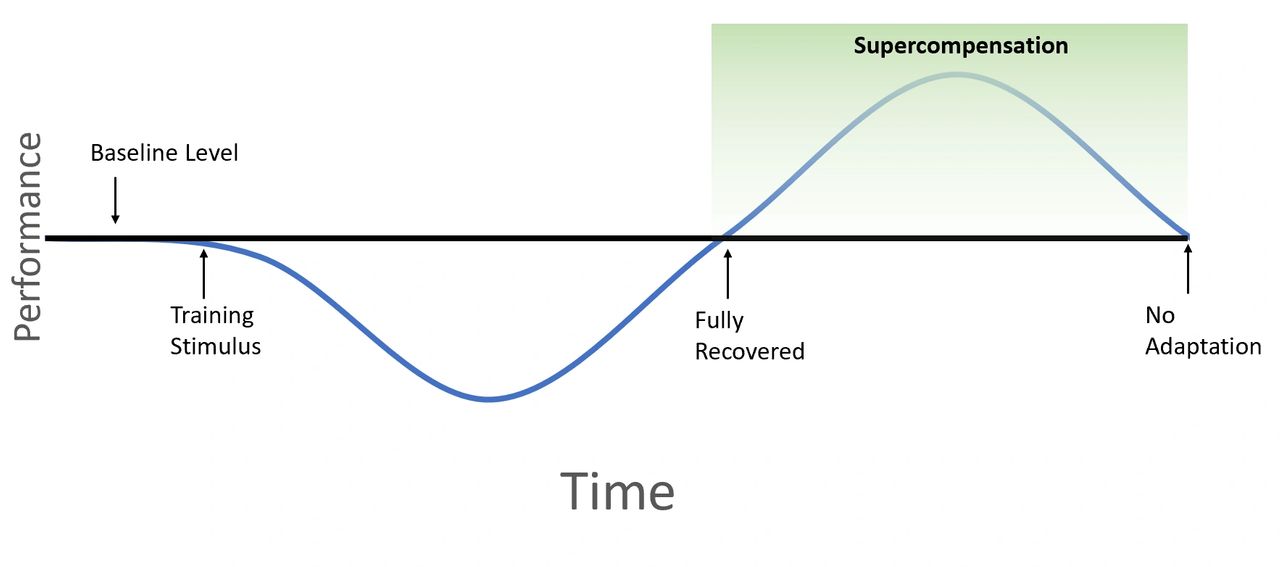
Stress is NOT bad. We need stress in order to create specific adaptations that supercede our previous skill level.

The overarching argument against weighted baseballs is some form of they are more stressful and thus more dangerous to throw with. Before we get into that argument, I think we need to understand the role of stress. Stress is NOT bad. In fact, we need stress in order to create specific adaptations that supercede our previous skill level. This process is called supercompensation and was made popular through Hans Seyle’s General Adaptation Syndrome. When a system is placed under conditions of stress, the fitness level initially decreases. Supercompensation happens when the system has been given adequate rest to recover and develop a new fitness level that supersedes the previous baseline. These positive physiological adaptations are what we are chasing as coaches and athletes. If we are not stressing the system, we are not able to create these adaptations and improve. Thus, understanding the dosage, timing, and method of applying stress becomes the better question (which is a really good one, by the way).

The General Adaptation Syndrome, image source

While we now understand that stress isn’t necessarily bad, it is worth looking at comparisons of stress levels between different weighted baseballs. Driveline Baseball has done research that compares the peak shoulder internal rotation torques and medial elbow torques for baseballs 4 through 7 ounces. Their findings are below:

see full article for more information, image source

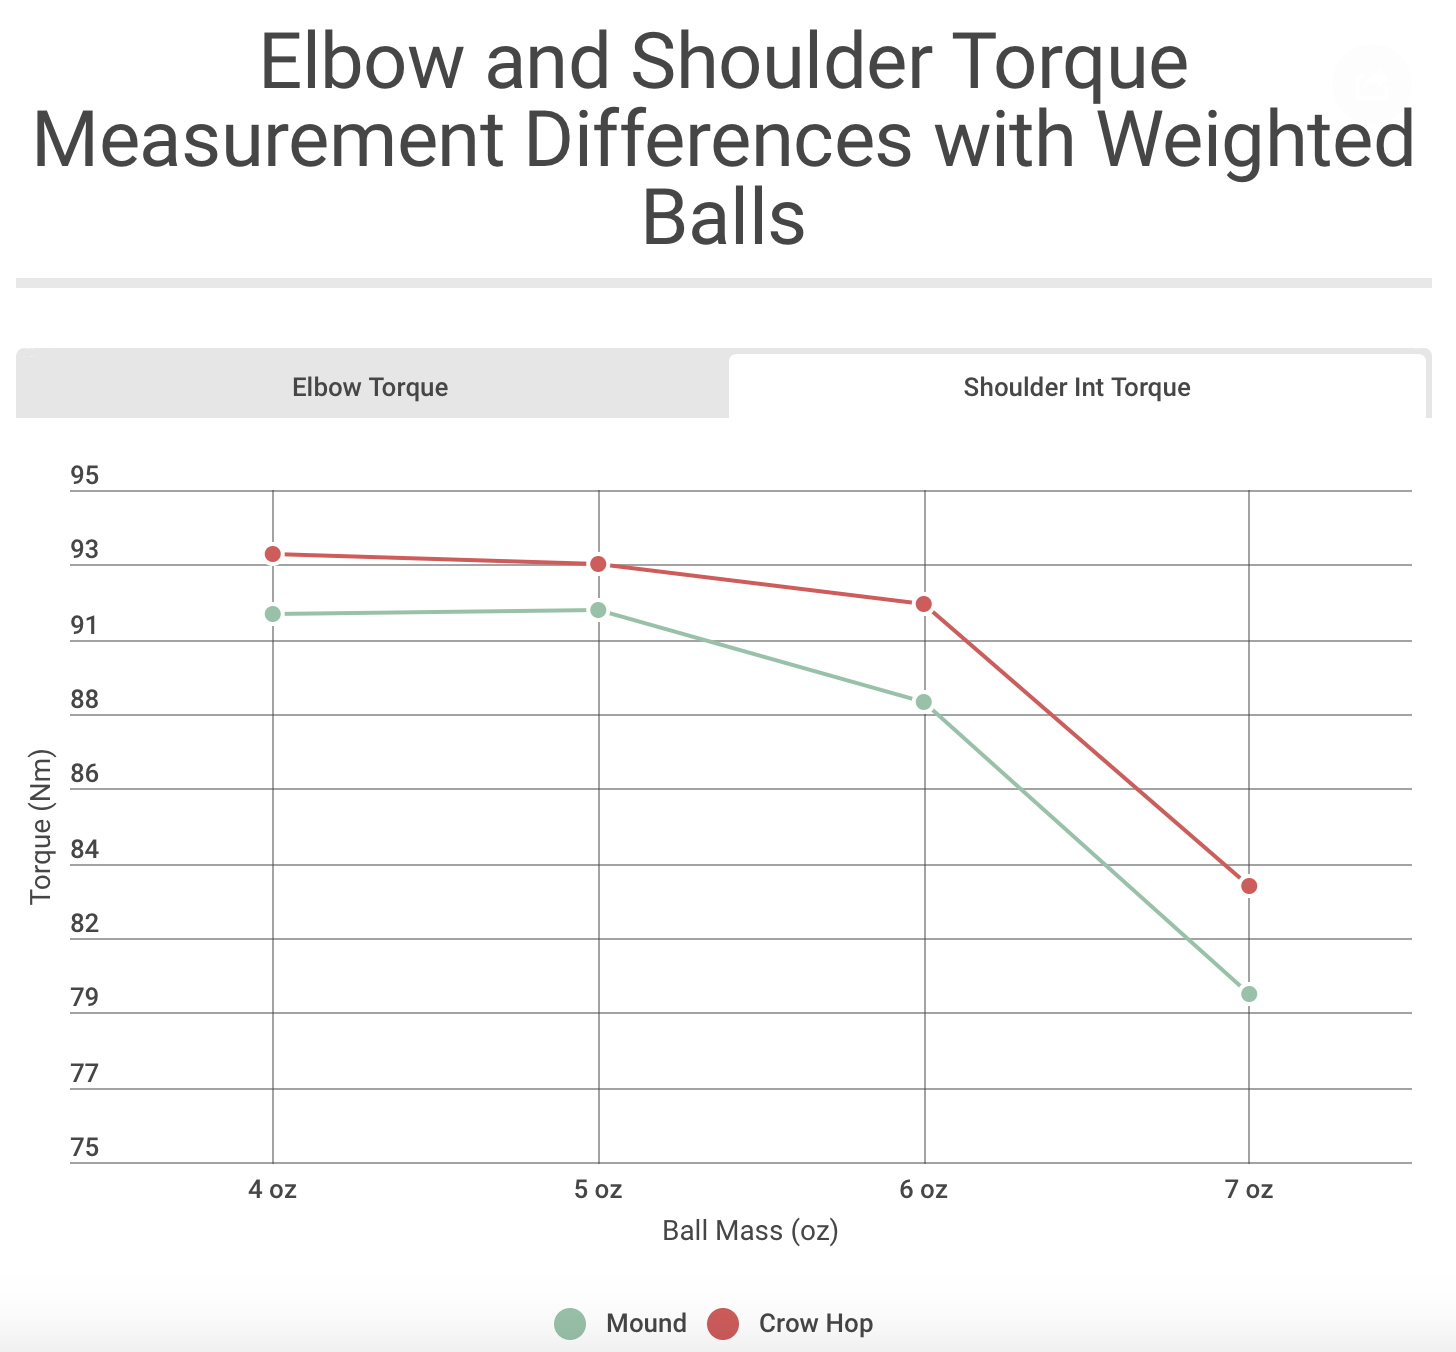
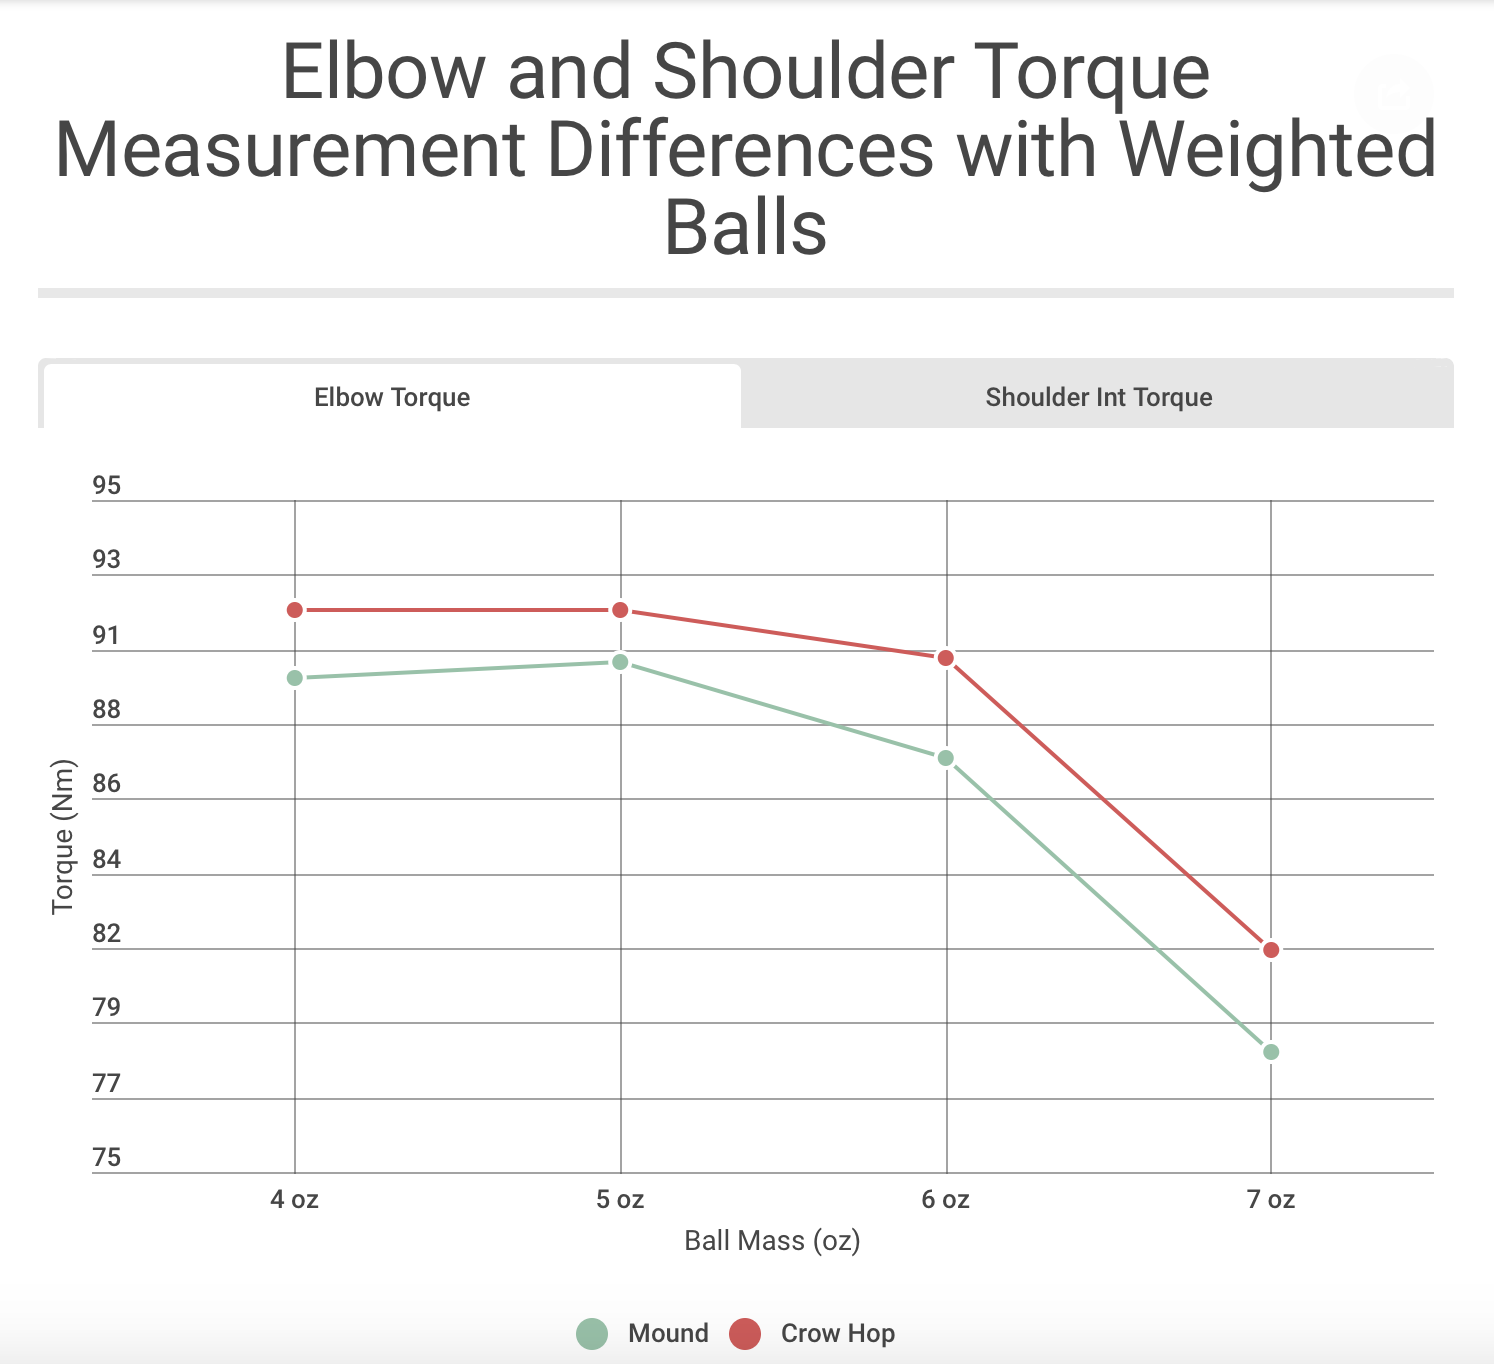
What you’ll notice is the peak torque levels actually significantly decrease when the ball weight increases. This is contrary to what most people think about overload implements – even though we know a lot of NFL quarterbacks have had success slinging 14-16 ounce  footballs without needing elbow surgery. If anything, the baseballs that might be “more stressful” to the system are the underload baseballs. 

At the same time, using a cookie cutter weighted baseball program is not your fast track to adding 5-10 mph (if anyone offers you a program and guarantees you x mph, don’t walk away – run). Using weighted baseballs does not mean you are automatically going to gain velocity. Weighted baseballs are nothing more than a tool that you should have in your toolbox as a coach. Some people might really benefit from them and others may want nothing to deal with them. As a coach, you need to be able to assess each athlete and find the lowest hanging fruit before you dive into an aggressive weighted baseball program. The best programs are the ones that do a lot more than the run ‘n gun weighted ball fun stuff that you see on Twitter (i.e. proper warm ups, recovery, building throwing capacity, developing a quality strength program, hydration, nutrition, etc.). 

Weighted baseballs are not bad. They are a tool. 

To sum it up: Weighted baseballs are not bad. They are a tool. If used correctly, they can be a great way to build high level movements that improve velocity, command, and arm health (see research for more on this). If you use them like an idiot (i.e. see study where kids players were making max effort throws with two pound balls), you’re probably not going to get better. 

  1. Mound work is more stressful than flat ground work

In baseball we have this myth that throwing off of a mound is more stressful than throwing off of a flat surface (apparently the idiots who created baseball forgot throwing off an elevated surface is bad). As a result, a lot of coaches will have pitchers work from a flat surface when practicing their pitches or delivery between outings. While there may be a time or place for flat ground work, it’s not quite accurate to say flat ground work is less stressful than mound work. 

Driveline Baseball recently published a case study where they took elbow torques of mound throws, flat ground throws, and compared the two. When they normalized for velocity, what they found was flat ground throws were actually more stressful than mound throws. They hypothesized that this was the case because of a lack of movement efficiency from a flat ground throw since we know stress does not have a linear relationship with velocity. Randy Sullivan and the Florida Baseball Ranch also investigated this myth at the 2019 ABCA Convention and found in their case studies that the average torques from mound throws and flat ground throws were nearly identical.

A 2014 research article reported similar findings saying, “Flat-ground throwing at even the shortest distances had similar biomechanical loads compared with pitching from the mound, yet at significantly lower ball velocity. This illustrates the mechanical advantage and increased efficiency of throwing from a mound.” 

If pitches are being executed off of a mound in a game, you are doing a disservice if all of your work between outings is off of a flat ground. 

As for the application, using the safety argument for flat ground throwing doesn’t really hold up against the research we have. Flat ground work can be a convenient way to get some work in if you don’t have access to a mound. However, the game is the most important thing. If pitches are being executed off of a mound in a game, you are doing a disservice if all of your work between outings is off of a flat ground. Too much flat ground work can disrupt the timing of your delivery and create movements that don’t scale off of a mound. As Sullivan says best, “Anything you overindulge in can corrupt you.” There can be a time and place for flat ground work, but it must be managed so the most important work is being done off a mound. Mound work is going to drive greater movement efficiency and is going to create the most game-like environment so you can better transfer your training to the playing field. 

  1. Velocity doesn’t matter

To start this one off, we need to detach ourselves from baseball and ask ourselves this question: “In what sport would we want to give our opponents more time to make decisions?” I don’t know about you, but I don’t think there’s a single sport out there that would want their opponents to have more time to make decisions. When it comes to pitching velocity, this is exactly what we’re doing – we’re giving the batter less time to determine whether they should swing or not. If you don’t think this is a competitive advantage, don’t waste your time reading the rest of this.  

All opinions aside, we know that velocity plays at the big league level. Offensive production falls off of a cliff when the radar gun starts lighting up numbers in the mid to upper 90s. Toronto Blue Jays General Manager Ross Atkins spoke about this in a Washington Post article saying, “You’re right that (front offices) are obsessed with velocity, and the reason is that it works. It is definitely the hardest thing to hit. It changes approaches, for sure. You can’t hit velocity without getting geared up to attack it.”

Below are the offensive slash-lines of MLB hitters in 2018 when facing four different pitch speeds.

  • 92 mph:  .283/.364/.475
  • 95 mph: .259/.342/.421
  • 98 mph: .223/.310/.329
  • 101 mph: .198/.257/.214

Adding velocity also benefits your breaking ball by improving its movement profile and effectiveness off of your fastball. It’s really tough to lay off of a mid to upper 80s fastball when you’re geared up for 98 on every single pitch. On the contrary, it’s going to be easier to lay off of breaking stuff when you have a lot more time to make a decision on their best heater. If you can speed up someone’s bat, your breaking ball just got better.  

While velocity doesn’t tell you whether you can pitch or not, it helps you get your foot in the door. “Velo is king, at least in the draft process, amateur ball and up into minor league ball,” said Trevor Bauer in a New York Times article. “Once you get to the big leagues, and you’re here, getting outs and stuff like that is king. But up until the big leagues, velo is king, and in the minor leagues, guys that have poor results but throw really hard get a lot more opportunities than guys that have really good results but throw 86 or 88.”

Velocity can be trained and it will improve your effectiveness as a pitcher. Believing it’s not is probably just an excuse for why you don’t throw hard. If you’re working with kids that want to take their career to the next level, you need to track, measure, and train for velocity. The average fastball velocity at the big league level in 2019 surpassed 93 mph – up from 89 mph in 2002. If you aren’t encouraging kids to move fast and let it eat, you’re playing from behind. 

  1. Lactic Acid “flush runs”

This one was one of my favorite ones to dive into because I think all pitchers have heard some variation of a “flush run” or running long distance to “build up your legs.” I started by pulling out Episode 19 from the Elite Development Baseball Podcast by Eric Cressey. In the podcast, Eric talked about why long distance running is common with pitchers and why he thinks there are better alternatives out there. Some of the main points from the episode were:

  • Lactic acid is not the cause of muscular fatigue
  • Physiological adaptations are incredibly specific
  • Research has shown there is not a significant amount of lactate present in pitchers post throwing  
  • Developing a good aerobic base is important to accelerating the recovery process between training sessions
  • Maintaining an adequate aerobic base requires a low frequency and intensity

If we compare long distance running to pitching a baseball, we come up with a pretty significant contrast when it comes to energy demands, recovery intervals, and exertion levels. Using long distance running to “build up your legs” for pitching is not going to create an adaptation that is specific enough. Pitching a baseball requires the creation and dissipation of a large amount of force within a short timeframe. Long distance running cannot create these types of demands that would transfer over to throwing a baseball. 

As Eric alluded to, flushing lactic acid out of your system is a myth when it comes to recovery. Dr. Stephen Osterer of Baseball Development Group did an awesome job explaining the misunderstanding behind lactic acid in his Recovery resource  (well worth checking out if you’re interested in this kind of stuff). He said:


“Mistakenly termed ‘lactic acid’, lactate is a natural byproduct of anaerobic metabolism that is used as a source of energy. Lactate has been wrongfully labelled the direct cause of muscle soreness after an acute bout of exercise – a sensation mediated instead by the inflammatory process from tissue breakdown – as well as causing the deep burning feeling and acute localized fatigue. Commonly, lactate has been the justification for several post-game or exercise recovery interventions, such as flush runs of active cool downs. This is problematic for several reasons. The first is the obvious short term timeframe in which higher lactate concentrations return to normal – usually within an hour. If we are undergoing more exercise within that hour, then attempting to influence lactate concentrations may be an advantageous step. But if we otherwise have days prior to the next competition is there a need to speed up the naturally occurring process? Moreover, although a few studies have shown reductions in lactate removal following an active recovery protocol, lactate itself has not been considered a strong predictor of training recovery or return to performance.”


Using distance running for pitchers does not “clear lactic acid” (not like it’s important anyways), it doesn’t build specific adaptations to throwing, it sabotages training economy that could be put into things that would actually help you get better at baseball, and it puts you at a higher risk of getting injured (running cross country is a horrible way to get into “baseball shape”). If you understand these risks and still want to go for a 15 minute jog after your start the next day, feel free. Don’t take something out of a kid’s program that he really enjoys. However, you cannot shove long distance running down the throats of your players when we know it just doesn’t match up against the physiology. 

Building an adequate aerobic base is important and should be prioritized for optimal recovery, but it’s a lot easier to build and maintain than most people think. Your training should help you throw a five ounce baseball – not run a 5K. 

Feel free to check out some more thoughts from Eric on this here and some thoughts from Driveline on the same topic. 

  1. Developing a sixth pitch

Understanding when to develop a new pitch is a really important question you need to address before allocating a huge chunk of training economy to learning that pitch. If you’re looking at adding a new pitch, you need to first understand your current arsenal. How does each pitch stack up against your competitive peer group in terms of velocity, command, and movement profile? What kind of batted balls typically occur when you throw that pitch? Does it get any whiffs? What kind of confidence do you have in it?

If you’re not sure about any of these questions, start with this one: “Bases loaded, two outs, 3-2 count with the game on the line – how many of my pitches would I be able to throw in this situation?” If you can’t throw any of your pitches with this kind of conviction, you don’t have a pitch. If you can only throw two of your five pitches in this situation, you don’t need to add a sixth pitch to the mix. You need to look at the three you can’t and either scrap them or work on them. I would take a guy that can go balls to the wall with two pitches over a guy that dabbles with 12. 

We all have a limited amount of time. Determining how we best make use of that time is going to have a huge impact on your development on the mound. We can only allocate so much time and energy to the various things we want to work on. Find the lowest hanging fruit and work up from there. You don’t need to add a 12-6 curve, slider, and change up if you’re a freshman in high school that tops out at 69. You just need to throw the ball harder. If you find that adding a certain breaking ball or change up would compliment your arsenal without sacrificing much needed training economy in other areas, by all means go for it. 

Get really good at one thing before adding something else. It’s easy to fantasize and dabble with adding a new pitch to your mix for the upcoming season. It’s tough to evaluate where you are and see if you actually need that pitch.  

  1. Icing/Non-Steroid Anti Inflammatory Drugs (NSAIDs, i.e. ibuprofen)

This one is a big one in the baseball community as you’ll commonly see guys pop a few Ibuprofens before throwing and throw a couple ice bags on their arm after throwing. If this is your daily throwing routine, you should really read this next section. If Dr. Gabe Mirkin – the man who invented the RICE (rest, ice, compress, elevate) protocol – no longer advocates its use, why would we use it with our athletes?  

If we look at recovery, tissue repair requires three stages:

  • Inflammation (gasp)
  • Repair
  • Remodeling

To get to step two of the recovery process, you must go through step one. This means inflammation is not a bad thing that you should avoid – it is step one to getting you back on the field. Inflammation helps accelerate the recovery process by bringing blood, nutrients, oxygen, and other first responders to the injury site. They help clean out the damaged tissue and prepare it for the next step of the recovery phase. If you’re using ice to “reduce inflammation,” you are preventing the body from going through a necessary step in the recovery process. Icing injured tissue constricts blood vessels and limits the amount of blood flow to the injured site – the exact opposite of what your body is trying to do. Gary Reinl – one of the world’s leading experts in recovery – says it best: “You can have inflammation without recovery, but you cannot have recovery without inflammation.”

If you’re icing to reduce swelling, you are again working against your body when it comes to tissue repair. Reinl explained this in a Youtube video with Kelly Starrett – author of Becoming a Supple Leopard – saying how swelling is the end result of the inflammatory stage. Swelling is a natural phenomenon where blood vessels in the injured site are dilated. This helps open up the area so the good guys (blood, nutrients, etc.) can get in and clean up the damaged tissue. This process must run its course before getting to the repair stage. Swelling, thus, does not become the problem. The problem is the evacuation of swelling at the end of the cycle. 

Swelling is not the issue – the inability to evacuate swelling at the end of the inflammatory process is. Icing does not help you do this. 

This is where the lymphatic system comes in. Your lymphatic system is a series of one way bags of fluid that are designed to evacuate swelling via muscle contractions. The last part of that is the most important because the lymphatics is a passive system. This means if you are not actively contracting muscles around the site of damaged tissue, there is no way for the lymphatic vessels to evacuate swelling. Icing and immobilizing damaged tissue does not help accelerate recovery – it prevents your lymphatic system from doing its job. If anything, you’re increasing the likelihood for more swelling because the swelling that was already there now has nowhere to go. Swelling is not the issue – the inability to evacuate swelling at the end of the inflammatory process is. Icing does not help you do this. 

Reinl also made a point to mention icing will make you feel good in the short term because it cuts off the signal between the muscles and nerves. This is why using NSAIDs like Ibuprofen or Aleve can be a misleading treatment option for your nagging arm. When using anti-inflammatories, you shut off the signal completely. Your nervous system is designed to protect you and keep you out of danger. If you inhibit your body’s ability to let you know when there is pain, you run a great risk of hurting yourself and creating long term issues. If you have pain, Aleve and ice is not going to help solve the issue. It’s going to mask the actual problem that needs treatment. If you have pain, ditch the pills, ice packs, and get assessed by a professional who has experience dealing with overhead throwing athletes. 

Key Takeaways:

  • Inflammation is not bad. It is the first step of the recovery process that must be completed before steps two (repair) and three (remodeling).
  • Icing prevents the inflammation process by constricting blood vessels and limiting the amount of blood flow to the injured site – the exact opposite of what your body is trying to do. 
  • The lymphatic system is a passive system that works to evacuate swelling through muscle contractions.
  • Icing and immobilizing an injured area prevents the evacuation of swelling and can actually create more swelling. 
  • Icing an injured site blocks the signals between muscles and nerves making you feel good temporarily.  
  • NSAIDs completely block the signal between muscles and nerves. 

Reinl also did a podcast with Eric Cressey about this subject. See their interview here for more information and alternative methods to icing for recovery. 

If you have damaged tissue, don’t ice it, immobilize it, suppress it with anti-inflammatories, or do anything else that would prevent it from healing. You’re better off just getting out of the way and letting your body do what it knows how to do best. If anything, use the old advice of “just walk it off” and help your lymphatic system help you. 

  1. No pain, no gain

In the Phoenix Rehabilitation presentation from part 1 of this series, Monica Johnson shared a statistic that really bothered me as a coach: “46% of injured adolescents report being encouraged to play through arm pain.” When we encourage kids to play through pain so we can win some meaningless travel baseball tournament championship, we are putting an adrenaline-infused kid at serious risk. We’re basically telling them to ignore the body’s message to us that something is wrong. We’re encouraging them to play through something that should be addressed. When we do this, kids are going to be more likely to hide pain from us in the future because they know we’ll be upset when we have to pull them from the lineup. When we create these kinds of associations with pain, we lose the ability to protect our athletes when they’re actually hurt. 

As coaches, we need to create transparency with our athletes where they should comfortable speaking up if they are in pain. We need to create relationships with physicians who can take care of our kids and detect early warning signs for serious injuries. It’s not okay if your starting pitcher needs eight Ibuprofen to throw every seven days. It’s also not okay if your starting shortstop has shooting pain every time he picks up a baseball. 

Winning baseball games should not come at the expense of the health of your athletes. “No pain, no gain” is not an acceptable answer. If there is pain, something is wrong and it must be addressed. 

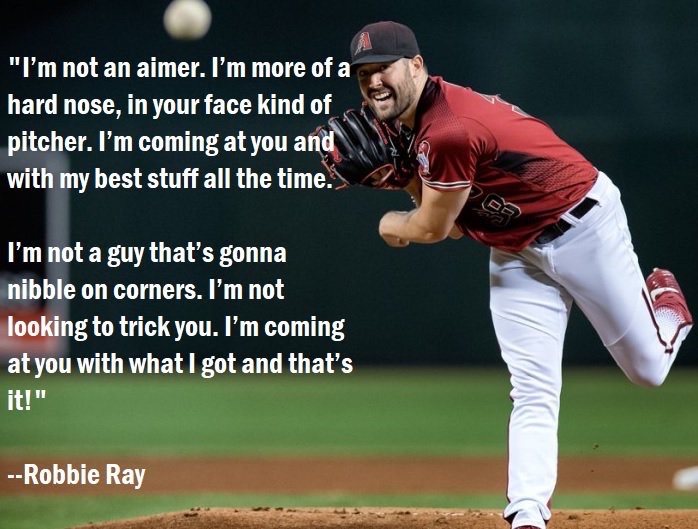
  1. Pitching to the hitter’s weaknesses over your strengths

John Wooden was not a huge fan of scouting reports. When his assistants tried to bring up the tendencies and strategies of his opponents, he didn’t pay too much interest. Wooden knew that if his teams played to the standard of UCLA basketball, it wouldn’t matter who they were playing or what they did – they would win regardless. I think this strategy could not be more applicable to a position that typically wins 70 percent of its battles. If you make good pitches and get into favorable counts, you will beat hitters a large majority of the time. This starts by understanding how to play to your strengths.  

If we pitch with the intention of exposing the weaknesses of hitters, we run the risk that we get away from our strengths. If we’re facing a guy who can’t hit curveballs but out curve is our least confident pitch, it makes no sense to throw two uncompetitive breaking balls and find yourself in a hitter’s count where you have to pitch to his strength. You’re better off going right at guys with the pitches you have confidence in regardless if it’s a strength of the hitter. If your stuff sucks, that’s a whole different problem.  

If you don’t know your strengths, now is a good time to figure those out. You need to have awareness for the pitches you have the most confidence in. Know what pitches to go to when you need a strike, ground ball, and swing and miss. Know which pitches play better against left or right handed hitters. You can’t become a great competitor if you don’t have a great feel for your bread and butter on the mound. 

Don’t fail with your worst pitch. Go to war with your best stuff. 


Images from @pitchingninja

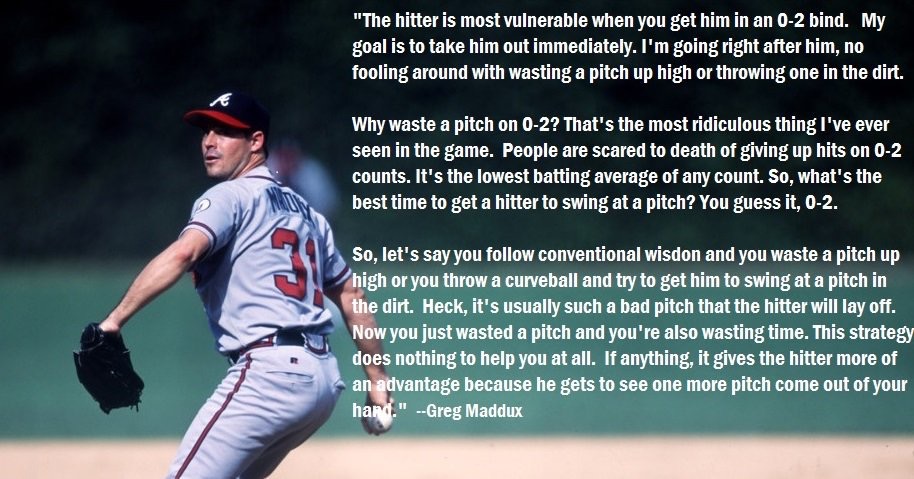
  1. Two strike “waste pitches”

This is something I wrote an article about a little bit ago. Read it here to understand the pitfalls of conventional wisdom when it comes to pitching with two strikes. If you don’t want to read it, I’ll summarize it using one question: “Why would you shrink the strike zone when you’re working in the most advantageous count as a pitcher?” 

Ditch the 50 foot curveballs and the four seams painted four inches off the black. Be like Greg Maddux and go right after guys.

image from @pitchingninja
  1. In Game Mechanical Cueing

Revisiting part 1, the optimal focus of attention for athletes in game situations is a specific external mindset. As a result, your language in games should encourage this kind of a mindset. If a pitcher needs to be over the rubber in a game, you as a coach need to be over the rubber with him. If you’re using vocabulary that encourages an internal focus of attention, you’re working against his ability to keep things simple and compete with confidence.

Be very careful how you talk to pitchers when they’re warming up, throwing their pre-game bullpen, between innings, or when you talk to them during mound visits. When you’re in a game, all you can do is compete with what you have that day. Sometimes everything will be working, sometimes nothing will be working, but most of the time you’re going to be constantly fighting, compensating, and making adjustments in games. Jon Lester said it best in Heads Up Baseball 2.0: If I have 30 starts in a season 5 will be with my A game, 5 will be with my C game, and 20 will be with my B game.  

If we know an external focus of attention works in games, we need to teach kids how to make adjustments externally with their eyes. Instead of making them worry about their mechanics, teach them to pick up a visual that helps them make adjustments and execute specific pitches. If Sammy is walking everyone in sight, the last thing he needs to hear is he’s falling off the mound, his throwing arm is late, his front leg isn’t bracing, and he’s not following through with his pitches. If anything, the best thing you can do is get him to breathe, get locked in on a focal point, and get him to start throwing with conviction (see Building a Process Oriented Athlete for more on this). 

To understand the importance of your language in games, see the excerpt below from Ben Lindbergh and Travis Sawchik’s The MVP Machine:

Pitching Coach Brent Strom guiding a rookie through a tough outing, excerpt from The MVP Machine by Ben Lindbergh and Travis Sawchik

Notice how Brent Strom didn’t yip the kid up about his arm action, lower half, or any other number of distractions. He instead used a little bit of humor to get the kid out of his head. Some of the best mound visits you can make won’t require a word about baseball. At that point, you have to compete with what you’ve got. Life isn’t perfect – it’s messy. Don’t miss out on an opportunity to teach kids this.  

Sometimes you fix the ship, other times you patch a hole and keep pressing on. You can’t have an athlete work on a specific pattern and try to compete at the same time in a game.

This is something to keep in mind when you’re making mechanical adjustments throughout the course of a season. As mentioned before, it is helpful for athletes to internally focus on a specific movement when first learning it. This internal focus helps them get a feel for the pattern so they can practice it, master it, and eventually make it automatic. The key to this is the shift from an internal focus to an external focus. If you can’t get athletes to execute the pattern using the external focus, you’re not going to be able to use it in games. As a result, you need to be able to pick your battles as a coach. Sometimes you fix the ship, other times you patch a hole and keep pressing on. You can’t have an athlete work on a specific pattern and try to compete at the same time in a game. If your movement patterns are that bad that they’re affecting your game performance, you shouldn’t be playing games to begin with.

Don’t yip kids up when they’re already yipped up to begin with. Kids need to be in a state of mind where they’re ready to compete. If they’re worried about 69 different mechanical cues while also trying to send guys back to the dugout, you’re going to have a recipe for disaster.

  1. “Just throw strikes”

Tell me if you’ve heard this one before: Pitcher X is in the middle of a walk parade while everyone on his side of the field is telling him to “just throw strikes.” I mean, seriously – did you think he was trying to throw balls? Do you really think that telling him to “just throw strikes” is all of a sudden going to make him throw strikes? Better yet – do you really think a ten year old has elite command of the strike zone when he can barely walk and chew gum at the same time?

The language you use with kids is very powerful – especially when they’re young. Young athletes are constantly fighting cognitive dissonance – they want to do things that make them feel good (winning) and avoid things that make them feel bad (losing). You as a coach are going to play an important role in that because kids are going to look to you for approval in a lot of situations. When you praise and commend them, they’re going to feel good. When you scold them, they’re going to feel bad. Thus, influencing kids depends on providing reinforcement for specific behaviors. The issue becomes this: You’re going to have the tendency to reinforce skills that might play when they’re younger but don’t play when they get to the big field. Two examples of this are:

  • Making hitters look stupid with horrendous breaking balls
  • Beating balls into the ground and either a) beating them out or b) letting the defense kick the ball around

When we reinforce poor breaking ball habits and beating balls into the ground, we’re sending messages to kids that doing these things are good and they should be repeated in the future. However, we know butchering a curveball is eventually going to catch up to that kid and it’s either going to get killed in high school or his arm is going to suffer. We also know that beating balls into the ground is going to create a steep bat path which prevents kids from driving balls in the air with authority. Ground balls and shitty breaking balls might help you win 12U tournaments, but they’re not going to help you win when it really matters later in their career. 

Giving kids who have an underdeveloped neuromuscular system the task of commanding a sphere three inches in diameter to a target 50 feet away is not an easy thing to do.

This is where “just throw strikes” comes into play. For one, we know that velocity is a significant barrier if you want to pitch at the next level. We also know that throwing strikes in youth baseball is equivalent to flipping a coin. Giving kids who have an underdeveloped neuromuscular system the task of commanding a sphere three inches in diameter to a target 50 feet away is not an easy thing to do. If we think about the movements that kids are going to make when they’re a) trying to throw the piss out of the ball or b) trying to dot up a corner, we’re going to get a significant contrast. One of those deliveries is going to build a foundation that will help kids pitch at the next level (yes, you can train velocity and command at the same time). The other one is going to create something that mirrors a robot trying to throw darts. You tell me which one you’d rather have. 

We make this even worse when we throw some variation of “just take a little off and hit the zone.” What we’re really saying to the kid is: “You can’t throw hard and throw strikes at the same time.” When we create this association, we essentially put a governor on that kid’s ability to throw hard because he’s worried about not throwing strikes. This is what’s known as the speed-accuracy trade off. This refers to the relationship between performing a specific skill with precision vs. how fast we can do it. If we look at this relationship at the major league level (see graphic below), we notice that there really is no velocity trade off for command. Developing command is not as simple as just telling a kid to ease off the gas pedal. There’s a lot more that goes into it. In some cases, telling a kid to slow it down might make their command worse

If your kid isn’t filling up the zone like Greg Maddux in 11U, don’t panic. Most kids are pretty bad at commanding the baseball simply because they don’t have the size, strength, coordination, or repetitions to figure things out. If anything, your best bang for your buck when they’re young is to develop speed. Research shows that kids ages 7-12 years old have a one-time window to develop elite speed as their skeletal structure is outgrowing their muscular structure. This creates tightly bound muscles that are very good at moving fast. If you spend these years doming up kids over their ability to dot corners, you are missing out on a huge window of opportunity to develop arguably their most important asset on the mound. 

If you’re working with kids who struggle finding the zone, don’t shrink it – expand it. We know most youth hitters aren’t exactly the most disciplined in the first place. Widen the zone, give kids the freedom to move fast, and throw out worrying about the end result. USC is not panicking if your 12U strike percentage is under 65 percent. However, you will be panicking if you’re a senior in high school, you’re topping out at 72, and you’re not getting any looks because you were too busy taking a little off and just throwing strikes. If the language you use is not helping kids develop skills that will scale, you’re wasting your breath.

If the language you use is not helping kids develop skills that will scale, you’re wasting your breath.

Let kids move fast, throw hard, and create an environment where they can start to figure out how to command a ball implicitly (i.e. without a barrage of meaningless verbal cues). The messages you send kids at a young age will have a huge impact on the rest of their career. You can’t expect kids to navigate the strike zone with pinpoint precision early on. Keep it fun and let them throw fuel. You’re better off refining command as they get bigger, practice more, and refine their neuromuscular system. Command is built largely through feel. You can’t develop feel if you’re domed up about walking the entire lineup because you’re “throwing it too hard.”  

  1. “Pull the lamp shade down”

The curveball is one of the most butchered pitches out there so I wanted to reserve some space to talk about it briefly here. Trevor Bauer does a really nice job explaining this in his Youtube pitch design video. I would highly recommend checking it out for more info on this. Below are some of his main points from the video:

*See 11:25 for curveball 

  • Cues like “twist it,” “pull the lamp shade down,” and “karate chop it” don’t actually describe what is going on at release and are poor ways to try to teach the pitch.
  • While you want to get to the front of the ball to create front spin, you want to pronate through the pitch instead of pulling down around it. 
  • Pronating through the pitch helps promote a healthy deceleration pattern. 
  • Don’t try to manipulate this with your wrist – lock your wrist in place. 
  • To create front spin, lock your wrist in a supinated position so your middle finger can get to the front of the ball. 

A really good question that came up in the discussion was when should pitchers start to learn a breaking ball? I think that is an awesome question that requires a lot of investigating from several different angles. From the things I’ve read and the people I’ve talked to, there really isn’t a need to showcase a spinner in games before 14 (see thoughts from Driveline). Early on, your goal should be to build a fastball that is above your competitive peer group in terms of velocity, command, and game effectiveness. Kids are going to get emotionally attached to pitches that help them win games when they’re younger. This means that they will get attached to a horseshit breaking ball that plays at 12U but won’t play when they get older.

Instead of keeping fastball mechanics and letting the grip create the movement profile, kids are going to slow their arm down and try to create movement in the wrong places (ex: creating a lot of lateral trunk tilt to get on top, dropping the arm to create more horizontal movement). This alters their delivery and can have a negative impact on the rest of their arsenal. The curveball is a complex pitch that takes time to learn and ultimately master. Giving it to kids who lack neuromuscular control and are fighting to compete against fatigue and other variable conditions in a game environment is a recipe for disaster. 

With this, I think Christian Wonders provided some really cool insight on this topic on Eric Cressey’s podcast (link here). If kids show sufficient movement quality at a young age (i.e. being able to do a push up, play catch without getting a cardio workout in from chasing balls), Christian sees value in teaching kids how to spin a ball early on. We know that throwing a curveball is a specific skill that must be learned through practice. If kids haven’t learned how to spin a ball when they’re 15, 16, or 17 years old, it becomes much more difficult to learn because they don’t have the repetitions or feel for holding a supinated position.

Below are a few tips that Christian discusses in the podcast when first learning a breaking pitch:

  • Teach kids how to hold the proper grip (don’t overlook this one).
  • Use carefully selected cues (he uses shoot the gun to the ground) to create a top to down front spin (think 12-6 or 1-7).
  • Never throw more than two curveballs in a row. Keep fastball arm speed a priority.
  • Get to the front of the ball and drive late arm speed.
  • Address lower half mechanics (i.e. loading/unloading the back hip) to determine if kids are physically able to get into positions where they can create the correct movement profile. 
  • Try to keep delivery within an imaginary tunnel to prevent kids from spinning off the pitch and creating side spin.
  • Learn one breaking ball before you learn two. 

Play for the long term when developing a spinner, but don’t wait until it’s too late because you’re afraid of getting hurt (hint: current research doesn’t suggest curveballs are more dangerous). 

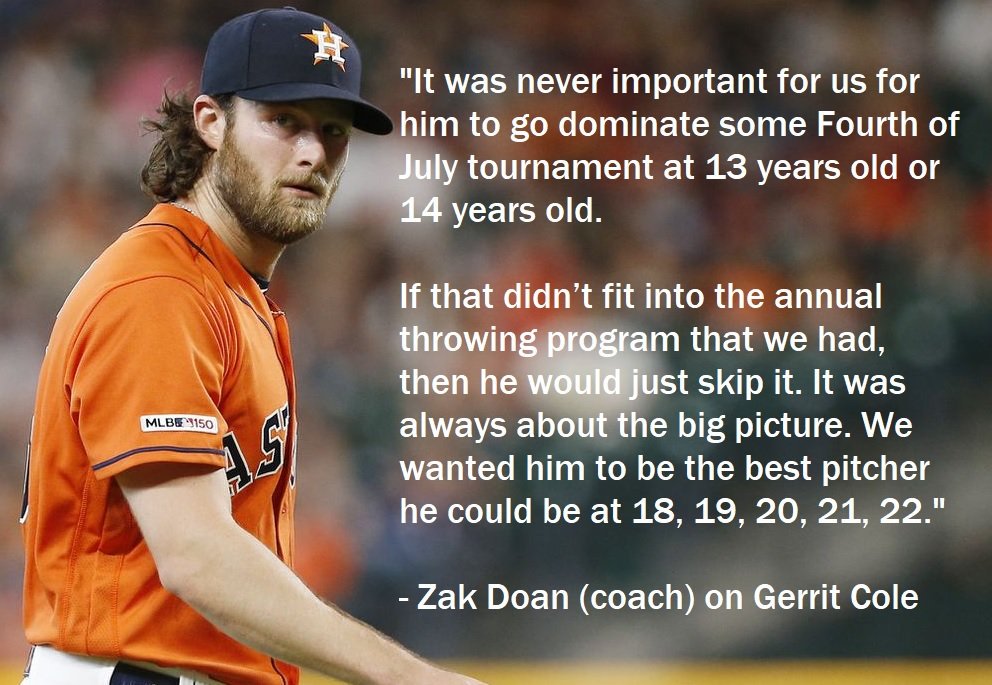
  1. Missing the forest for the trees

As mentioned above, your goal as a coach should be getting kids to play their best baseball at 17, 18, and into their early 20s. Your goal is not to develop the best 12U team in the world. If kids aren’t growing and developing a skill set that will help them compete at the next level, you are doing them a disservice. If you are abusing the players on your team who hit puberty first, you’re damaging their love for the game and the chance they’ll continue to play throughout high school. If you burn up your ace traveling the country at 16 years old and land him on the surgery table, you might have cost him the chance to go to a Division I school and play professionally – all for a couple of tournament trophies.   

Taking advantage of kids for our short term interests must end. We cannot pitch in baseball games 12 months out of the year and expect kids to stay healthy and continue to have a passion for the game (ASMI has found kids who pitch in games more than eight months out of the year are five times more likely to get hurt). We need to build the athlete first and give kids opportunities to try out other sports before shoving one down their throat. We need to let kids experiment with other positions instead of labeling them as a “pitcher only” at 14. If Jacob DeGrom played shortstop through his junior year of college, I don’t think you need to rush your high school kids to specialize on the mound. 

Most importantly, we need to be the authority figure that has the discipline to step in and tell our best pitcher that he’s reached his pitch count and he can’t pitch anymore. We need to allow time for our number one to return to mound shape instead of rushing him back for a game that he is not prepared for. We need to forget about the wins and losses and instead focus on what’s next for that kid. If what we’re trying to do doesn’t fit in the long term plan for that athlete, we cannot do it. If he does not have a long term plan, make one. 

image from @pitchingninja

Do it the right way and play the long game. You owe it to your kids. 


24 Myths that are Making your Pitchers Worse: Part 1

I was recently able to have an interactive discussion with baseball coaches and players from the south central PA area. The discussion was centered around developing the complete pitcher by eliminating common training myths and misconceptions. The discussion also featured a presentation from Monica Johnson, PT, DPT, of Phoenix Rehabilitation who gave tips from the perspective of a physical therapist to help keep athletes healthy.


We were able to cover 24 things that you should NOT be doing if you want to develop high level arms. I will go over items 1-11 in this part of the blog along with the presentation from our physical therapist. 

1. Get to a Balance Point


A “balance point” refers to when the pitcher lifts his lead leg and gets to a position of zero lateral movement before continuing his motion down the mound. This is a very common teaching point when first learning how to develop the lower half in young pitchers. When talking about balance points, I always come back to a question from Wayne Mazzoni – pitching coach at Sacred Heart University: “If you had someone kneeling five feet in front of you, what would your delivery look like if you wanted to punch them in the face?” When kids show you what their best punch looks like, you’ll notice none of them come to a “balance point.” 


Teaching a balance point does not make any sense when developing pitchers simply because no one gets to a balance point. When we look at several big league arms, we notice none of them get to a position where they can hold their center of mass over the rubber if you stopped their delivery after leg lift. As Mazzoni says, we want to get away from the rubber. As the lead leg comes up, the athlete’s center of mass should begin to shift down the slope of the mound. This is not a rushed move down the mound – it’s a controlled gathering of energy. Every athlete is a hair different in regards to how they do this, but none of them create power by getting to balance. 


Nolan Ryan, Gerrit Cole, Trevor Bauer, and Corey Kluber all getting away from the rubber using a controlled gathering of energy (videos from @pitchingninja). 

Ben Brewster of Tread Athletics wrote a very good article about this and the advantages of getting away from a balance point. He describes a better move down the mound as “the drift” – the initial forward move that occurs during leg lift. He explains the benefits of it saying:


“The drift is a “free” movement that hardly costs any energy , and allows you to save that available hip/knee        
extension and hip abduction until the majority of it can be directed laterally into the ground (once the center of mass has actually shifted away from the rubber).

“I liken this to standing directly next to someone and trying to knock them over with your hip, to standing 6-8 inches away from them and trying to knock them over with your hip – the increase in efficiency and force is substantial, so saving up your rear leg until all of that force can be directed where you want it is probably more effective than muscling your way down the mound.”


Ben has a few theories on why the balance point has become so prevalent. Like all bad information, it comes down to a misinterpretation of what guys may unconsciously do. Pitchers with athletic deliveries may not think about drifting down the mound. They just figured it out through trial and error without ever thinking about what actually happens at leg lift. This move is also tough to see from the rear camera angle on TV. From behind, it may appear that some of the best pitchers come to a balance point. It’s only until you see them from the side that you realize what’s actually going on.

His last point made a lot of sense to me: It’s easier to teach balance points. He explained saying:

“You can take a group of 12 year olds and work on an up-down-out lower half in a very systematic and repeatable way. Try to teach a 12 year old how to move dynamically through his leg lift – you’re going to have a hard time making much headway in all but the most athletic kids. Balance is easy – and to some extent, it might help create more repeatable mechanics in the majority of kids who are falling all over the place when they throw. But just because it lowers a 12 year old’s walk rate doesn’t mean it’s what the majority of the hardest throwers in the world do.”

Sapping an athlete’s ability to create linear momentum down the mound is an energy killer. Building a high velocity delivery cannot be accomplished by teaching static positions of balance. Pitchers should be trained to move like athletes – not robots.


Pitchers should be trained to move like athletes – not robots.


The best way to get athletes away from a balance point is to stop teaching it. Kids will naturally get away from a balance point if you allow them to move fast and throw hard. If you have kids who have more ingrained patterns, below are a few ideas that you can use to create a better sequence.

  • Starting on slanted surfaces (slope of the mound, slanted boards)
  • Walking windups
  • Shuffle throws off the mound 
    • While this one is less specific to the delivery, it helps athletes get a feel for accelerating their center of mass down the mound and can unlock some athleticism in the process

 2. Drop and Drive

Athletes need to be careful with the “drop and drive” style. Drop and drive refers to the athlete getting to a position of balance and then driving with their back leg towards the plate. If the athlete is working into his back leg but not going anywhere, he’s creating a cost-effective move that is difficult to execute. Instead of using linear momentum to create velocity, your arm is at the mercy of how much you can one-legged squat. The drive portion of the cue can also create a quad-dominant delivery – something we’ll talk about below.


3. Push off the Rubber                                                                                                                                                                      

4. Get a longer stride


Push off the rubber is a commonly used cue when coaches are teaching kids how to use their lower half to add more velocity. While it’s well intentioned, the average interpretation and application of the cue creates bad moves that inhibit an athlete’s ability to use their glutes and produce an efficient rotary sequence. When athletes are told to push off the rubber, you’re going to commonly see kids shift the weight in their back foot to their toe as they try to push off and create extension with their back leg. This creates what is called a quad-dominant move. Instead of staying into the heels and utilizing the glutes, the less-powerful quads are turned on to drive lower body movement (note – you want to keep the entire foot grounded, not just the heels). This gives athletes the illusion that they’re creating more power from the lower half by leaping down the mound, but instead they’re throwing off the rest of the sequence and not utilizing the strongest muscles in their body.


You can identify a quad dominant move by looking at the back knee and foot in the delivery. Guys with a quad dominant delivery will leak their rear knee out over their toe and the heel will come out of the ground prematurely. This can cause guys to start to step across their body and lose good direction to the plate (emphasis on good direction). Below are a couple of examples of quad dominant deliveries.


An example of a quad-dominant delivery. Notice the back heel comes out of the ground prematurely and the weight shifts to the back toe (Image Source).


A glute dominant move is created when an athlete’s butt sits behind their heels. The entire back foot stays connected to the ground for a long period of time. The back leg does not “triple-extend” the way you were to if you executed a vertical jump. The rear glute mirrors the slope of the mound (a Lantz Wheeler quote) and drives the center of mass forward to create a powerful rotary sequence. By letting the big guys do the work, athletes are able to create energy efficient positions required for a powerful delivery. The “tall and fall” style prevents athletes from doing this and can have a negative impact on velocity, arm health, and command.


Kenley Jansen showing a glute dominant move where his back foot stays connected to the ground (from @pitchingninja). 


A rear view of a glute dominant move where the butt sits behind the heels (Image Source). 


Two of the hardest throwers on the planet using glute dominant moves (from @pitchingninja).
 

Wes Johnson, pitching coach with the Minnesota Twins, explained the importance of a glute dominant move down the mound in a recent article saying:

“We know that hip speed is a function of velocity and command as well. Hip speed is generated through your glutes and we’re just trying to activate the glute medius. We’re trying to get the glute med to activate first instead of your quadricep because when a guy’s quadricep activates first, his hip speed goes down. So we’re just trying to activate the glute to get the hips to rotate faster to get command and-or velocity, whichever one.”

Randy Sullivan from the Florida Baseball Ranch elaborated on this idea in a blog article saying, “The quads are designed for one thing, extending the knee. As such, the quads are excellent for pushing and leaping forward, but they are not good at sitting, riding and rotating. That’s the job of the glutes.” 


Below are lower half transformations from Twins pitcher Kyle Gibson and White Sox pitcher Lucas Giolito. You’ll notice both pitchers used to have quad-dominant deliveries and now are able to utilize their glutes much better. Gibson had a career year in 2018 after making these changes setting career-highs in ERA (3.62), IP (196.2), and K (179). After struggling in 2018, Giolito became one of the league’s hottest arms in 2019 making his first All-Star appearance and fanning 228 batters in 176.2 IP. 


Notice Gibson’s quad dominant move (left) causes him to step across his body and hurt his ability to attack guys to his glove side (video source)


Giolito’s new glute dominant delivery helped tighten up his arm action and helped propel him to an All-Star caliber season (from @pitchingninja).


Push off the rubber is a cue that can be used when coaches are trying to create a longer stride (why I broke down these two misconceptions together). Research has shown some high velocity throwers generate an exceptional stride length (see Chapman analysis) in relation to their height. As a result, coaches started to think that a longer stride equated to ball velocity. Kids started to sell out for stride length at the expense of a pushy, quad dominant move down the mound. Instead of looking at the actions and the moves that created a “bigger stride,” most coaches just jumped to the “reactions” of a powerful, efficient delivery. Big league pitchers don’t throw hard because they have bigger strides – they throw hard because of the sequence that creates a bigger stride.

Sullivan spoke about this relationship saying:


“Back in the early 2000’s it became very popular among pitching “experts” to say, “stride length should be at least 120% of body height. There was some merit to the observation. Many hard throwers do have front foot landing points farther away from the rubber than their softer throwing peers, but it has nothing to do with the length of their stride. They land further out because they ride their glutes longer, thereby creating greater and later (ground reaction force), giving them more velocity. That compelled me to coin this phrase: “The length of the stride is a product of the duration of the ride.”You stride longer by staying connected, keeping your inverted pyramid in the ground and defying gravity with your center of mass until your front foot finally hits the ground.”


Trying to get kids to push off the rubber and create a longer stride is more likely to create a quad-dominant move that throws off the rest of the rotary sequence. This creates a power leak and can have a negative impact on the upper half as well. The pieces of our delivery do not occur in isolation – we are interconnected head to toe when throwing a baseball. If our body can’t create sufficient energy through the lower half, it will seek to find it in other places. This is where poor movement patterns are created.  

Key takeaways are pretty simple: Don’t push off the rubber, don’t force a longer stride, and don’t “tall and fall.” Let your big muscles do the work for you – don’t work against them.

 5. Stride Straight

A lot of coaches at some point have done drill work where they’ve drawn a straight line out from the athlete’s back foot towards the catcher. The pitcher is then instructed to stride straight so they can land on that line. This is done to keep kids from throwing across their body or falling off to their glove side. Maintaining good direction throughout your delivery is important, but striding straight is not. Don’t believe me? See a couple of guys who don’t stride straight (smh) below. 


Some examples of big league All-Stars striding open and closed (from @pitchingninja).


Stepping straight is really a misinterpretation of having good direction to the plate. Direction refers to a pitcher’s ability to generate energy in an efficient sequence towards their target. Having poor direction would be a kid who generates momentum away from their target. An example would be a kid with a pushy/quad-dominant that causes them to step across their body – like Gibson from above (not saying stepping across is bad – just giving an example where it could be bad).

If we’re looking at stride direction, we need to first look at the movements that got them there in the first place. Stride direction is a reaction in the delivery. The movements that occur further up stream (ex: drifting down the mound, using the glutes) are going to dictate how the pitcher strides. Just looking at the stride and saying that someone strides too far open isn’t an effective way to reshape a delivery. It is an effective way to kids get domed up about where their foot lands while also trying to throw strikes and throw the ball hard. There is no freedom or athleticism in this. Instead of letting kids move fast and let it eat, they’re now consciously worried whether or not they’re landing in a straight line. If we want to develop high level moves, we need to let go of striding straight and see the bigger picture. Save the duct tape for problems that actually need it – not problems we create. 

Phoenix Rehab Presentation

We were very fortunate to have Monica Johnson, PT, DPT, come in and give a presentation on injury prevention in baseball athletes. She started by sharing some statistics and thoughts on injury rates in baseball today:

  • 46% of injured adolescents report being encouraged to play through arm pain
  • 36% increased risk of overuse injury in young athletes playing a single sport for more than 9 months out of the year
  • Overuse injuries are linked to factors including early sports specialization, skeletal immaturity, year-round playing in games, and lack of adherence to rehab protocol
  • Early detection of overuse injuries may be able to prevent further progression of the injury

She then illustrated the sad reality when it comes to youth sports training today:

I thought this was one of the most powerful points throughout the entire discussion. Instead of slow cooking young athletes and teaching them movement principles that will enhance their performance on the field, we jump right to the skill portion and spend most of our time there. In essence, we jump right to calculus when kids can’t even grasp basic algebra concepts. If we want to keep kids healthy on and on the playing field, we cannot invert this pyramid. We need to teach kids how to move before we teach them how to play their sport – and moving their thumbs on their sofas doesn’t count.

Before picking up a baseball, kids should be able to execute the five basic movement patterns: hinge, squat, push, pull, and an iso core movement (ex: plank). Because sports require athletes to produce and accept force on one leg, I would add a single leg variation (lunge) to the mix.  This is going to help teach kids basic core control and how to use the big muscles in their body. If your kid can’t hinge or squat without collapsing their knees over their toes, there’s a good chance they won’t be able to create a glute dominant pattern from the mound. If your kid can’t keep his scaps from dumping forward while executing a bodyweight push up, don’t be surprised if his elbow hurts while throwing. Mastering basic movement sets the foundation from which you can continue to build on. If you try to outsmart the system and do it backwards, it will catch up to you in time. 


If your kid can’t hinge or squat without collapsing their knees over their toes, there’s a good chance they won’t be able to create a glute dominant pattern from the mound.


For more information on how you can start to teach quality movement, see our previous blog posts on building a better warm up and my thoughts from my trip to Cressey Sports Performance. Monica would also be more than willing to help you guys out with anything movement related. She can be reached at mjohnson@phoenixrehab.com or 717.212.9229.

6. Read the watch

Reading the watch refers to when a pitcher shows the ball to second base at front foot strike. If you watch any film of big league guys, you’ll notice virtually no one does this. Instead, the ball is kept in a neutral wrist position. This means that the ball is facing towards third base as a right hander and the ball is facing towards first base as a left hander.


Keeping the ball in a neutral position, images from @pitchingninja and Texas Baseball Ranch

As to why you shouldn’t read the watch, Christian Wonders does a nice job breaking this down. I’ll link to the video here, but below is a quick summary of the points he makes.

  • Reading the watch keeps the hand in pronation (thumb down)
  • Keeping the ball in a neutral position keeps the hand in slight supination (thumb out) 
  • The shoulder does not want to get into a clean layback position when it is in pronation. Instead, the humeral head migrates forward and loses congruency in the ball/socket complex.

In its most simplest form, don’t teach kids something that’s not natural. Almost no one shows the ball to second base when they land. It’s not a coincidence, either. 

7. Throw over the top                                                                                                                                        

8. Get nice and long/don’t short arm it


Manipulating arm action is one of the most misunderstood concepts when it comes to pitching. Your average youth baseball player is going to hear a barrage of cues when they pick up a baseball that include “Don’t sidearm it, throw over the top!” or “Don’t short arm it, get nice and long!” These cues are usually intended to create “proper mechanics” so kids don’t get hurt when throwing. While they’re well intentioned, they don’t really describe what a lot of high level throwers do. If anything, they’re likely to do more harm than good. 

Part of the origination for these cues goes back to the bridge between feel and real. A lot of guys may feel they’re doing certain things when in reality they’re doing the exact opposite. To explain this, check out this clip of Pedro Martinez describing the importance of throwing over the top and compare it to what he actually did below.


Pedro “throwing over the top” (image source)

In reality, arm slot is a little more complex than just thinking “over the top.” A true over the top delivery where the ball is launched from the trajectory of an iron mike does not exist. Your arm slot is dictated by the position of your trunk in space as you rotate to deliver the ball. Your arm should create a perpendicular relationship in regards to the angle of your torso. To better explain this, see the images below.

Kershaw appears to “throw over the top” because he creates more lateral trunk tilt to his glove side. Sale appears to “side arm” the ball (smh) because his torso is more vertical at ball release. If you were to rotate these guys and get their trunks aligned, you would notice the arm slot is identical (the two lines on both pitchers create a perpendicular relationship). If your arm is not able to create this angle in relation to your torso, you are throwing outside of your natural arm slot. This is going to make you more likely to get hurt than not throwing over the top ever will. 

Along with this, coaches will try to force a nice and long arm action for pitchers. We have this misunderstanding in baseball where “short arming” (a more direct arm action) the ball is bad and we need to get long in order to throw harder and safer. If you look at some of the best pitchers in the game, you’ll realize that this doesn’t really make sense. If we have guys like Trevor Bauer, Joe Kelly, and Giolito running it into the upper 90s while “short arming” it, why the hell would we teach our kids to get long? 

I’m a firm believer that we cannot find an athlete’s unique arm slot or arm action solely through verbal cueing. No two pitchers have ever thrown the ball the same way before in the history of baseball. If we try to figure out an athlete’s own unique style through the use of cookie cutter cueing and drill work, we are more likely to create poor patterns that become very difficult to change when they get older. Our goal as coaches should be to create an environment where an athlete can figure out his own unique style. Teaching kids to “throw over the top” or “not side arm it” won’t help them discover this. 

Our arm action is going to take shape through Nikolai Bernstein’s principle of human movement: “The body will organize itself based on the end goal of the activity.” This is why some of the game’s most efficient arm actions come from shortstops and catchers. Players at these positions are forced to make strong throws from different angles (more relevant to shortstops) under considerable time constraints. Because their end goal required quick and fast throws, their arms took on shapes that allowed them to do this. When we’re on the mound, we don’t have these time constraints. Training a kid to just locate his pitches vs. throwing the piss out of the ball is going to create two completely different arm actions.I don’t know about you, but I’m betting on the guy trying to throw fuel. 


Trevor Bauer’s advice for what your young pitchers should be doing (from @baueroutage). 

If you’re a guy who’s trained your whole life as a pitcher and you feel like a robot when you toe the rubber, you’re better getting off of it and playing shortstop (see tweets above). This is something that Trevor Bauer and Derek Johnson, pitching coach for the Reds, have talked about a lot. Making throws across the diamond from shortstop is going to give you a pretty good feel for their natural arm slot and action. It’s going to unlock some athleticism, create efficient patterns, and get kids thinking externally as opposed to internally. Tucker Frawley, infield coach for the Twins, talked about how pitchers at Yale used to complain about losing a lot of athleticism pretty quickly when they got away from their infield position. If you think about it, their “arm care” program was the throws they made from the infield. When they lost touch with some of the things that probably really helped them out in high school, they started to fall off. If you’re trying to develop a young pitcher, the worst thing you can do is train them like a pitcher. As Bauer says best, get them to move fast, throw hard, and play shortstop. 


If you’re trying to develop a young pitcher, the worst thing you can do is train them like a pitcher.


Arm action changes are very difficult to make. If you see someone with an action that looks disconnected or out of sync, start with the lower half. Athletes will tend to find energy in the wrong places if they can’t create it with the big muscles in the lower half. As mentioned before, you can’t isolate the delivery and just look at one piece of it. Observe, see everything that is going on, and then find the things that seem out of sort. 

If you’ve checked this box and are still having some issues, below are some ideas you can use to try and create some better patterns:

  • Eliminating time 
    • Any drill that forces the athlete to speed up or get the ball out quicker. A stopwatch is a great tool for this for guys who muscle up and fail to sync up their whole body in the delivery. 
  • Weighted baseball catch play
  • Throwing the football
  • Connection balls
  • Indian clubs

When it comes to arm action, you can usually do more harm than good. Create the right environment and let the kids do the rest.


9. Get “Extension”

Randy Sullivan of the Florida Baseball Ranch did an awesome job breaking this one down in his ebook book Getting Extension is Fool’s Gold. Below are some of his thoughts on the origin of “getting extension” and why it is a huge velocity/arm health killer. 

The idea of teaching pitchers to get “extension” goes back to research in the late 1990s and early 2000s where some very smart coaches figured out the hardest throwers in the game tend to let go of the ball further out in front of their bodies. They calculated that every foot the ball is released closer to the hitter would equal to about 3 mph of perceived velocity. This gives hitters less time to react and can increase the effectiveness of your fastball without actually adding more velocity. Thus, getting “extension” was created as a way to release your pitches closer to the catcher so you could add more perceived velocity. Coaches designed drills like the towel drill where athletes are cued to extend and hit a target on their follow through. The basic idea behind this was right, but the application was horribly wrong. 

While we know that high level arms do release the ball closer to home plate, it is not because they’re reaching out to throw the ball closer to home plate. Instead, “extension” is merely the byproduct of an interconnected and efficient delivery. If everything up stream is sequenced correctly, what you’ll see at release is the throwing shoulder will be rotated slightly in front of the glove side shoulder. This is what Ron Wolforth of the Texas Baseball Ranch calls “late launch” and is what the experts deemed as “extension.” The athlete is not reaching out and creating what Randy calls a “linear deceleration pattern.” Instead, they are utilizing a properly sequenced delivery to release the ball further out in front towards the hitter.  


Creating a linear deceleration pattern through drills like the towel drill is a velocity and arm health killer.


Creating a linear deceleration pattern is a killer when it comes to velocity, command, and arm health. Sullivan explains that when an athlete creates a linear deceleration pattern through drills like the towel drill, the muscles of the posterior rotator cuff and shoulder disengage after ball release. When this happens, the biceps is left alone to eccentrically resist long axis distraction, humeral head elevation, and terminal elbow extension. In other words, your biceps muscle is working to prevent your arm from flying off your body. This is not a safe way to decelerate your arm as the forces trying to pull your shoulder off exceed 1X your bodyweight. Since your biceps tendon is attached to the labrum, this issue can place a beating on the labrum and eventually pull it right out of the socket. 

On top of this, encouraging a linear deceleration pattern can put your elbow at serious risk by preventing the pronator muscles in your forearm from turning on. By getting long and reaching to get extension, athletes are not able to go into shoulder internal rotation and pronation. When the athlete is stuck in supination, the pronator muscles in the forearm are unable to do their job and take the initial stress from the throw. We know that the stress from throwing a baseball (studies show 70-90 nM of stress on the medial elbow at shoulder external rotation) exceeds the stress that the ulnar collateral ligament (UCL) can handle (about 35 nM). The forearm pronators play a huge role in the dissipation of this force as they are the first responders to protect the UCL. If this link in the chain becomes broken because of a linear deceleration pattern, the UCL can get overloaded and eventually fail. 

For those of you that followed along with all of that, the major takeaways are this:

  • Getting “extension” is the natural byproduct of an efficient delivery where the throwing shoulder rotates beyond the glove shoulder at ball release.
  • Trying to artificially create extension using the towel drill places the athlete at risk for developing a linear deceleration pattern.
  • A linear deceleration pattern causes the forearm pronator muscles and posterior shoulder to surrender to the biceps which rages eccentrically to keep your arm from flying off of its socket.
  • A healthy deceleration pattern is created when the hand pronates after release and the throwing shoulder internally rotates. This keeps the forearm pronators and posterior shoulder engaged so they can help dissipate force and let the body naturally unwind.
  • The best way to teach a good deceleration pattern is to not screw up kids in the first place.
  • Please don’t do towel drills. 


While much of this problem is created by human intervention, there are ways you can work and improve your deceleration pattern. Some examples include wrist weights (see more on these here), the Durathro training sock, and overload throwing implements. Kyle Boddy dives into this idea a little more in a Youtube video and an article on fangraphs from a few years ago.

10. Finish in a fielding position 

I originally had this linked with the extension part of the presentation, but I wanted to separate it for this article because I didn’t think I covered this enough in the discussion. Pitchers are commonly told to “not fall off” or “finish in a fielding position” after releasing the ball (god forbid you miss a ground ball back up the middle). Both of these cues are well intentioned, but they don’t make sense because 99 percent of big leaguers “fall off.” It isn’t by coincidence, either. 

The reason why most big leaguers level “fall off” is because they’re trying to throw the piss out of the ball. It’s a natural byproduct of the body accepting a large amount of force and dissipating it. To throw the ball, the shoulders are going to rotate forward with the throwing arm internally rotating at over 7,000 degrees per second. We also know the lead leg is working unilaterally to accept over 400 pounds of force simultaneously. As a result, your body is going to naturally unwind around your front hip and towards your glove side to accept and dissipate force as efficiently as possible. This causes a lot of guys to “fall off” – a perfectly normal thing to do if you’re trying to throw the ball hard. 

Greg Holland, Nathan Eovaldi, and Chris Davenski all run it up into the upper 90s without finishing in a “fielding position” (from @pitchingninja).


If we know that slamming on the brakes isn’t great for our cars, why would we want to slam on the brakes with our arm?


When we encourage pitchers to finish in a fielding position, we are cutting off their ability to naturally decelerate. Athletes are not able to completely rotate around their front hip and create late launch to help the arm safely unwind. Cutting off forward shoulder rotation encourages early launch where the athlete’s arm is brought to an abrupt stop after release. This results in significant banging and recoiling of the anterior shoulder and can create shoulder and elbow pain in throwers. If we know slamming on the brakes isn’t great for our cars, why would we want to slam on the brakes with our arm? Your body also isn’t going to produce a lot of force if it can’t safely and efficiently accept it. There’s no reason for your body to punch the gas if it doesn’t trust the brakes system. 

Does this mean that finishing in a fielding position is always bad? Absolutely not. There are guys who throw the ball very well that finish in more of a fielding position. However, this is unique to their own style. They more than likely did not have coaches who were constantly berating them for falling off the mound. They simply found the best way for them to produce and accept force. Forcing athletes into a pattern that does not fit their unique mold is called cookie cutter coaching. We know that cookie cutter programs do not work because no two athletes are ever the same. Teaching everyone the same way will mirror a bell curve: Some will get better, the majority will stay the same, and some will get worse. 

As a coach, the key takeaways should be pretty simple: “Falling off” is not a bad thing, it is a good thing. Your kids are finding ways to move fast, throw hard, and naturally decelerate their body. Each kid is going to have their own unique finish after they throw the ball. Be very careful when you start to tamper with how they finish after they throw. If you tamper with the body’s natural brake mechanism, you’re more likely to place athletes at risk for injury. 

Please stop telling kids to finish in a fielding position. You’re likely doing more harm than good.                                  


11. Death by Verbal Cueing 


The overuse of verbal cueing might be the greatest detriment you can use when trying to build pitchers that thrive in competitive environments. This is something I’ve talked about in the past on here and I still feel the same way about it. With all the mechanical stuff that we can screw up, the absolute worst thing we can do for kids is to dome them up with a million different cues in practice. If you think about some of the best performances you’ve ever had, most will agree that they were instinctual. We weren’t worried about where our hand was or whether we were using our legs enough. Instead, we trusted in our training and thought less. We were simply in the moment and competing with everything we had in the absence of thought. 

Research has shown the most effective focus of attention for game performance is a specific, external focus. An external focus refers to when we are focusing on something outside of our body in our environment. Examples of external cues include “throw it through the mitt,” “hit it over the center field wall,” and “try to separate the floor.” Unfortunately, most of the cueing used in coaching promotes an internal focus. An internal focus refers to when we are focused on something within our body. Examples of internal cues include “use your legs more,” “get your hands up,” and “don’t drop your elbow.” The broader the cue is, the more room there is for misinterpretation. 


Instead of keeping things simple and letting their athleticism take over under the lights, we jump in and complicate things through poor cueing.


If we are constantly thinking about what our body is doing in games, we are becoming our own worst enemy. We’re not trusting in our training and we’re not giving ourselves the freedom to compete one pitch at a time. Instead, we’re worried about the aesthetics of our delivery. We want every single move to be perfect even though we know there are going to be a multitude of factors that impact our delivery every single game (energy levels, field conditions, weather, nutrition/hydration, sleep, soreness, etc.). Instead of focusing on executing pitches and competing with what you have that day, we’re worried about whether we’re using our legs enough or whether we’re sidearming (smh) the ball or not. This is where we create kids that can’t get out of their own head. Instead of keeping things simple and letting their athleticism take over under the lights, we jump in and complicate things through poor cueing. 

The double-edged sword to internal cueing is that there is a time and place for it early on in the skill acquisition process. It is helpful to give kids a better feel for the difference between certain moves by creating an internal focus of attention (conscious incompetence). However, the focus must eventually progress to external (unconscious competence) as the athlete develops mastery over the skill. If they cannot execute the skill with a specific, external focus of attention, it will not play in a game environment. 

Derek Johnson likes to describe this process of building a skill using “over the rubber” and “over the plate.” When we are over the rubber, we’re working on developing a skill. This could be trying to create a better movement pattern, shape to a breaking pitch, or velocity. When we’re over the rubber, we’re not worried about executing pitches. We’re trying to create feel for something that’s going to eventually help us in a game environment. When we’re over the plate, we’re in a competitive, game-like mindset where the main focus is executing pitches. We’re not focused internally on our delivery – we’re focused externally on competing with what we have to send guys back to the dugout. 


If the focus is on executing pitches, you can’t cue guys to use their legs more. If the focus is on building a better movement pattern, you can’t worry about filling up the strike zone. We’re either over the rubber or over the plate – we can’t do both.


As coaches, we must not blur the line between over the rubber and over the plate. If Jonny is trying to create a better pattern with his lower half, the execution of his pitches is going to be slightly off. If you berate him for not filling up the zone while focused internally on his lower half, he’s going to abandon the new pattern and go to the old one that is more comfortable for him. Your sessions should not be a mix of over the rubber and over the plate. Create a goal for the day and coach it accordingly. If the focus is on executing pitches, you can’t cue guys to use their legs more. If the focus is on building a better movement pattern, you can’t worry about filling up the strike zone. We’re either over the rubber or over the plate – we can’t do both. 

When it comes to cueing, less is usually more. Yogi Berra said it best: “You can’t think and hit at the same time.” Pitching is no different. 

Part 2 of the article will go over items 12-24

What I Learned from the ABCA 2020

The 2020 ABCA Convention was held in Nashville, TN. Throughout the weekend, thousands of coaches gathered to learn, teach, and share ideas to prepare for the upcoming season. Below are some of my thoughts from the experience, reoccurring themes, ideas that resonated, and tips you can take home to your teams and players.

Themes 

Tech cannot replace the Teacher

The theme of balancing technology and teaching came up more than anything else this year at the ABCA. With the explosion of technology in baseball player development, we are starting to see the benefits of using tech tools – but also some of the pitfalls when it is mismanaged. More organizations today have access to a lot of the same information, but the difference maker is in what is collected, why it’s collected, and how it’s communicated to the athlete. Information is designed to increase your effectiveness as a coach by supplementing what you’re trying to teach. It should not be used to make yourself seem smarter. Application is key – not necessarily collection.

Bobby Tewksbary of Tewksbary Hitting explained how to navigate this problem by starting with what matters. Whether it’s hitting the ball harder, getting on plane earlier, or improving timing, you as a coach need to determine what is going to help that athlete become successful (works the same way with pitching). When you can establish what is important, you can start figuring out how you’re going to measure it. If it’s important, you can’t guess – you need to measure it. The process of collecting this information requires an implementation plan. You need to explain when and how information is going to be collected during training sessions. This involves getting a large enough sample size so you can get a feel for where that athlete is without any bias from small sample sizes. Bo Bichette’s father talked about how he feels kids need 5,000 at bats before they can start to figure out who they are as a hitter. If kids aren’t getting at bats in games, you need to find ways to get them at bats outside of their games.

Lastly, you need to have a plan for when and how you will retest athletes. This shows whether what you’re doing is working or not and ultimately keeps coaches accountable – numbers don’t lie. Some adjustments may be easier or tougher but you can’t determine if an athlete has mastered something if you don’t have the information to support it. Find what matters, learn how to measure it, create a plan for how you’re going to measure it, and retest to see if it’s working.

Building Better People

No matter who was speaking or what level they were representing, one theme seemed to shine through with everyone: Coaches are in the process of building better people. The amount of kids we will work with that will make it professionally is miniscule. Our best bet as a teacher and a mentor is to use baseball as a platform to teach life lessons that will help them beyond their playing days. What we can do for them as players is a bonus.

This begins with your ability to build relationships with your players. We as coaches spend a lot of time talking, teaching, and instructing, but some of the best moments we can spend with our athletes are when we don’t speak a word. In order for our athletes to trust us (we don’t have anything if we don’t have trust), we need to make sure they known their voice is heard. Get to know them outside the baseball field. Know the names of their parents, siblings, and their interests off the field. Know their story, why they play the game, and why they came to your school. This foundation gives us the ability to teach them, hold them accountable, and confront them when they aren’t doing what they said they would do. If you can’t love them on their worst day, you really don’t love them.  

The baseball part is the small picture. Building better men should be your ultimate goal as a coach.

“I wouldn’t change a thing”

Smart people learn from their mistakes, but wise people learn from the mistakes of others. Being 23 years old, one of the questions I asked a lot of coaches was, “If you were to do it all over again, what would you change?” Most, if not all, gave me the same resounding answer: “I wouldn’t change a thing.”

The experiences we go through as coaches shape who we become. The bad information we used to teach and the athletes we screw up are all a part of the process of becoming a better coach. There is no shame in looking back on what we’ve done before and realizing how differently we would do it today. The information gets better, we learn more from smarter people, and we learn from our experiences with kids. Those that continuously work to hone their craft will figure it out in time. If you aren’t transparent about where you’ve screwed up, you’re not confident in what you do.  

We all want to give athletes our very best. We’ll help many, screw up some, and make plenty of mistakes along the way, but our greatest failure will only be if we fail to evolve. The greatest coaches have the humility to show others how they’ve changed, but they also don’t regret the steps in the journey. Own your story – no one started this thing with all the answers.

Stay Centered

The best coaches are the ones that are able to navigate the emotions from the highs and the lows. They don’t let success get to their head or failure get to their heart. They keep their foot on the gas when things are going good because they know much work is to be done. They don’t demean their teams when they’re down and instead find ways to pick them up. This even keel demeanor is exactly what kids need to handle a sport deeply rooted in responding to adversity. If you can create that consistency at the top, kids will learn how to take it to their game. Anything that drags us away from the present moment is working against our ability to teach, play, or learn. Stay centered, quiet the drama, and don’t let the emotions of this game pull you off track.

Thoughts from Coaches  

Tim Corbin – Vanderbilt University

Every single year, the head coach of the reigning Division I national champions kicks off the event with a speech Friday morning. Tim Corbin’s Commodores captured the national championship last June defeating the Michigan Wolverines for his second championship in five years. Corbin’s work at Vanderbilt is arguably the greatest coaching job in college baseball history. The program he’s built is a large testament to the strong culture he has created – hence, the title of his speech Culture is…

Corbin started his speech describing a story about a young man he wanted to bring to his program early on in his coaching career at Vanderbilt. The young man’s coach actually was not interested in Vanderbilt at all (imagine saying that today in 2020), but the kid was very interested and ended up coming to the school. As a freshman, Corbin said you could tell the kid was uncomfortable early on. He didn’t talk much or engage with his teammates. In the fall of his freshman year, the kid had a really rough outing in a practice intersquad. When Corbin went to console him after practice, he couldn’t find him. The next time he saw him was the next morning in his office – eyes red and swollen from crying.

The young man proceeded to tell Corbin that he was going to quit the team, drop out of school, and start working. Sensing discouragement and fear, Corbin explained how he would be making the biggest mistake of his life and ended up persuading him to stay in school and on the team. That interaction was the last time Corbin has to convince David Price to stay in school. The rest is history.

As a coach, you’re in a position where you have the ability to mentor young kids and guide them through difficult decisions in their life. These conversations don’t usually end in both of you feeling good. They’re going to require you to confront the athlete, empathize with their situation, and give them what they need to hear – not what they want to hear. If you can give the kid consistency when everything else in his life seems inconsistent, you have the chance to get him back on track. Who knows – you might just save a big league career.

Culture has become a buzz word in sports today. When new coaches are hired, everyone talks about changing the culture or creating a better culture. It’s easy to talk about what the great cultures look like (hard work, no nonsense, etc.), but it’s really tough to create a sustainable one that aligns with your values. This isn’t done through reading books – it requires years of skin in the game. Patience from years of hard work helps give you wisdom and wisdom helps you see the simplicity of the game. The best cultures don’t do extraordinary things – they just do the ordinary things better than anyone else. As Corbin says best: “Do simple better.”

Culture is not static – it is dynamic and it’s constantly in motion. The things that you allow, encourage, and tolerate are being communicated through your words and actions every single day. As Corbin says, the best way to build your culture is to model it yourself. After you build it, the greatest compliment you can receive as a coach is when your players take the wheel and start to drive your culture. Your role is to facilitate an environment where you can empower players to make these kinds of decisions. Dictating an environment is a great way to build resentment towards the culture you’re trying to create.

On a final note, Corbin talked about how the journey of what you’re doing is greater than winning baseball games. Winning the final game of your season just isn’t practical. What you do as a coach can’t be just about winning the final game because your season is finite – it has an end. Building life lessons into your kids is infinite – it does not end the day your season ends. As coaches, we’re trying to play for the infinite game – not the finite game. Our kids are going to graduate our coaching at some point. What they take with them is what’s most important.

Be the teacher you would want your son or daughter to have 

Derek Johnson – The Pitcher/Hitter confrontation and Youth Development

Derek Johnson – Reds pitching coach – was masterful at the convention diving into the pitcher/hitter confrontation and youth development. He started off his segment by illuminating the reality of baseball: Every single pitch is a war between the hitter and the pitcher. There is a winner and loser on every pitch – there is no gray area. This battle of skill and will comes down to the game between the ears. It’s the belief that I’m better than you and this is my opportunity to show you. It’s having the courage to strike first knowing the opponent who makes the first move outnumbers their opponent 9-1. It’s the ability to take punches, quickly recover, and counter with punches. Winning this war comes down to Sun Tzu’s main principle from his book The Art of War: Know thyself, know thy enemy.

Developing an approach on the mound or in the box starts with understanding who you are. What are your best pitches/locations for a strike, swing and miss, and ground ball? What pitches and zones do you hit the best? When you can grasp the things that make you successful, it’s then important to turn your attention to the other side of the battle. What are the tendencies of your opponent? Where are they most vulnerable? How have they been attacked before in the past? What have the results been?

The psychology of this battle lies within the count. The count dictates which side has the advantage going into the next pitch. This advantage is highly predictive of who is more likely to win the battle. This advantage is also constantly fluctuating – differences in just one pitch can swing batting averages over .150 points. If you don’t know who you are, who you’re facing, and if you can’t be present pitch to pitch, your odds at coming out on top are slim to none. At the end of the day, deliveries and swings don’t win games – competitors who are ready to shove It up your ass do. Let your approach dictate your mechanics. If you want to play baseball at a high level, get really good at competing pitch to pitch.

At the youth level, Derek talked about his three big rocks when working with pitchers just starting out: Eyes, tempo, and rhythm. Eyes will dictate your direction, rhythm will sync the moving pieces together, and tempo will determine the speed and efficiency of the movement. Having a strong connection to the ground is also another place to start with young athletes. The easiest way to do this is to teach kids how to tie their shoes and how to feel all six cleats in the ground with their back foot. A lot of energy is lost when kids fail to understand how to utilize their hips and trunk throughout the delivery. Attacking this issue starts with creating a stable platform to move from.

When it comes to developing efficient moves, Derek sees a lot of value in getting kids off of the mound and playing positions that require strong throws within time constraints (i.e. shortstop, catcher). Your best arm action is the one that you’ll use when you’re making a play from shortstop. There’s no conscious thought about where my arm, hand, or foot is. All we’re focused on is catching and throwing out the runner. When our instincts and our subconscious take over, we’re given the freedom to develop authentic and efficient movement patterns.

This is something I talked about with Twins infield coach Tucker Frawley. When a lot of kids come to Yale and become pitcher only players after spending years as an infielder, many complain about losing a lot of athleticism pretty quickly. He’s seen several infielders who can hop on the mound and throw the ball pretty hard after years of learning how to sling balls across the diamond. While he’s only seen a small sample size, Frawley sees a lot of value in giving pitchers the freedom to continue to take ground balls and make throws from infield positions. Pitching a 5 ounce baseball 90-100 times a game out of the same delivery doesn’t match the movement variability of a shortstop making several types of plays. You want to give kids the opportunity early on to explore a wider spectrum of movement solutions so you can maximize their window to develop their most optimal movement patterns. You have to learn how to throw before you learn how to pitch.    

Derek finished his presentation on a great thought: “Most people know what to do and how to do it, but very few are willing to do it.” Discipline is the separator. If you talk the talk but don’t walk the walk, people will see right through you. Show up, shut your mouth, and do the work. You only have yourself to blame if you don’t.   

Buck Showalter – Perspective from a Life in Baseball

Considering the road that Buck Showalter has taken in baseball, this is one of the presentations I was really looking forward to. He started it off with arguably his best piece of advice from the presentation: “Design practices you would want to be a part of.” He described a situation where he was asked to help out someone he knew at a 15U baseball practice. Instead of setting the field up for a monotonous BP situation where players stand around and lose interest, Buck set up a field by asking kids where they wanted to play. He got a kid in the box, set a 0-2 count, and tried carving up kids with his best stuff. It didn’t even take 15 minutes before the kids were hooting, hollering, and having one of the best times they’ve ever had at practice. In the process, Buck was also able to create a game-like environment that was competitive, engaging, and realistic. After all, over half of our at-bats are going to get to two strikes.

On the scouting side, Buck placed a big emphasis on how kids interacted with their families when gauging if they would be a good fit for his ball club. He wanted to see if they treated their parents and siblings with respect or if they blew them off. He wanted to see if they were alert, present, and if their interactions were genuine. If a player couldn’t pass this test, he wasn’t interested in them.

On the field, Buck loved to watch guys off the ball. If there was a ball laced in the right center gap, he wanted to see if the left fielder was moving to the ball, if the pitcher was backing up third base, or if the first baseman was trailing the runner to second base. This helped give Buck a feel for a player’s alertness and understanding of situations. Not every ball is going to be hit your way in a game, but every single ball in play requires the defense to move as a unit. All nine have a role on every single batted ball. What you do when the ball isn’t hit your way reveals a lot about how you play the game.

On a final note, Buck explained the importance of a true heart. “Know who we want to be, how we want to do it, and stay true to it.”

Randy Sullivan and Eugene Bleeker – The Flaws of Intent Based Training

Randy Sullivan of the Florida Baseball Ranch gave a great presentation on his theory about dead arm. He started by explaining the dynamic systems theory and its importance in your training programs. In its most simplest form, dynamic systems theory states that everything affects everything within a system. Your body is constantly adapting and reorganizing based on the current state of the system and its interactions with the task and environment. Looking at just one or two variables would not account for the multitude of variables that can have an impact on the system. We like to look for cause and effect relationships because they’re easier to explain but our body is not this simple to navigate.

In a baseball context, saying a pitcher got hurt because of “bad mechanics” would be a small part of the equation – even if is true. To properly apply the dynamic systems theory, one would need to look at the pitcher’s injury history, training program, movement constraints, previous training history, his workload, recovery, nutrition, hydration, external factors potentially creating stress (i.e. breaking up with your girlfriend), sleep, mindset, field conditions, weather, warm up, and more. Jumping to one of these variables would be missing the bigger picture and would violate the dynamic systems theory – everything affects everything.

To understand movements as complex as throwing patterns, we need to look at the stable components of the system: Attractors. Attractors are created through the cocontractions of agaonist and antagonist muscles around joints to provide stability and optimize length tension relationships required for removing muscle slack. Removing muscle slack helps the system organize into positions where force can be produced and accepted (you can’t pull a sled with a rope attached until the rope is taught). Movement efficiency is not new – it’s how organisms have learned to adapt and evolve for survival. Our body craves to conserve energy by its biological nature. It’s why some of the best players in this game look effortless when they’re in competition. It’s not that they’re not trying – they’ve just found the easiest ways for them to produce and accept force.

This is something I talked about with Eugene Bleeker of 108 Performance. A lot of Bleeker’s training involves kids learning how to find their most optimal power output using the least amount of effort. Instead of trying to create a lot of tension early on in the sequence, Bleeker wants his athletes to create tension at the right moments in time. You have a small window in baseball to produce and accept force. If you can’t elicit the right amount of tension in these small windows of time, a lot of energy is subsequently lost.

To get a feel for the timing of this, Bleeker likes to cue his hitters to pretend to make contact with a 500 pound ball. This helps athletes create feel for bracing the trunk when energy is being transferred from the lower half through the midsection and eventually to the bat. This stable platform for the transfer of energy helps segments of the chain decelerate quickly and efficiently. Some of the best athletes in the world are able to decelerate (i.e. throwing on the brakes) much quicker than their counterparts. Hitters and pitchers must have a strong and well-timed set of brakes to prevent energy leakage throughout the movement. Inability to slow the movement down will prevent your body from reaching its top speed out of protection.   

Coming back to Sullivan, athletes can start to get themselves out of sequence when misguided intent becomes thrown into the equation. When athletes try to create a lot of effort through intent based training, athletes have the tendency to find energy in the wrong places. High intensity throwing places a larger stress on the system. We know added proper amounts of stress is required to create certain adaptations within a system, but we also know that the body is not interested in conservation of energy within situations where there is a one-off emergency. When the efficiency of a pattern breaks down, tissues start to take on stresses that they are not capable of handling. This causes the body to go into self-preservation mode and save your degrading tissues by placing a governor on your ability to produce power. This is where Randy believes the idea of “dead arm” can come from: Your body is responding to the accumulation of burning too many calories through inefficient movements. Our body will not let us burn calories indefinitely without consequence.

Throwing with higher levels of intent has its place within a training program, but it should not be used to the point where it begins to compromise the efficiency of the system. If it doesn’t look natural, don’t waste your time. Our body craves efficiency – don’t work against it using poorly managed intent training.

David Franco and Alan Jaeger – Mastering the Game Between the Ears

David Franco of the Seattle Mariners performance staff spoke at the youth clinic session about developing a practical plan to help kids learn the mental game. He began by explaining the further away you get from your playing career, the tougher it is to remember how hard this game once was. As a coach, it’s easy to get frustrated when our kids aren’t executing the way we think they should be. However, we’re not too far removed from those games where we smoked three balls right at the center fielder and only had an 0-3 to show for it. Take the scoreboard out of it and get kids to become really good at their process. The younger you can do this, the earlier you can build a robust foundation that will impact their careers as the game becomes much harder.  

This process comes down to developing simple, repeatable routines that help kids manage the 15 seconds between pitches. Every single pitch, kids should be able to learn from the last one, get control of their mind and body, create a specific plan for execution, and 100 percent commit to it. This process is used to help get the athlete external and into a state of mind where they are focused on competing with everything they have to win the next pitch. These routines should combine physical actions (stepping out, taking a breath) with mental cues (see ball/hit ball, next pitch) for ultimate effectiveness. Physical routines are of no use if they do not include mental components.

Routines help keep us grounded in competitive environments by giving us things we can do at any time and in any place. Unfortunately, kids don’t always stick to their routines and they can abandon them when they don’t trust in their training. When the results aren’t always there, most kids hit the panic button and lose sight of the process to achieve those results. Alan Jaeger of Jaeger Sports calls these distractions drama – the fans, scoreboard, weather, opponent, coaches, or anything else that you cannot control which is creating a distraction. Having a purposeful process helps eliminate these distractions and keep you focused on the task at hand. Failing to trust in your training or not having a plan/process is a great way to let these distractions get the best of you.

A really important question to ask your kids is what causes them to give away at-bats/pitches? What gets you out of the moment or keeps you from being the best version of yourself? Franco has had experience with minor league players who claimed they threw away a third of their at-bats because they didn’t trust in their process. A third of your at-bats could dictate the kind of season you and your team has. If you can create some awareness for moments that get you out of the present, you can start to recognize these feelings and eliminate moments where we get off track. Everyone knows what it feels like to lose control in these moments, but few have the ability to recognize what goes wrong, why, and how to get back to the present. Of all the skills you can teach kids, this is arguably the most important.

Alan dove deeper into the subject of the mental game by talking about the benefits of meditation for coaches and players. Alan has consulted with major league clubs, players, and some of the best colleges in the nation about the benefits of daily meditation practice. He firmly believes that players need to be able to control their breath, commit to their process, and block out the drama in competitive environments. Being able to meditate and deliberately slow things down is a great way to help block out the drama and connect with yourself on an intimate level.

As athletes and coaches, we’re constantly fighting to connect with our flow state. The flow state is a condition where humans find a balance between skill difficulty and arousal level. When you enter the flow state, you experience this calming sensation where you’re able to execute with precision in the absence of drama. This is what a lot of athletes describe when they’re in the midst of their best performances. There’s no conscious thought guiding them or any kind of distractions pulling them from the task at hand. It’s just them doing what they know how to do best in a relaxed state of mind.

Alan believes that the ability to connect with a flow state is always inside of us. We don’t just access it at certain moments – we always have the ability to find inner peace when everything around us may seem chaotic. This comes from practicing meditation on a consistent basis.

The one thing that Alan emphasizes a lot is you do not need to be a sports psychologist to teach athletes how to meditate. While it does take some practice, anyone can run their team through a guided meditation practice. See his youtube video for a 15 minute guided meditation practice that you can take home to your team. It’s not about creating the best practice possible – it’s doing it on a consistent basis.

On a final note, David Franco left on the quote: “Do everything on purpose with purpose.” Just showing up to practice does not mean you are going to get better. He proceeded to explain a story where Dee Gordon noticed some minor leaguers that were getting blown up on the slider machine. Instead of avoiding the possibility of looking bad, Dee hopped right in there and took the first slider as it missed towards his back foot. When the coach tried to adjust the machine, Dee wouldn’t let him because he knew that was a pitch he needed to work on laying off. In a round of 12 swings, Dee swung at three pitches and took nine. He walked out of the cage confident that he had successfully attacked a weakness he needed to work on.

When the best players in your organization are doing things like Dee Gordon did, you have a chance to build something pretty special.  

Jeremy Sheetinger – Becoming a Transformational Leader

Jeremy Sheetinger shared a moving story about his journey as a coach and in the ABCA explaining who he used to be as a coach, why he had to change, and how he does things differently now as the head coach of Georgia Gwinnett College. As host of the ABCA Calls from the Clubhouse for the past three years, Sheets had the opportunity to interview and talk to some of the best minds in baseball. Through this process, he began to realize how his coaching used to be transactional. He valued wins more than developing men, his record became part of his identity, and his ego blurred him from seeing the bigger picture as a teacher.

Today, Sheets understands that baseball is just a game – a lesson he got from Augie Garrido, the second-most winningest coach in college baseball history. Instead of coaching for himself, Sheets learned the importance of empowering his kids and giving them the courage to make decisions on their own. You are going to become the person who you’re supposed to become. As a coach and a teacher, you have an opportunity to help kids discover who they truly are. You won’t go far if you don’t know who you are.

When you start to figure out your identity, you need to say it, mean it, and show it. Alan Jaeger talked about the importance of authenticity – being who you are and acting within your values. Kids can see right through you when the talk doesn’t match the walk. If you want to start somewhere as a coach, understand who you are as a teacher, model it on a daily basis, and keep it real with your kids. They’ll learn how to do the same.

The next point Sheets brought up reminds me of a moment from last year’s Super Bowl. When Patriots head coach Bill Belichick was asked about what his some of his goals are to finish out his legacy as one of the greatest coaches of all time, he said, “Well, I’d like to have a good practice today.” Everyone wants to be great at the end of the tunnel, but few people realize that you need to be good over a consistent period of time before you achieve greatness. Belichick knew this more than anyone else. Instead of focusing on the end goal, he kept perspective to having a good practice that day. If you can do that day in and day out for a long time, you’ve got a chance to be great. Skipping steps on the ladder won’t get you to the top quicker.  

One of the values that forms the backbone for Sheets’ program is vulnerability. As a coach, Sheets is not afraid for his kids to see him at his worst. He’s transparent about where he’s been and why he thinks the way he does now. He’s able to create this using the exercise hero, hardship, and highlight. Every single member of the team stands front and center and explains someone who’s helped them get to this point, a moment in time they had to overcome, and something they’re proud of. This creates some tough conversations and can bring emotions out of players and coaches, but in the end it makes the group stronger as a whole by creating a mutual understanding. As humans, we’re quick to make judgements about people who we know very little about. Sharing your story helps people understand you on a level where they can respect you and see things from your perspective.

Through his experiences on and off the field, Sheets has come to describe the bond between all coaches using the word fraternity: The state or feeling of friendship and mutual support within a group. We are all in this thing together and we all add value to each other. For us to continue to push this great game forward, we need to be in a constant state of support. As Tim Corbin said best, “Grow your craft – not your title.” The day you think you have this thing figured out is the day you don’t.

Every time you talk in front of your team you’re selling tickets to your funeral. The bigger the crowd, the bigger the impact. 

Final Thought

Last year was my first experience at the ABCA. It was an incredible thing to be a part of, but it was also overwhelming. There were so many people I had never heard of and there was so much to learn that I did not know. Being alone as a 22 year old kid can be a humbling experience among 6,500 other coaches, but there was one interaction that really made me feel at home.

I was able to introduce myself to Alan Jaeger last year at the tail end of one of the hot stoves Saturday evening. It was a brief introduction and not much was said, but it was the way that Alan introduced himself that really made the difference. His words and his actions were genuine. You could tell he really cared about other people and he had this contagious energy that lifted your mood. When I saw how down to earth Alan was and what he meant to the baseball community, I knew I was in the right place.

As a coach, your words and your actions – big or small – have a profound impact on the people you come into contact with. Don’t ever think you’re too big to introduce yourself to someone that might just be getting started. They probably won’t remember what you say, but they’ll never forget how you made them feel.


See you all in DC next year.  


Common Hitting Flaws: Steep Path to the Ball

A common flaw we see with a lot of hitters is a very steep approach to contact where the hands go directly to the ball. Since we know the average pitch comes in at a roughly negative 6-10 degree angle, hitters need to match this plane for optimal contact with a slightly uphill swing. This maximizes the window for hitters to make hard contact and drive balls in the air. This is also not news – Ted Williams figured this out a long time ago in his book The Science of Hitting. Taking a steep approach to the ball minimizes this window and makes it very difficult to drive balls in the air. Most batted balls with this type of swing are hard ground balls or pop ups with excessive back spin. 


From the Science of Hitting by Ted Williams


We believe this type of swing has become common due to a couple of things. For one, batting average on balls in play (BABIP) is very high at younger levels of baseball. A lot of kids don’t catch and throw at a high enough level causing a lot of ground balls to become base hits or errors where players reach base. This positively reinforces movement patterns that help kids just put the ball in play as opposed to driving the ball in the air (kids feel good when they reach first base – they don’t care how). These patterns may work early on but they will not scale as the field becomes bigger and their ground balls no longer find holes. At the MLB level, the batting average on ground balls in 2016 was .239. Just putting the ball in play might work when you’re younger, but it’s not going to create movements that scale when the playing field gets much better. 


Another reason why kids can develop a steep approach to the ball is the misinterpretation of what it means to be quick to contact. Conventional wisdom suggests the quickest route between two points is a straight line. However, this is not true for an object traveling through space between the same two points. In the famous Brachistochrone Curve, the ball that travels on the most direct route actually finishes last compared to the other two balls. The ball that gets to the end point first has a distinct curve which takes a steeper negative route but finishes on a slightly uphill path (sound familiar?). As a result, a straight line may be the shortest distance between two points – but it is not the path of least time


The Brachistochrone Curve showing the path of least resistance, from @InertialObservr


In terms of the swing, hitters must be able to create early acceleration by turning the barrel back – not by taking the hands directly to the ball. This move helps maximize bat speed by keeping the stretch shortening cycle engaged. Turning the barrel helps pulls slack out of the system just the way you would pull slack out of a rope if you wanted to drag a sled. This keeps tension in the posterior shoulder and trunk in order to create elastic energy (think of the way you’d create energy when you pull a rubber band back). This elastic energy is then used to produce force required for the swing. If the hands run forward and take a direct route to the ball, hitters are not able to keep tension necessary for removal of slack for optimal energy production and transfer.


Stanton and Bonds turning the barrel back as opposed to pushing their hands forward, from Heefner 2018 ABCA Presentation 


Here are a couple of really good visuals for this turn.


Vlad Guerrero Jr. and Nolan Arenado turning the barrel back, from Dustin Lind’s Google Drive and @HyattCraig respectively 


After this, the athlete must continue to accelerate the barrel and get it going on a slightly uphill plane. To optimize for ball flight, athletes should strive to catch the ball on the upswing. This would create what is known as a positive attack angle – where the bat reaches its lowest point before contact is made. A negative attack angle would be a situation where the barrel is traveling on a downhill (steep) plane at contact (i.e. taking your hands directly to the ball). To hit the ball hard and in the air, athletes should strive to create a positive attack angle. Maximum ball flight is going to occur when the bat is able to match the plane of the pitch with minimal spin off the bat. This is very hard to do when you take a downhill path to a ball traveling on a downward plane. 


Altuve matching the plane of the pitch with a slightly uphill swing, from @HyattCraig 


Teaching Points


A lot of attack angle issues can be cleaned up by eliminating some bad cueing. As we’ve discussed before, our thought patterns have a direct correlation to our physical mechanics. Most kids have been taught to swing down on the ball their entire life. Finding the cues that helped establish these patterns (ex: swing down, hands to the ball, knob to the ball) can help create a mutual understanding for where they are and how they got there. From here, giving athletes the freedom to drive the ball in the air (external cueing) is a really easy way to unlock some athleticism where the athlete can discover more optimal patterns. 


Based on how the athlete receives this, you can add in some other cues such as taking your hands to the sky, turning the barrel back, or slotting the elbow into the rib cage. Find which one resonates and incorporate it into your vocabulary with the athlete. A lot of our athletes tend to describe their best swings when making this adjustment as “smooth.” It’s worth using this cue with athletes who are trying to create a better swing plane. Steep bat paths can create a “choppy” feeling as the bat is moving through space. 


Batted ball flight is going to be your best source of feedback when making this swing change. The athlete’s goal should be to hit balls hard and in the air with the least amount of spin possible. A lot of spin after contact is going to be indicative of a swing plane that has a tough time matching the plane of the incoming pitch. Early on, try to get athletes to feel the difference between a pushy swing plane (hands directly to the ball) and a more ideal swing plane (turning the barrel back). Hitters will only be able to make long term changes if they can feel the difference between certain movements. Create some routines that the athlete can use to create a feel for the movement you’re trying to create. Utilize film to understand how the “feel” relates to the “real.” At the same time, understand the feel might not always match up to the real. Every athlete is going to process things differently – adapt accordingly. 


Jaden creating feel for an uphill swing plane between pitches


Posey and Carpenter feel moves vs. what their actual swing looks like, from @HyattCraig 


Below are a few different drills Dan Heefner from Dallas Baptist University uses to create feel for a more optimal initial move to the ball (from 2018 ABCA Presentation). 


Using a foam roller to hold angles as the bat moves into the hitting zone


Feeding the mistake from the front and trying to get the hands to slide forward prematurely


Creating feel for keeping the hands back while turning the barrel


Hitting plyos are a great place to start when working on this change in tee work and flips. The goal when using them is to square them up and hit them hard in the air with minimal spin. Hitters with a really steep path to the ball will struggle to square these up and drive them in the air. The ball itself will create an external focus to help the hitter organize into more efficient patterns using feedback from ball flight. Skills are best learned and retained implicitly rather than explicitly. Give the athlete parameters to work within but don’t overcoach the athleticism out of them. 


Hitting plyoballs can help hitters get a better feel for their bat path


A drill you can use with hitting plyos is slow pitch softball styled underhand flips. By increasing the arc of the incoming pitch, hitters are forced to create a bat path that is going to match the exaggerated negative plane of the ball. This goal is obviously not to build a slow pitch softball hitter, but rather to create a feel for how the body should work to create a better attack angle. The goal is to drive the ball with minimum spin in the air. Below is an example of a hitter who we used this drill with to create a better path to the ball. The after video (top) was taken at the end of just one session with the athlete. 


Notice Dallas creates better angles by tilting his shoulders and working into the ground (watch back knee) to help him square balls up and drive them as opposed to slicing underneath them (see bottom). 


Another tool you can use with athletes is putting a longer bat (ex: fungo) in their hands and working the middle-in portion of the plate. The constraint of the longer bat and the pitch location forces the athlete to create a tighter turn that cannot be accomplished using a handsy/steep move to the ball. Heavier bats are also going to help create a more efficient path to the ball by keeping the barrel connected to the torso without excessive hand manipulation. Heavy bats act as constraints the same way weighted baseballs can constrain pitchers into more optimal arm actions (see our article on variable practice for more information about this. 


For some athletes, teaching a better path to the ball starts from the ground up. Teaching better moves with the lower half can help clean up poor swing paths by creating a more efficient sequence. Below is an example of a college hitter who came in with bat path issues. Instead of jumping to the path path, I got him into a narrower stance and gave him the freedom to create more movement with his lower half. Using only the cue “hit a homer to center field,” you’ll notice a completely different sequence with both the lower half and upper half. 


Notice how he does not lose a lot of space behind the white line in the bottom shot as opposed to the top shot. Negative sway gives athletes a tendency to get stuck on their backside and can have a subsequent impact on swing plane (ex: pulling off, slicing underneath balls). Athletes with wider bases tend to create this sway as they feel the need to go back to go forward. We like to cue this move using “down and out.” 

Notice Colin is able to turn the barrel in the bottom frame giving him more space for his hands to work on an uphill plane to the ball (see his front elbow work up in the bottom frame as opposed to down in the top frame). He’s able to catch the ball on the upswing and stay through the zone longer as a result. 


Jaden is another example of an athlete who worked hard to improve his swing plane. Notice the position of his hands after his initial move in both frames (see the white line). In the top frame, his hands slide forward and push. In the bottom frame, Jaden is able to turn the barrel back and hold angles like the Bonds and Stanton still shots from above (hands, rear hip/knee should align). For him, the things that clicked were trying to create feel for getting the barrel on an uphill plane (see feel move from above) and driving the ball in the air. 


Hannah was someone who we started from the ground up to help create space for her hands to work on an uphill plane. Notice in the gif below how she creates very little movement in the top frame. This gave her a tendency to get stuck on her backside (i.e. squish the bug) and lose a lot of power. We used medicine ball work to help fix this and create a bigger base for her to fire from (see the difference in how far she travels beyond the white line in the bottom frame). 

From here, we used some plyoball work and some external cueing to help create the desired ball flight which would indicate a much better approach to the ball. Notice the difference in hand positions after the initial move (white line) and contact positions. She’s able to catch the ball on the upswing in the bottom shot as opposed to the downswing in the top shot. This helped her drive the ball in the air with minimal spin for optimal ball flight.   


Final Thoughts


Creating a better path to the ball is an adjustment that athletes tend to pick up on pretty quickly with the right cueing and drill implementation. With this, don’t rush to progressions before seeing some early mastery. If you challenge the pattern too soon, it will break down. When adding progressions, make sure to film and reassess so you can be sure the pattern is sticking. Don’t guess if you don’t have to – confirm what your eyes are seeing as much as possible. Most kids today are visual learners. If they can see what they’re feeling and bridge that gap, they will be more likely to retain that pattern in the future. 


Feel free to reach out with any questions, thoughts, or cases of your own. Keep learning, growing, and please don’t tell kids to swing down on the ball. 


Summer Camp Recap – Teaching the Warm Up

This past summer, I had the pleasure of working our annual summer camp as lead instructor for our younger camp. I was also able to get on the field with our older group towards the end of camp and during our extended summer camp. Being on the field every day for the past seven weeks helped me learn a lot about my craft and the kids I was teaching. Over the next few posts, I’m going to talk about some of the things we did at camp and why we used them. Today’s focus is going to be on our movement prep in the warm up period. 


Designing the Warm Up


The first thing I prioritized at our younger camp was the warm up period. I think the warm up is misused and undervalued at a lot of baseball and softball practices. I personally think that in past camps, we haven’t used the warm up period to really maximize general physical development. While there is a time and place for static stretching, I don’t think it should be a priority for kids. 


Instead, I developed a daily routine where we taught kids how to hip hinge, squat, lunge, bridge, and breathe. Below are some thoughts about why I chose these patterns, how to teach them, and what to look for in kids:


Hip Hinge


The hip hinge is the foundational movement for rotary athletes. It helps reinforce a glute dominant pattern which keeps athletes connected to the ground for a long period of time. It also teaches athletes how to brace their spine without excessive lumbar flexion (rounding of the lower back). Since lower back injuries are the most common injuries in baseball, we want athletes to learn how to protect their spine by teaching certain muscles (glutes, hamstrings, spinal stabilizers) when and how to fire for most efficient transfer of force.


What to look for:

  • Feet a little wider than shoulder width, slight bend in knees
  • Athletes initiates movement by pushing glutes out (posterior weight shift) without knee flexion
  • Torso gets to roughly 45 degree relationship with the ground (this is just a general starting point, athletes can get higher/lower to ground based on feedback from execution of movement)
  • Braced midsection, lower back remains locked/fixed 
  • Knees remain vertical in relation to heels (vertical shin)
  • Chin is tucked/packed, no excessive cervical extension (looking up)


I used a PVC pipe with our kids to help learn how to maintain congruence of the head, upper back, and lower back throughout execution of the movement. If the athlete loses one of these points throughout the hinge, let them know and try to create awareness for when they lose contact with that point.  


Two common faults I saw when teaching this move were excessive lumbar flexion (rounding) and a lack of a posterior weight shift. I tried to attack these by first teaching the athlete how to push their hips back (posterior weight shift). To do this, I would place a vertical object 4-6 inches behind their glutes and try to get them to touch the object when they hinged back. This usually helped clean up some of the lumbar flexion by creating more space for the torso. It won’t look perfect at first, but kids will start to figure it out with time. 


Bodyweight Squat


The squat is an important movement to teach off the hip hinge as it promotes a similar posterior weight shift through a braced midsection. The main difference between the squat and the hinge is athletes flex from the knees to get their hips roughly parallel to the ground. This move helps teach athletes how to work their hip line into the ground while keeping the posterior chain engaged – an important skill when learning how to optimize ground reaction forces. 


What to look for:

  • Braced midsection 
  • Hips sit down and back, glutes push out
  • Knees drive down and out (watch for knees that cave in, out over toes)
    • *note* The squat will demand more of a positive shin angle (knees slightly beyond heels), but never to the point where it compromises posterior weight shift
  • Chest stays in a more vertical relationship to the ground (as opposed to hinge where chest works more horizontally to the ground)
  • Chin tucked/packed, no excessive cervical extension 


I had athletes extend their arms out to create a counter balance which allowed for a posterior weight shift in the squat. For those that struggled sitting their hips back without falling backward, I would have them grab a pole and practice the squat while keeping their hands around the pole. As their hips worked into the ground, their hands would slide down the pole. 


It’s very common for kids to drive their knees down and in when executing a squat (lack of a posterior weight shift). To help teach a better pattern that creates space for the hips and relieves stress on the knees, I would hold a PVC pipe over their toes. The athlete would then be instructed to execute the movement without letting their knees touch the pipe.  


Reverse Lunge


Baseball and softball require movements that demand strength, stability, and dynamic balance on one leg. Teaching kids how to control their bodyweight on one leg is absolutely critical for developing high-level rotary patterns. Lunge variations are an awesome way to get kids started. 


Out of all the lunge variations, I like the reverse lunge because emphasizes posterior force production – something baseball players commonly rely on while rotating and sprinting. When compared to the forward lunge, the reverse lunge is a little more knee friendly and can be a little easier in terms of controlling the torso/midsection. 


No matter what variation you use, you’ll find out pretty quickly that kids are horrible at moving on one leg. They have a tough time bracing their midsection, controlling excessive movement of the lead leg in the sagittal plane (wobbling), and navigating the eccentric portion of the movement (slamming their knee into the ground). This one was the toughest to execute by far – but it was also the biggest area of growth in most of our athletes.


What to look for:

  • Taking one leg back and gently touching the ground with their knee (some like the knee to hover above the ground – I’m indifferent)
  • Chest up, chin up, midsection braced
  • Shoulders over hips, back knee roughly lines up underneath shoulders (bigger lunge requires more hip extension, find happy medium where they can control it all the way through)
  • Eyes focused on an external focal point for dynamic balance
  • Gripping the ground with the back toe (as opposed to taking your laces into the ground)
  • Hands at side, on hips, or behind head
  • Knee stays behind toes (slight positive shin angle is fine) 


Most kids are going to dump their chest forward when lunging back because they don’t have the strength, stability, or belief that they’ll come back up. Many will also slam their knee into the ground because they don’t have the strength to control the movement all the way to the ground. In these cases, it’s a good idea to start from the bottom position and have kids work up from there. 


You can also use a PVC pipe or pole to create awareness for how their knees are working in relationship to their heels. An easy fix to excessive forward knee movement is to get the athlete to lunge a little farther back. This creates more space for the knees and hips to work in a friendlier position. 


There aren’t a lot of magic tricks when it comes to working on a lunge movement. The best thing you can do is get kids to practice this one early and often. If kids aren’t able to control their body weight on one leg, there’s a good chance they’ll start to leak out energy when executive more complex and sport-specific tasks (hitting, pitching, sprinting). Aside from the hinge, a single leg variation is the most important movement you can incorporate into your daily warm up. Don’t be afraid if it looks ugly at first – it will improve with time and technique.


Glute Bridge


The glute bridge builds off of the hip hinge by building strength and awareness in the posterior chain and midsection. It forces athletes to learn how to use the big muscles (glutes, hamstrings) for movement instead of the lower back. The isometric hold at the top also creates a stability component that helps strengthen the spinal stabilizers. 


What to look for:

  • Athlete starts on the ground in the supine position with knees bent, feet in ground
  • Squeeze glutes to initiate movement
  • Hips roughly line up with shoulders/knees at top of movement
  • Two second hold at the top
  • Hips gently lower back down to the ground (controlling the eccentric portion)
  • Entire foot, shoulders, head, and arms stay connected to ground
  • Knees drive up and out (as opposed to in)


This movement is a pretty simple way to get the posterior chain engaged prior to practice. Make sure the movement is being created through the glutes and hamstrings, not the lower back (you’d see excessive arching in the spine). Holding the movement at the top helps create for greater awareness in the glutes/hamstrings. These mind muscle connections are important to create so they can translate to efficient lower body movements.  


Belly Breath


While the breath isn’t a physical movement, it is one of the most important skills we teach and reinforce on a daily basis at camp. Like we’ve talked about before, the breath is going to be the bridge between the physical and mental game for players. The combination of physical benefits (lowered heart rate, increased oxygen to brain) and mental benefits (moving on from the last pitch, being present) from the breath makes it a crucial starting point when teaching the mental game to kids


What to look for:

  • Athlete starts in supine position on ground
  • Eyes open or closed
  • One hand on chest, other hand on belly
  • Make the hand on your belly rise
  • The hand on your chest should stay relatively still
  • Breathe in through nose, out through mouth


I like to give athletes the freedom to practice their breath and utilize it until they feel relaxed. Your role as a coach during this time is minimal. All you’re trying to do is create an environment where kids are able to focus on their breath and get their mind off the clutter in their life. Being present pitch to pitch is a crucial skill in sports. If our mind is on anything but getting the task in front of us done, we won’t be able to executive it efficiently or effectively. 


Dynamic Warm Up


After the hinge, squat, lunge, bridge, and breath have been completed, we then move to the more dynamic portion of our warm up. This portion is centered on getting kids to move their feet and sync up their upper half while completing a variety of different movements. While I won’t go into great detail about execution, below are the movements we would incorporate to help get a sweat going before catch play:


Side Shuffle with Overhead Reach

  • A frontal plane movement that teaches athletes how to gain ground laterally

Power Skip

  • Emphasis on getting off the ground, jumping/landing on one leg 

Carioca

  • Getting the hips working in a more transverse plane (rotation)

Backwards Run

  • Great for general athleticism, posture, single leg strength/stability 

Build Ups

  • Bridging into sprint work 


Coaches have a lot of freedom to add or subtract movements to this portion of the warm up. The overall theme is to make sure athletes are learning how to get comfortable moving their feet while expressing body control in various positions. It’s also important to utilize this as a way to elevate heart rate get blood flowing to the extremities. The warm up is designed to prepare athletes to throw – we do NOT throw to warm up. 


Final Thoughts – Warm Up


As a coach, the warm up period is an excellent time to teach good habits which will directly impact how kids move on the field. The earlier you can teach kids these movements the better. There’s nothing exciting about executing good quality movement – but there’s nothing out there that can replace it. Using a well-executed warm up is an awesome way to keep kids healthy by building an early foundation in strength, motor control, and body awareness. Don’t let the monotony of a warm up period ruin the potential impact it can have on kids.


Feel free to experiment with different moves, cues, and ideas. Keep things simple early on so kids can catch on. Constantly drill them on how to execute the movement so it starts to become ingrained. Add things (jump/land mechanics, push/pull, etc.) as they start to get a better feel for how to move. Individualize based on the needs of each player. 


Feel free to reach out with any questions or thoughts. 


Keep learning and growing. 

Common Hitting Flaws: Creating a Better Move to the Ball

A common mistake we see with a lot of our hitters is how they attempt to load after their move out of balance. This move is crucial to the rotary sequence and the movements that occur later up the chain. An inefficient linear move is going to put athletes in a poor position to really optimize their sequence. Since rotation swings the bat, we want to make sure athletes are in good positions in foot plant that enable them to do so with great power and efficiency.


To describe the move, we’ll use the terms negative and positive move. A negative move is when the hitter is going to create a substantial amount of “sway” in the direction of the catcher (golf has done similar work with this). You can identify this sway by looking at the hitter’s head in his set up position and when he gets to the peak of his move out of balance. If you draw a line on the hitter’s head in his set up, you can identify negative sway if there is a lot of space between the line and his head when he takes his move out of balance.


This move is going to give kids the tendency to get stuck on their backside, lose angles with their upper half, pull off balls, and get beat when facing velocity. Kids with a lot of negative sway tend to have narrower bases, lose power, struggle to stay through the ball, and have difficulties timing pitches in games. It’s a move that’s easier to get away with while utilizing tee work or flips because of the lack of a time constraint. It also gives kids the illusion they’re loading because a load in the traditional sense is thought of as a move back. 


Instead, we like to teach the “load” as a positive move (think of the move a pitcher makes down the mound). Instead of swaying back to create power, we encourage kids to gain ground and work into the ground to generate a more forceful linear move. When the front foot comes up, the rear hip should begin to move forward – just like a pitcher. The head of the batter should move down and out – as opposed to up (working out of the ground) and back (negative sway). Below are a few examples for what this move should look like:


(Visual from hyperlink below)

Mookie Betts

Yordan Alvarez

Christian Yelich

(Visual from hyperlink below)

Barry Bonds

Cody Bellinger


Notice how the athletes immediately begin to move forward as their foot comes out of balance (some quicker, some slower). Their heads work down into the ground and out towards the pitcher. Once their front foot lands, their head stabilizes and does not continue to move forward. Their head stays over the center of their body helping them maintain a dynamic balance. They hold an attacking posture with their shoulders (front shoulder down, back shoulder up). As their foot moves forward, their hands move back to create their ideal stretch/hip shoulder separation. 


It’s important to know that this is not a rushed move – we are not advocating kids to quickly pick up and put their foot down. We encourage kids to ride into their front side, maintain a vertical shin on the rear leg (we’re not pushing out of it), and keep tension in the rear hip/glute region while moving forward. We want to create a move that is driven by the posterior chain


We also want to make sure kids are utilizing the lead leg for its main function – a timing mechanism. If we take a quick, uncontrolled move to the ball with our lead leg, we lose adjustability to various speeds/locations throughout the zone. A common cue we like to give kids is “earlier and slower.” Each kid is going to have his own style, but make sure they’re not rushing to put their foot down. 


If you have a player that is struggling with a lot of negative sway, you can attack the issue from a few different angles. I like starting the movement progression with a medicine ball to eliminate the worry about squaring up the ball. From here, you can get athletes in a more narrow set up to eliminate the need to move back. The wider athletes get, the more of a need they feel to move back to load. 


A popular drill we like to use is the “Belly Drill” – in reference to Cody Bellinger’s positive move to the ball (see link above). With a narrow stance (feet under shoulders, have the athletes take one positive move to the ball without any sway back. As for cues we like to use, getting the athlete to think “down and out.” When an athlete can get a feel for this movement with the medicine ball, we like to progress to a bat and can utilize it in our tee work, front toss, and even BP/machine variations. It all depends on the hitter, what you see, and how it’s transferring to more game-like conditions. 


Below is an example of one of our athletes Cole utilizing the Belly drill. By simplifying his move to the ball, Cole was able to get much more out of his lower half (see the before/after still shots of him at footstrike). He’s since adopted a narrower stance to help him feel this move – something you can try with your athletes. 


Below was Cole’s original swing

Below are still shots of him at his move out of balance and at foot strike. You’ll notice how the Belly move helped clean up a lot of negative sway and put him in a better position at foot strike.

Another one of our athletes Nathan has utilized the Belly drill to simplify his move to the ball. A lot of the balls Nathan mishit were pull side ground balls. In the before/after videos, you’ll notice Nathan has simplified his leg kick (we still encouraged him to use a leg kick if he felt comfortable with it) and takes a much quicker route to the ball. This has helped him utilize the middle of the field more and prevents him from spinning off on balls the way he used to.

Before

After

A different example of teaching this move is what we did with Sid. Sid showed a big negative move in which he lost his rear shoulder prematurely and inhibited his ability to work into the ground. This move also caused him to feel unbalanced. As a result, we tried to get him to think about keeping his front shoulder down while staying balanced. This helped create a more direct move to the ball in which he felt much more balanced (not balance in the traditional sense, but a dynamic balance in which the athlete feels under control while executing the movement). Keeping his front shoulder down helped Sid hold an attacking posture with his shoulders and ultimately helped him work into the ground better.  

Before

After 

To see these changes at the MLB level, check out these swing transformations from Betts, George Springer, and Justin Turner. 


It’s important to film and refilm when you’re making adjustments with athletes so they can connect a feel with what is real. Get film when the athlete feels really good and when the ball is popping off the bat. Use this feedback for when the athlete can start to go astray. Bad swing habits are just like bad habits in real life – they never go away. Because of this, it’s important to mix in refresher days so the new pattern can continue to stick. 


Feel free to reach out with any thoughts, questions, or examples of your own. Keep learning and growing.

Thoughts from Fielding Discussion

Our fielding roundtable discussion was built around the theme of mastering catch and throw. If you cannot execute the basics of catch and throw from your position, you will not play this game at a high level. Carmen talked about how one of the first things college coaches ask him when talking about prospective student athletes is if they can field their position. It’s very easy to get caught up in the swing and trying to launch balls into outer space, but nothing can replace catching and throwing exceptionally well. More games are lost rather than won. Teams who play great defense don’t beat themselves. 


Mastering the Basics


Before grabbing the fungos, coaches must learn how to police catch play. We go into great detail about this in our blog article “Summer Camp Recap – Teaching Catch Play.” Carmen cannot emphasize enough that the time you play catch for is the most important part of your practice. If kids can’t make throws from 120 feet in catch play, don’t expect them to throw the ball across the diamond with precision. If you police it, it will improve with time.


A visual of the sweet spot of the glove, from Frawley/Correa ABCA Presentation


An important concept to emphasize early on with catch play is creating feel for the sweet spot in the glove. Just the way your bat has a sweet spot, your glove also has a sweet spot located between your thumb, pointer finger, and middle finger. You know if you’ve got one in the sweet spot if you hear a nice crisp pop on the catch. If you don’t hear this pop, you’ve missed the sweet spot. To create the proper sound, players should try to “stick” the ball out in front of their eyes. The ball shouldn’t take you back on the catch. If the ball takes you to your left or right, move your feet and catch it out front. Catch with your feet, throw with your feet. 


All infielders should get into this position as the ball enters the hitting zone


When you start your ground ball work, it is important you put a premium on the set up/ready position. This should mirror the athletic position – knees bent, feet slightly wider than shoulder width, head over center of mass, arms slightly bent outside of hips. A lot of kids will start with their hands inside their hips almost pre-set in a catch position. This puts the athlete in a disadvantageous position and can inhibit range. Players must be able to get into this position every single pitch. Just like hitting, a poor set up position can throw off the events that follow. 


Along with this, infielders must understand how to create pre-pitch movement. Through years in professional baseball, Carmen has learned that the most range is lost from this position. Kids with stagnant feet as the ball enters the hitting circle struggle to get good reads off the bat. Just as a football defensive end depends on his first two steps, infielders need their first two steps to be crisp. Your ability to do this largely depends on your pre pitch move. 


Teaching a tennis style “hop” is a great move for infielders learning pre-pitch movement


We like to teach a tennis styled “hop” for infielders just learning the pre-pitch move. This helps get athletes on the balls of their feet as opposed to being flat on their heels. The timing of the move should happen right around where the ball meets the dirt/grass cutout. Athletes can hop from a narrow or wider base depending on what feels most comfortable. The right/left footwork prior to the hop should depend on which side of the field the athlete is covering. For example, third basemen should go right/left because they have the line covered to their right. First basemen should go left/right because they have the line covered to their left.


Jaden utilizing a split hop pre-pitch move


With this, the hop is not the only move you can make. You can step into it, sway into it, or even step back based on the position and type of athlete. The timing for the move remains the same. If you’re working with kids just getting a feel for the infield, a simple right/left step “into the circle” is a great place to start.  


We have put a premium on this move in our team practices. Below are a few before and after examples of pre pitch moved with a few of our high school kids. 

Before

After


From here, we turn the emphasis to good catch positions. Some of the things we look for are a triangular position where the athlete gets a wide base and their head is over their center of mass. The right foot should be in the ground and the left toe should be up. The head, ball, and glove should be in line with the glove creating a ramp. The glove should be presented out in front of the athlete’s eyes as opposed to closer to their belly button. The glutes should be pushed out in a hinge position where the athlete’s back is tabletopped. The feet should be slightly staggered with the left foot slightly in front of the right (from right/left footwork). 


Jeter showing a quality catch position


A good question we received was whether you should teach kids to funnel with two hands or play through with one. We think both are great options and the style is up to the individual. For kids just starting out, we find a lot of value in teaching kids how to catch one handed. Most coaches are going to teach kids to use two hands and get in front of everything, so reinforcing a position where the athlete is forced to use one hand can free up a lot of athleticism. Kids who funnel can also have a tendency to lose the fingers and funnel the ball too quickly towards the belly button. On the flip side, make sure kids keep a relaxed arm when playing with one hand. A straightened arm creates tension that limits freedom, quickness, and adjustability.  


Progressions to a Moving Ball


After creating a feel for good catch positions, we like to incorporate the footwork by introducing right-lefting the ball. When the ball comes off the bat, infielders must be able to get to the right of the ball to read the incoming hop. To understand this, see the visual below. You don’t see the shape of the object until you’re able to tilt it slightly to the right. In the infield, you won’t be able to get an accurate read on the hops until you can get an angle on the batted ball. As a result, right-lefting the ball has a huge impact on hop selection. 


You can’t see the shape of the object until you create a slight angle (get to the right of it)


You can teach this move to athletes using some basic constraint work. Place an object in front of the athlete and roll/hit fungos directly at the object. The constraint of the object forces the athlete to work to the right of the ball without taking a large “banana” route to the ball. Below is a video of one of our athletes practicing this move using a bucket as his constraint. 


Utilizing a bucket constraint can help kids get a feel for right-lefting the ball


Right-lefting the catch is also an important move to create good catch positions and direction towards the target. As Carmen says best, the ball always wants to gain ground. Being able to right/left the catch helps the athlete redirect energy as opposed to catching, stopping, and then starting back up again. It also helps athletes learn how to time up their glove presentation as their right foot plants. Just the way you walk, your left arm wants to work in tangent with your right leg. As the right leg plants, the glove should start to present and create a ramp for the ball. As the left leg lands, the heel drops first and the toe drops left. We call this a heel-toe move (see Lindor). It gives the infielder adjustability and helps them stay grounded in their right foot as opposed to leaking out.  


Two drills that help teach the right/left footwork are toe up and leg up. The toe up drill helps create a feel for the heel-toe move with the left leg at catch. The athlete should plant the heel as they catch the ball and replace feet using a 2 step approach. Coaches can roll huggers and short hops to the athlete. See the video below from Tucker Frawley and Kainoa Correa’s 2019 ABCA Presentation for what this should look like.


The leg up drill is a progression off the toe up drill which reinforces the same right-left principles from a more dynamic position. The left leg should be back with the glove hand forward and the right leg planted in the ground. As the ball is rolled, the athlete begins to take his glove and left foot to the ground using the heel-toe technique. See video below from the Frawley and Correa presentation for what this should look like.  


Teaching athletes how to cut down distance and play on an “x” are important concepts when infielders start to react to a moving ball. A drill you can use to teach cutting down distance is the line and circle drill. Draw a straight line from the athlete’s starting position and extend it anywhere from 5-8’ depending on the distance from the fungo hitter. At the end of the line, trace out a circle big enough that the athlete can get into a good catch position inside of it. Hit ground balls on the line at the athlete and try to get them to catch the ball inside the circle using good right/left footwork. If the athlete can’t catch the ball in the circle, they haven’t cut down enough distance. You can also use the line as a visual for athletes to get to the right of the ball. 


When moving left and right, infielders should strive to play the ball and cut down angles on a “x” as opposed to a “t”. Playing on an x (see Bregman interview with A-Rod) forces athletes to take more direct routes to the ball as opposed to working predominantly east and west. This helps cut down distance and gives infielders more time to make throws. Certain types of batted balls will require different angles. Carmen says best: “The ball will dictate the play.” Get your kids to learn how to play balls on as many different angles as possible. No one has ever gotten the same exact ground ball in a game twice. Your practices should mirror that unpredictability (see our previous blog post for more on variable practice). 


As Bregman alluded to in the interview, certain positions are going to have different concentrations of batted balls. Below is a heat map from Frawley and Correa’s ABCA Presentation showing the ground ball distribution between Andrelton Simmons and Nolan Arenado. 


As a coach, the fungos you hit in practice should reflect the heat map above. Middle infielders should learn how to be comfortable catching and throwing when moving far to their left and right. Corner infielders should be able to catch and throw moving in and moving back. Some balls are going to require infielders to retreat so they can catch the big hop. See Anthony Rizzo for an example of this. 


Catching and throwing on the run is an important skill for both types of infielders. To help athletes get a feel for this, start by rolling kids huggers/tossing short hops from 8-10’ away. Get kids to learn how to get to the right of the ball, catch off their glove foot, and throw off their post (right) foot. The post foot should be angled so the middle of the shoe is facing their target – also known as a toe in move. The shoulders should be angled so the athlete can transfer and deliver the ball from a lower slot. This move is similar to the action a hitter takes when they try to match the plane for a pitch down in the zone. Fielders cannot throw from just one angle – they need to be able to utilize a variety of angles to be most effective. 


Infielders must be able to use a wide range of arm slots


When you can get kids to understand a variety of plays, teach them when to utilize each one using the four second pace. In 2019 at the MLB level, more than half the league got from home to first between 3.93 and 4.40 seconds. As an infielder, you need to be able to make plays within this time constraint. Building this internal clock is going to determine whether you take a four step pattern, two step, get rid of it right away, or play it on the run. The best way to get a feel for this is to us a stopwatch or live baserunners. If guys can’t consistently make plays within this time constraint, it’s worth examining their routes to the ball, footwork after the catch, or repositioning them to adjust for their arm/range. 


Double Plays


Double plays are a great progression off basic infield work to teach various moves, feeds, and footwork. We work on these consistently at our team practices. Just like ground balls, different double play feeds are going to depend on the feed. At second base, you’re going to have three basic moves: step back, step across, and step behind. On all three feeds, the second baseman is going to take their left foot to the bag and their right foot to the ball (on the catch). Carmen also brought up second basemen should also try to finish their feed with their knees facing towards first base to help protect against awkward side collisions. 


The step back is going to be your basic move on a good feed without any significant time constraints. The second baseman is simply going to step back to clear the base path and make the feed. The step behind is going to be for the feed that misses the second baseman arm side. On the throw, the second baseman should adjust and step behind the bag to make the feed. Infielders are protected behind the bag just the way they are protected outside the sliding lane. The step across feed is for the ball that takes the shortstop or third baseman away from the bag. By stepping across, second basemen are able to cut down distance and shorten the time for their feed given the time constraint of the batted ball. See our instagram post from the past to get a feel for what these should look like. Also see Jose Altuve for the step back/across moves in a game situation.  


On plays where turning two isn’t likely, second baseman should turn into a first baseman and sell out to get the lead runner. In doing this, defenses are able to keep a runner out of scoring position and keep the double play in tact. If the infielder taking the ground ball bobbles a potential double play feed, the play should automatically go to one. Outs are a premium as a defense. Don’t give one away because you tried to rush a double play feed when you had a chance to get the guy at first. 


At shortstop, it’s important to play behind the bag when receiving double play feeds. You don’t want to cheat towards the glove side part of the bag and get beat arm side on an errant throw. We always want to secure the out at second base (see Gleyber Torres secure the catch before making a feed to first). When turning double plays as a shortstop, the footwork is flipped. The left foot goes to the ball and the right foot swipes across the back of the bag. Footwork should be aligned as close to first base without impeding in the baseline. If the throw takes the shortstop far to their glove side, you can utilize a spin to get momentum back towards first base. If the ball misses arm side, have the athlete take their left foot to the back and right to the ball – just like a second baseman. See our previous instagram video for what these should look like. 


Both middle infielders should learn how to deflect when receiving good feeds on double plays. Deflecting happens when the person catching transfers from glove to hand without closing their glove (see Altuve). This makes for a quicker transition that is necessary to make plays within a four second pace. Athletes should deflect on feeds that are within the framework of their body – chin to belt, shoulder width. If feeds take athletes outside of this framework, the athlete should catch one handed and transfer in the middle of their body. Taking two hands on a bad feed can limit range and create poor throw positions by taking the athlete away from their target. 


Make the Exceptional Play


On a final note, too much of infield instruction is monotonous. Ground balls are hit right at kids and two hands need to be used for everything. This is simply not how the game is played. While mastering the basics is crucial, athletes need to learn how to make the exceptional play. They need to be able to dive and snag a ball heading down the left field line. They need to be able to make the spin six up the middle as a shortstop. They need to be able to make that Jeter play deep in the hole and cut down the lead runner at second. 


If you don’t give kids the freedom to play with athleticism and make a variety of plays, you’ll never be able to do them in games. Your practices will either free your kids to be themselves or constrain them into a mold driven by fear. Keep things fun and make the extraordinary play.  


Thoughts from Hitting Discussion

Hitting a baseball is arguably the hardest feat to do in all of sports – and teaching it is even tougher. At our most recent baseball roundtable discussion, we tackled the subject of hitting and dissected it from several different angles. With everything we have to offer, there is still quite a lot we don’t know and having conversations with players and coaches from the area is a great way to create a collaborative learning environment. These discussions really push our organization forward and it is a great joy to be able to share our experiences with others while also learning from theirs. 


Being in the private sector has given us the opportunity to see different swings, work with different kinds of players, absorb different ideas, and experiment with various tools, cues, and drills. Through this, we have ultimately learned that there is no “cookie cutter” model when teaching hitting. As a coach, it is crucial that you learn how to work with different athletes by building a large toolbox. Certain athletes are going to respond to different cues, drills, or implements you use with them. Your effectiveness as a coach is going to be minimal if you don’t have the ability to find something that works for several different athletes. Speak multiple languages with your hitters. Know how they think, what they feel, and what they need to be successful in the box. 


From a player’s perspective, it is imperative you understand one language – your own. Know what helps you feel good in the box and what you need to do to create those feelings. Understand your strengths and use them to compensate for what you don’t do so well. Know your routines, mindset, and approach down to a tee. Know the bad habits we tend to fall into and how we can make adjustments from game to game. You’re going to experience different coaches, training environments, and situations throughout your playing career. If you want to be able to navigate these with consistent success, start to take ownership of your training. With all the information out today, there is no excuse for you to become a victim of your circumstances. Do your homework, know thyself. 


A quote Carmen always comes back to is: “You either like it, love it, or live it.” You as a player are the only one that can answer that question for yourself. To play this game at a high level requires discipline, sacrifice, and an uncommon commitment to greatness. For you to get to the levels you want to go, you need to be honest with yourself. You need to know exactly where you are as a player, where you want to go, and what you need to do to get there. This is why it is crucial you have the right coaches around you. Don’t seek a coach that tells you how good you are – find someone who can be honest with you and tell you things you don’t want to hear. If we lie to kids because we want them to feel good, we are doing them a disservice. Be honest with your kids and be willing to have difficult conversations. It’s only going to help them in the long run. 


As talked about before, one thing we always come back to when training hitters is putting a premium on your practice. An idea Carmen brought up from Bobby Valentine to reinforce this was Bobby’s 6 P’s: “Proper Preparation Prevents Piss Poor Performance.” The success – or lack of – that you have on the field is going to reflect the quality and consistency of your training. If you aren’t having the success you think you should be in games, it’s worth revisiting how you’re preparing for competition. As Abraham Lincoln once said, “Give me six hours to chop down a tree and I will spend the first four sharping the ax.” 


With the conclusion of the World Series happening this week, we decided to tie in the Nationals impressive series victory by bringing up a recent article talking about Juan Soto’s unique approach in the box. The thing that really stuck out to us was how his father Juan Sr. trained him to become a big league caliber player. Check out this excerpt from Juan Sr. in the article below: 


It’s like I always told him — when you get into the batter’s box to hit, you own that space. Nobody can intimidate you. On the contrary, those guys [the pitchers] are the ones who should be afraid of you. And you have to show them why.  


We love this approach because it emphasizes the importance of competing with confidence. If you don’t have a strong belief in yourself and your abilities as a hitter, you will crumble when faced with adversity. Confidence is something Soto never lacked growing up – and it’s a big reason why he’s been able to have success at the MLB level in some of the game’s biggest stages.  


Another theme that drove our conversation was the idea of “mechanics cure all.” If players aren’t having success on the field, most coaches jump right to the mechanics part and try to make tricky mechanical adjustments in the middle of the competitive season. While most of these coaches are well intentioned, we don’t agree with this approach at all. We believe there is a checklist of boxes you need to go through before you try to change a player’s movement patterns. We do this because:


  1. It is very hard to make meaningful mechanical changes.
  2. Our thoughts are going to have a direct correlation to our physical movement patterns. Think about how your swing is going to look like when swinging for the fences vs. trying to hit a ground ball. 
  3. Everyone is different. How do you know the changes you’re trying to create are optimal for that athlete?
  4. Research consistently shows players with an external focus of attention (over an internal focus of attention) perform better in game situations. Making mechanical changes creates a tendency to focus internally as opposed to externally.


There is a time and place to focus on movement patterns, but this cannot be your only tool as a coach. Kids need to learn and practice tools that help them compete in the batter’s box. If a player is struggling in the batter’s box, we suggest you go through this checklist before even thinking about touching their mechanics:


  1. How is the player seeing the ball? Visual misreads can account for a large array of physical mistakes which include timing, pitch recognition, premature weight shift, wrist roll, poor direction, and knowledge of the strike zone. If you have kids struggling with vision, make sure they’re getting two eyes on the pitcher in their stance. Kids who really close off their front shoulder will have a difficult time doing this. There are seven muscles in each eye – use them to your advantage. Sandy Koufax illustrated this idea best when he said the best hitters he ever saw all picked him up with two eyes. 
  2. Do they have a plan/approach at the plate? How are they managing the strike zone? In the article from above, Juan Soto talked about hunting one pitch in one location. If hitters are looking for everything, they’re not ready for anything. A lot of the “funks” we get ourselves into are because we’re lost our ability to manage the strike zone. The strike zone is to baseball is what the line of scrimmage is to football – teams that win both win games. See our previous blog post for more information about how to build an approach in the box. 
  3. How are they breathing? The belly breath does a multitude of things to help get us in a state of mind where we can relax and trust in our training. If you have an athlete who can’t control their nerves, teaching them how to breathe is a great place to start. 
  4. What are their thought patterns when playing? The best athletes in the world think very little in competition. Considering the reactionary nature of sports, players simply don’t have time to think. Confident players play with their eyes. Players who lack confidence become victim of their negative thought patterns. If you have an athlete struggling with this, it’s worth developing some positive self-talk
  5. What do they see/feel when they’re having success? Some simple awareness can provide players with a strong foundation for how to get back on track. If you can reconnect with times where the player was at their best through visuals (pictures/film), helpful cues, or drills, you can get them back on their feet much quicker without any mechanical interventions. 
  6. Are they feeling any external pressure from coaches, parents, teammates, or scouts? The last thing you want to do is turn games into a three-hour timeout. Games should be exciting for kids – it’s their opportunity to show the hard work they’ve put in to refine their skills. Give them the freedom to compete, make mistakes, ultimately be themselves on the field. Players will never be able to let their abilities shine if they’re constantly worried about screwing up.  


Movement Patterns


When looking at movement patterns in athletes, it’s important to understand principles vs. styles. Principles are key movements that all high level hitters share while styles are slight variations in swings that help different hitters be successful. For example, a principle for hitters would be the front leg firming and bracing after landing while a style would be a leg kick vs. toe tap timing mechanism. As a coach, you want to be able to teach the principles of the swing while allowing for room for individualization. You don’t want to try to teach styles as if they’re principles – you’re more likely to coach athletes out of beneficial patterns. We all have a unique fingerprint as to how we move – don’t coach kids out of these movements.   


Two positions we try to put a premium on with hitters are the stance and foot plant. In a hitter’s stance, the athlete should be in a position of balance where their head is over their belly button and they have a slight bend in their knees. They should have two eyes on the pitcher and be in a position where they can get a clear visual of the ball coming in. Athletes should also have some sort of movement/rhythm in their stance whether it be their barrel or feet. We don’t want to stand still like a statue in the box – we want to match the movement the pitcher is creating. 


Stances allow for quite a bit of variation between athletes. Some examples include the width of your base, standing taller/lower, starting open or closed, the position of your hands/bat, and the angle of your back foot. Give kids the freedom to experiment with different things, but always make sure the big rocks are in play when trying new moves. As for common faults, we see a lot of athletes who are very still in the box, start with their weight heavily on their backside, and close off their front shoulder quite a bit. A helpful cue we like to use to help create good head/eye positions is “try to watch your favorite TV show in centerfield.”  


At foot plant, athletes should again land in balance with their head over their center of mass (belly button). They should be in a hinge position where their glutes are behind their heels and their chest is over the plate. Both heels hold the ground and knees stay between the athlete’s feet. Visual field for the athlete is in front of the ball. Hands are inside elbows with the top hand angled slightly in front of the bottom hand. The hands remain down the line of the pitch and do not get lost far behind the athlete’s torso. The barrel is angled over the athlete’s center of mass and roughly shares a vertical relationship to the ground. 


The shoulders are going to be in an attacking position where the back shoulder is slightly higher than the front shoulder and the back elbow is up (some guys slot a little sooner than others). The shoulders are also going to remain closed while the hips slightly open – creating hip/shoulder separation. This gives the athlete the ability to store energy just the way you would when pulling a rubber band back. The anchor point to pull back from would be the lower half and the rubber band pulling back would be the upper half. 


While these are some general rules of thumb, there are plenty of athletes that do things differently (see below). While we wouldn’t necessarily teach some of these positions, we definitely wouldn’t coach them out of kids if they had a lot of success with them. Some moves are going to be easier to get away with when the velocity isn’t as demanding, so keep an eye on how patterns fair against better competition. Adjust accordingly, but don’t jump to make changes if they don’t look aesthetically pleasing. Mechanics don’t win baseball games – competitors do. 


Kyle Tucker “keeping his knob to the catcher”


As for some common flaws, we see kids over rotate their shoulders, lose balance and get stuck on their backside, dive into the plate and lose their hinge, land with their torso vertical to the ground, and lose angles with their upper half. As for teaching points, we like to start with the lower half and see how everything organizes itself from there. Teach kids how to hinge, create a positive move forward, get a bigger base, and work the hip line into the ground while keeping weight distribution in the middle of both feet. Kids will seek to create tension in bad places (ex: counter-rotating the shoulders) if they can’t create it with the lower half. 


As for the upper half, give kids a general rule of thumb and let them experiment by picking up different bats and getting a feel for how the hands and barrel want to work. For example, long bats can help guys who lose angles over the plate and short bats can help kids who lose their hands behind their torso. Take note of what works and be as creative as you’d like. The less verbal cueing the better. 


Below are some other thoughts about the swing that were brought up throughout our discussion:

  • Get kids to work on creating a slightly uphill swing plane. A lot of kids that we see come in with really steep attack angle (hands directly to ball) that makes it very difficult to square up pitches in the air. A lot of this can be cleaned up in kids with good cueing (ex: hit it high and hard).


F
From The Science of Hitting by Ted Williams

  • Be careful when teaching kids to “keep their weight back.” Our intention is to move forward. The load is not going to be a move where the athlete shifts their weight towards the catcher. Get kids to gain ground and create a positive move towards the pitcher. See our past blog post for more information about this.


  • Where your head goes, your body will follow. If the head cannot stabilize after foot plant, the athlete’s body will continue to drift forward and out of contact. After foot plant, you want athletes to rotate around an imaginary steel rod that runs from their midsection out through the top of their head. If the torso rotates above this line, athletes will have the tendency to “pull off” the ball. 


  • Contact should come out in front off of the lead leg. When working on the tee, make sure it is set up in front of the athlete so they can catch the ball out in front. If you have an athlete that can’t get the ball off the ground, give them a visual in front of the plate where contact should happen. 


  • The back knee should create an inside move after foot plant where it works down and in as the rear hip starts to rotate forward and the front hip firms/braces. The ground is your best friend as a hitter – use it to your advantage.  


  • Beware of “one plane swings.” Athletes are going to have to make adjustments to a multitude of pitches in games. Don’t just let them tee off on a pitch middle-middle belt down – get them to learn how to drive a variety of pitches. 


Posture varies based on the location of the pitch

If you want the itinerary or full sheet of visuals from the event, reach out and we can send those to you!


Feel free to reach out with any questions or concerns. Keep learning, growing, and doing damage in the box.

Thoughts from Cressey Sports Performance Fall Seminar

I was able to recently attend the Cressey Sports Performance Fall Seminar September 21-22. It was the first time I was able to make it up to their location in Massachusetts. Being someone who has followed their work for quite a while, it was a great opportunity to meet and collaborate with the staff, network with others, and learn a great deal throughout the weekend.

The topics of the sessions were quite diverse and covered everything from business, psychology, sports performance, general population, ACL rehab, pitching, and more. Below are some of my thoughts about what I learned and why I believe they’ve built an awesome culture at CSP.  

The first thing you could notice with the entire staff was the synergy that connected them. While everyone shared foundational knowledge about training, each staff member brought to the table a unique skill set and expertise. They were encouraged to be themselves and to train people as they saw fit while maintaining certain core principles (incorporating a push/pull, squat/hinge, etc.). The CSP staff didn’t utilize a step-by-step instruction manual – they had an adaptable toolbox which was suited towards their strengths

Considering the complexity of coaching human beings, being adaptable is one of the most important skills you can have as a coach. Some kids will respond to certain exercises, cues, or drills better than others. Your job as a coach is not to shove a style down someone’s throat, but to use feedback from the athlete to build their own. Several of the presenters mentioned the idea of autonomy – giving athletes some say in their training process. Nobody wants a dictator for a coach. By including athletes in their development plan, you’re able to get better buy in, more engagement, increased enthusiasm, and better results. 

This autonomy is delivered through relationship driven coaching. As a professional, you must put a premium on the personal relationships you have people. If you’re going to get the best out of someone, they need to know that you care about them as a human being. You need to know who the athlete is, what excites them, their interests outside of training, why they train, and what makes their personality unique. Whoever you are working with must be able to trust you – the single most important factor when building buy-in. If you go about this process transactionally, athletes are going to see right through you. If you take the time to slow cook your relationship and really get to know them as individuals, you are going to have far more success.

This coach-athlete relationship is more important than ever with the rise of anxiety and depression related issues. It’s estimated that 70 percent of teens state their peers show symptoms of anxiety and depression. People who suffer from anxiety have trouble concentrating, feel the need to be a perfectionist, and lack trust. This is a crucial component as the coach-athlete relationship depends heavily on trust. If your athletes do not perceive you as someone that cares about them and can help them, you will not be able to build sufficient buy-in. 

When dealing with athletes that show symptoms of anxiety, it’s important to be an active listener. Let the athlete share their thoughts and concerns. Aim to learn the true source of their anxiety and ultimately try to alter their perception of their limitations. If you can change an athlete’s thought process, you can help them develop the courage to overcome it through acknowledgement, positive feedback, and consistent support. As a result, your interactions on the playing field or training floor can have a profound impact on the life of that individual beyond sport – our ultimate goal. Athletic performance cannot be your main focus when dealing with young men and women. Above all else, coaches must strive to build optimal well-being within the individuals that they come into contact with. 

At the Saturday bonus session, John O’Neil and Kyle Driscoll talked about their summer collegiate pitcher development program that they ran for 10 weeks with just over 40 arms. The program had great success and helped numerous pitchers get stronger, more efficient, and gain more velocity. Aside from the technical components of the program, what I found really interesting was how they used competition to fuel greater returns this year. One of the things they did right out of the gate was pick everyone’s throwing partners. Since the athletes would spend a lot of time with their throwing partner, John and Kyle specifically chose partners that would get the most out of each other. Some of the factors they took into account were motivation levels, previous training experience, abilities, movement patterns, and personalities. When blended just right, they developed a tandem that worked every single day to get the most out of themselves and each other. 

This is something John and Kyle believed really helped the program this year as opposed to last year. By utilizing the dynamic systems theory and really placing a priority on creating a competitive environment, throwers in their program thrived seeing average velocity gains of 3-4 mph. I thought this was a great teaching point for coaches and athletes: If you want to really challenge yourself in catch play, pair yourself up with someone who will get the best out of you. Bounce ideas off of each other, try new things out, and compete your ass off to shove it down their throat every single day. You’re only as good as the people you surround yourself with

This leads to another point that was driven throughout the clinic – master the basics before getting caught up in the details. The programs CSP writes for athletes and general population clients are largely the same. A lot of the exercises they describe are not exciting at all – they’re basic, fundamental movements. There’s nothing sexy about executing a quality hip hinge or snapdown into the athletic position, but it’s a prerequisite to establishing robust movement patterns that can eventually be loaded. Executing a prone trap raise is not as fun as doing 69 sets of biceps and triceps, but it’s a fundamental pattern that teaches people how to posterior tilt and move the scapula flush along the rib cage while keeping the humeral head in the glenoid socket. 


Athletes executing a hip hinge in our warm up before summer camp

If you want to throw a baseball hard and stay healthy while doing it, you must master the basics on the field before getting to the fun stuff. Catch play is a very basic and monotonous part of baseball, but it’s a foundational skill that must be taken seriously every single day. If you don’t strive to get the most out of your catch play every single time you touch a ball, you are wasting hours of precious development. Your window in this game is very limited. If you aren’t taking care of the basics on a consistent basis, your window will start to close sooner than you thought. 

This is a big reason why Eric’s initial assessment with athletes simply begins by looking at resting posture. While it seems basic on the outside, it gives a lot of information in terms of whether the athlete sits in flexion or extension, the alignment of their pelvis and shoulders, upper trap tone, the angle of their clavicle, and forward head posture – to name a few. Without getting deeper into the assessment (passive/active range of motion, basic joint movements, lunge, push up, overhead squat, etc.), a really simple position will give you a lot of information that can dictate the rest of the assessment. If you were to overlook this, you could put the athlete in a situation where exercise selection would feed the exact patterns you’re trying to avoid (ex: dumbbell loaded exercises for those with overactive lats that sit in downward rotation). 

When a baseline has been established through assessment, it’s important to start building a program with exercises that match up to your client. John and Kyle did a great job explaining this by laying out the following guidelines:

  1. Is an exercise, technically:
    1. Necessary? 
    2. Sufficient?
    3. Appropriate?
    4. Effective?
    5. Challenging? (or interesting, enjoyable?)
    6. Safe?
  2. Environmentally:
    1. Person (assessment/training history)
    2. Practitioner (coach?)
    3. Periodically/phase appropriate/time sensitive?
    4. Place appropriate? 
    5. Position appropriate?

While the first list is more of a general guideline, the second list is a little more individualized in terms of the client, the coach, the training location, and how it fits into their short and long term goals. Based on the client and their aspirations, there is great value in taking a conservative approach early on in order to build positive associations with training (think twice before making athletes do sprints/push ups for punishment). This list is also not static – some things may change in time. Being adaptable and being able to make adjustments is a critical piece in delivering an effective training program.  

Having the knowledge to eliminate certain exercises is also an important piece when designing programs. Depending on the sport the athlete plays, the calendar, their starting date, individual assessment, or position, certain exercises are not going to make sense. Giving an individual who lacks sufficient hip flexion a heavy dose of front squats is a disaster waiting to happen. If an athlete can’t move their scaps while executing a push up, placing them on a bench and doing horizontal press variations (bench press, dumbbell bench) is not a great way to get them moving correctly. 

This rule is also applicable in a baseball setting. Being able to choose and eliminate different inputs is a skill that requires a big toolbox – just the way program building is. Heavy bats can be great for loose movers to help create more efficient angles, but is a poor idea for someone who can’t control their barrel in the first place. Short bats can help some learn how to stay on the ball for a longer period of time, but don’t make sense when athletes start to cheat and lose angles over the plate. While it’s necessary to learn how to add certain drills/movements, it’s just as important to learn addition by subtraction


Using the short can be a great tool for athletes who pull off the ball prematurely 

Another concept John and Kyle talked about was utilizing a High/Low Central Nervous System (CNS) model – as made famous by Charlie Francis. This model balances structural and functional exercises as they relate to the increasing demands on the CNS. Developing an efficient CNS is integral in optimizing neuromuscular coordination – a big reason why multi-joint exercises should be the backbone of any training program.  The movements we make throughout the course of the day largely do not happen in isolation. They are the result of coordination between various joints and segments throughout the body. 

With this, certain exercises and tempos are going to create different demands on the CNS. Structural exercises (hypertrophy, low load/speed) are going to demand less on the CNS as opposed to functional exercises (endurance, strength, power – heavy and fast). 

High CNS movements:

  • Sprints
  • Heavy compound movements (deadlifts, front squats)
  • Medicine ball throws for speed
  • Watching the Buffalo Bills every Sunday for 22 years (I’m kidding)

Low CNS movements:

  • Low aerobic capacity work (elliptical, light jog)
  • Isolation strength training (biceps curls, leg extensions)
  • Low intensity dynamic warm up exercises (side shuffles, marches, carioca)
  • Angrily mowing the lawn after the Bills lose a heartbreaker (this happens too often)

Because of the strength and coordination required, high CNS exercises are going to typically be the best bang for your buck when training – as well as the most taxing. As a result, they should be executed when the athlete is the least fatigued. This can be accomplished by placing high CNS moves at the beginning of workouts and spacing your high CNS days between low CNS days (hence, the high/low model). A low CNS day can be any workout that does not place a heavy emphasis on endurance, strength, or power. While younger athletes can typically get away back-to-back higher CNS days because their CNS isn’t highly developed, older and more experienced lifters are going to need more time to recover.  

To create an example week utilizing the high/low model, Monday and Thursday could be high CNS lower body days. Tuesday and Friday could be moderate upper body days, Wednesday a lower CNS day, and Saturday a higher CNS day with a very low CNS day on Sunday. This can be modified or utilized in a variety of different ways – as long as you are allowing for recovery time between high CNS days. This same pattern should be utilized when developing a velocity program for pitchers. High CNS days would be velocity days and low CNS days would either be low intensity throwing/mapping or complete off days. By allowing for optimal recovery time between high CNS days, you can maximize your training without compromising the long term health of your athletes.

Early trainees are going to progress rather rapidly (linear progressive overload), while more experienced lifters are going to take more work to continue to progress and see performance gains. In either case, it’s important to always have a strong foundation with the basics (general physical preparation). Activities like baseball are going to generally pull athletes into beneficial asymmetrical patterns (ex: loss of internal rotation in back hip, gain of internal rotation in lead hip). John made a point to note throwing a baseball is going to require you to be asymmetrical – whether you had those qualities to begin with or developed them over time. Because of this, it’s important your training finds a way to neutralize some of these positions without going too far in one direction or the other (ex: anti-rotary exercises, non-dominant med ball throws to offset asymmetrical rotational demands). Less experience in the weight room is going to require less specificity on the training floor. More experience will require greater variety, but not without regards to basic movements. 

Certain qualities are going to be easier to develop and maintain than others. For example, research has shown aerobic capacity and low max strength work are pretty easy to develop and hold on to. On the other hand, power is going to be one of the first qualities to go if it is not maintained on a fairly regular basis. Considering the window of time needed to produce force in baseball, developing plane specific power should be a priority throughout programming. However, it should not come at the cost at developing general strength. General strength should be developed first before adding more explosive, power centered exercises into programs. As for some markers for general strength, CSP likes to see athletes trap bar deadlifting 405, lunging their bodyweight, and front squatting 1.5X their bodyweight. While these markers don’t necessarily dictate the health/performance of an athlete, they give some really basic information as to where their strengths, weaknesses, and greatest windows for opportunity are. 

This brings up another point discussed throughout the clinic – there is such a thing as “strong enough” when it comes to developing athletes in the weight room. Eric did a great job of explaining this in his presentation of the spine. The rotary athlete is going to require a thinner, more mobile spine in order to adapt to the constant rotation and extension you see throughout baseball. This spine is not going to fare well in the long term when constantly loaded axially (front/back squat) and bilaterally. Those with thicker spines (powerlifters, offensive linemen) are going to fair much better with these patterns as they’ve created more specific adaptations to their functional tasks. 


Using medicine balls is a great way to build rotational power

As a general rule of thumb, CSP feels pretty comfortable when an athlete can get into the upper 400 to lower 500 pound range. Since everyone’s training economy/timetable is limited, it’s important athletes are prioritizing sport specific training adaptations. Chasing a 600 pound deadlift as a baseball pitcher should not come at the expense of using medicine balls to develop rotary power. A 400 pound squat is no good if an athlete can’t reverse lunge 135. Research has shown power is largelyplane specific (e.g. why powerlifters typically don’t throw baseballs at a high level). If you aren’t getting strong in the positions and planes that your sport demands, you are wasting a good portion of your training economy. There is a time and place for loading up the bar on a deadlift, but there is also a limit as to how far you should really push to load the pattern. 

To help these gains in the weight room transfer to the playing field, John and Kyle emphasized the importance of working proximal to distal when addressing movement patterns. Much of what you see at the distal extremities (hands, feet) is going to mirror what is happening at the trunk, glutes, and pelvis. As a result, one of the first things they prioritize is creating some proximal stability. Stable positions are repeatable, unstable positions are tough to repeat. 

When athletes take their move out of balance, John and Kyle like to see some sort of rear hip stiffness. This is created by keeping the back foot in the ground and the rear glute behind the athlete’s heel (the hinge position). Instead of coaching athletes to push off the rubber, CSP likes to teach athletes how to hold angles and keep tension in their backside as they move down the mound. This gives the upper half the ability to mobilize and create separation. If the lower half is not able to create stability, the upper half won’t be able to separate and will work as one unit with the lower half. This throws off the rotary sequence and will result in a lack of velocity, health, and performance. 


Keeping the glove thumb down after hand break

Another key point John and Kyle discussed was direction to the plate. Through their observations, athletes tend to get very stiff (“muscling up”) and rotational (trying to create more separation) when trying to throw harder. This gives athletes the tendency to fly off their target through towards their glove side through early trunk rotation. Controlling the trunk throughout the delivery is a big piece in teaching athletes how to create adequate stiffness at key points. They like to teach athletes how to delay the trunk (in terms of its relationship to the pelvis) by keeping the glove thumb down (shoulder internal rotation). This helps the throwing arm retract (scap retraction) and eventually get into a slot at foot strike where the forearm/humerus and humerus/torso share about a 90 degree relationship. The throwing arm is then able to lay back and eventually deliver the ball through internal rotation and pronation. If the glove side is not able to hold angles and keep the torso stacked over the rear hip, athletes will go into early trunk rotation, lose the ability to retract the throwing scap, and spin off the ball (lack of direction) with diminished velocity. 


Getting to the 90/90 position at foot strike (general rule of thumb) with torso stacked over rear hip

Before telling pitchers to get their arm up or to keep from flying open with their lead leg, make sure you address what is going on proximally. See if they know how to hinge, turn their glutes on, and create/hold stiffness in their back hip. Make sure they’re able to create stability with their lower half before chasing separation with their upper half. Keep their direction going down the hill. You’ll never solve the issue distally if you fail to address it proximally. As John and Kyle say, “Proximal stability dictates distal performance.” 

On a final note, I think the most important fundamental takeaway was using a collaboration of several skill sets to build a sturdy, holistic business model. Everyone has their own strengths in terms of social skills, background knowledge, physical skill sets, or sport specific expertise. It’s important as a coach and athlete to know your strengths, weaknesses, and opportunities for growth. Perform using your strengths and grow your weaknesses into tools and skills you can use down the road. Outsource when you can’t find information and network with people who can complement your skills. Nothing beats having a quality conversation with an expert in the area that you desire to learn about.

I really appreciate the time Eric, Pete Dupuis, and the rest of his staff put into making this clinic a possibility. I would highly recommend them to anyone who is interested in learning more about the information presented in this article.

Feel free to reach out with any questions or concerns. Keep learning and growing.  

Blocked vs. Variable Practice Style – Which is Best?

Blocked and variable practice are two main practice styles coaches can use to design the layout of their practices. Both styles have a distinct mold which ultimately influences how athletes learn skills, retain them, and refine them with practice. While research tends to favor variable practice for long term skill acquisition, both styles of practice can help accelerate the learning curve. As a coach, knowing how to use both is a fundamental component when it comes to designing engaging practices and maximizing the time you have with your athletes. 


Blocked practice is the most common and traditional method of practice. It involves predictable, consecutive repetitions of a specific skill. There is little to no variance between repetitions. Motivation behind blocked practice usually involves a desire to perfect a certain technique. Variance in patterns is minimal, but less skilled athletes can show more unintended fluctuations in technique. 


It is very common to see examples of blocked practice when athletes are first learning a skill. In a baseball setting, an example of this would be fielding 10 ground balls in a row hit right at you or taking 10 consecutive swings off the tee in the same place. Because of the lack of variation, blocked practice tends to be the easiest to set up and execute – part of the reason why it is very common.


Variable practice is a type of practice in which consecutive repetitions differ through slight fluctuations. In true variable practice, repetitions of the skill are unpredictable (performing predictable fluctuations of a skill falls under a hybrid variation of blocked practice). The variability of repetitions is designed to try and create a more game-like environment in which the athlete is challenged to find various movement solutions as opposed to just one in blocked practice. 


This type of practice is more difficult because athletes are not able to rely on their most recent solution to execute the next rep. Each rep presents a new challenge which forces the athlete to build a large database of movement solutions. Variable practice is most effective when done at the edge of an athlete’s current abilities. Too big of a challenge creates helplessness while too small of a challenge lacks necessary stimulation for learning.  


The Shea and Morgan experiment of 1979 was one of the first studies that dove into the effectiveness of blocked and variable practice style. Participants for the study were grouped into a blocked practice group and a variable practice group. Both groups learned a skill and were tested for skill retention using a 10 minute post test and a 10 day post test. Researchers found that participants in the blocked group outperformed the variable group in the initial acquisition trials but were significantly outperformed by the variable group in the 10 minute and 10 day post test. In other words, the participants in the blocked group could not retain the skill they had just learned only 10 minutes after doing it. Ever feel like you’re starting all over with an athlete every time you see them? It might be worth going over the practice environment before you blame it on their lack of dedication.  


Frans Bosch, Dutch neurophysiologist and leading expert in motor learning principles, explains this phenomenon using the terms “adaptable” and “adapted” athletes. Athletes in blocked practice settings haven’t really learned anything – they’ve simply adapted to the task at hand. It may look good or feel good in the short term, but the monotony of it does not engage the physical and motor learning systems in a meaningful way that promotes long term retention of skills. On the contrary, athletes in the variable practice setting have become adaptable by grappling with problems and implicitly discovering new solutions within the context of various internal and external constraints (ex: physical limitations).  It may look ugly early on but the athlete is actually learning at a much faster rate than his counterparts in blocked practice. 


Chad Longworth, hitting instructor and creator of LPD+, further dives into the effectiveness of variable practice by explaining the role of the Central Nervous System (CNS) in human movement. When solving movement problems, the CNS uses sensory information from the environment to construct a “roadmap” of neural pathways that guide the body to perform a specific skill (i.e. hitting a baseball). As the pathways strengthen with time and experience, the skills become much easier to execute and the roadway created becomes an ingrained manual the athlete can consistently recall. This process effectively puts skills on “autopilot” meaning minimal conscious thought is required to repeat the skill in the future. This process is a natural human phenomenon to conserve mental energy and save it for more demanding tasks in life. We all have a limited amount of energy that we can use throughout the course of the day so it would be a great disadvantage to us if we spent a large portion of it doing things like breathing, walking, or driving.   


While throwing a baseball is not as second nature as breathing, it is a skill that becomes more automated with practice – and it must be to perform in competitive environments. The double-edged sword to the automation of skills is no new learning occurs when the skill is on autopilot. The CNS is not forced to adapt to any new information because of its familiarity with the skill. The learning systems once heavily involved in the skill acquisition process are no longer necessary. If practice fails to engage the learning systems, athletes are merely going through the motions. This is why more practice is not always better. The quality of your practice will always outweigh the quantity of it (see “Deliberate Practice” for more information on this).


When athletes are faced with new challenges through variable practice, autopilot is turned off and the brain is forced to adapt by creating newer and better skill pathways. This process helps create positive adaptations that supercede their previous skill level. These adaptations help athletes solve complex motor tasks by challenging its physical capabilities and neuromuscular efficiency. If challenges do not push athletes beyond their current skill level, their body will sit in its ideal state of homeostasis – the body’s natural mechanism to provide stability and resist change. When acquiring and refining skills, we are fighting against homeostasis. 


Plenty of research (see more) since the Shea and Morgan experiment has been published and collectively suggests athletes are better able to learn and retain skills through variable practice over blocked practice. With this, variable practice is not the end-all be-all way to train your athletes. Being able to use both styles of practice is critical to maximizing the effectiveness of your coaching to all athletes – but the scale definitely should not be tipped in favor of blocked practice. 


Blocked practice is going to be your most basic tool for teaching new skills. It is effective with novice athletes that lack experience, body control, and awareness. It is also effective with athletes that have built an ingrained CNS map of how to do a specific skill the wrong way. The CNS maps for bad patterns do not just go away when you do the skill correctly. As a result, it is important to give athletes time to practice the skill so they can construct and strengthen the new CNS maps. With enough practice, these maps can become strong enough to automate the skill and make it usable in game environments. This process does not happen overnight, but using blocked practice can be an effective way to build an early foundation for the skill that you can build on top of.


Keep things simple early on when utilizing blocked practice. Get athletes to build competency in one area before trying to move to three different areas. If you’re looking at a couple of different things, start with what will give you the biggest bang for your buck. Give the athlete some basic parameters to work within, but don’t get caught up in the aesthetics. Three different athletes might accomplish a certain task three different ways. Understand your non-negotiables and give the athlete space to individualize. You’re not trying to create clones. 


When a certain level of competency has been reached, it is crucial you challenge the pattern using variable practice. This is a continuous process that must happen in order to facilitate future learning and refinement of skills. It’s also something that should be done sooner rather than later. Since we know athletes don’t retain information very well in blocked practice, it would be a disservice to the athlete to spend most of your training time in blocked environments. Learning is messy. If you want kids to look good, tell them to join a beauty pageant. 


As you add difficulty to the task, monitor to see where the pattern breaks down. Variable practice is tougher to introduce because it’s much more difficult for kids. This can be discouraging at first and if you’re not careful can create negative associations with helpful training processes. You don’t necessarily have to explain the science behind it, but kids need to know what variable practice looks like and why it is important. No one feels good when they try something challenging and fail. As a coach, you need to be a strong mentor and give kids the psychological safety to try new things, fail, and use feedback so they can learn from their mistakes. The challenges you introduce should be enough to stimulate them but not enough to crush them. This process is difficult and requires a lot of trial and error, but don’t be afraid to regress if you’re not getting what you want from the athlete. It will be better for them in the long run.  

Below are some examples of variable practice that you can implement with your athletes:


  • Overload/Underload Bats


Overload and underload training goes back to Soviet experimentation in the early 1970s and is one of the most researched forms of variable practice. Overload bats are going to be any bat weighted heavier than the athlete’s game sized bat, while underload bats are any bat that is lighter. Overload bats are great for mechanical patterning by constraining the body to move more efficiently. Underload bats are a great tool to build bat speed by allowing the athlete to move faster than they normally do. Utilizing a combination of the two is a pretty effective way to improve your exit velocity off the bat – something we know correlates very highly to success


Research has studied bats with weight variations that range from +/- 20 percent, so this is a pretty good place to start with most athletes. If you’re struggling to find an underload bat, a fungo is a great option (you also get a couple of different training effects that I’ll discuss underneath). Whiffel ball bats are also great underload options for young kids. Popular progressions include heavier overload bats (up to 100 percent in some studies) and varying the overload portion of the bat (ex: end loaded, handle loaded, etc.). If you have some old bats that you don’t use anymore, turn them into weighted bats using some duct/bat tape, pennies, and a scale. The more variation the better.  


  • Different sized bats/barrels 


Really good hitters have a great feel for the barrel of the bat. Building barrel awareness is an important skill to help hitters make consistent hard contact. This can be trained using bats that are longer, shorter, and barrels that are smaller. Each bat presents a movement problem in which the hitter must reorganize to find a new movement solution. While long and short bats are great for general barrel awareness, they can also be utilized to help influence a certain movement pattern. For example, short bats can help athletes who pull off the ball prematurely and long bats can help athletes who have a steep (hands directly to the ball) attack angle to the ball. This is why the fungo bat can present a variety of training effects – the length, size of barrel, and weight all create a unique combination for the motor learning systems to navigate. 


  • Weighted baseballs


Weighted baseballs follow the same training principles as the overload/underload bats. Overload balls – such as plyo balls – constrain the system to influence more efficient movement patterns. Underload balls help train arm speed by allowing the arm to accelerate faster. Utilizing both training effects is a great way to develop velocity the same way overload/underload bats improve exit velocity. Oh, and we also know throwing velocity correlates highly to success.  


Another huge benefit to weighted baseballs is the proprioceptive (“feel”) adaptations it creates for throwers. Each weighted ball presents a new challenge in which the athlete implicitly learns an optimal solution for each throw. This can help the body reorganize into more advantageous positions by using feedback from each rep to make adjustments for the next. This can have positive impacts on velocity, command, secondary stuff, and arm health. 


American Sports Medicine Institute (ASMI) research has shown heavier weighted implements (in comparison to the 5 ounce regulation ball) are actually going to be less stressful on the arm as opposed to lighter implements (the study looked at implements thrown off the mound that were 4-7 ounces). As a result, the majority of your weighted ball work should be done using overload implements. If you are planning on starting a weighted baseball program, make sure you consult with a knowledgeable coach or professional for an individualized plan to ensure maximal results.  


  • Different sized baseballs


Similar to weighted baseballs, different sized balls can have create proprioceptive adaptations for throwers. Different sizes and weights are going to create tendencies to miss in similar areas (ex: athletes are more prone to miss arm side with heavier, bigger baseballs). This forces athletes to implicitly learn how to make adjustments by using feedback from ball flight of their previous repetition. This helps build a larger database of movement solutions for the athlete that can positively impact command, for example. 


  • Variable sloped mounds


Every mound is going to have slight fluctuations that creates some external variability for pitchers. Some will be higher, lower, slope off steeper, or have more clay/dirt. Your job as an athlete is not to demand perfect playing conditions – it’s to adapt to the cards you’re dealt with. Having athletes pitch off a variety of dirt mounds is a great way to teach pitchers how to make adjustments and cope with less than ideal conditions. Coaches can also manipulate portable mounds by tilting them to the left, right, or having athletes throw up the slope to create certain movement adaptations.  


For hitters, the use of slopes can help make batting practice or machine work more realistic by increasing the downhill angle the ball travels on. Throwing BP off mounds or placing pitching machines on mounds can help create a ball flight that mirrors a pitcher throwing off a mound. 


  • Different distances


Manipulating the distance from the rubber to home plate can help pitchers who have trouble making adjustments vertically in the strike zone. Coaches can narrow the distance for guys who miss up and lengthen the distance for guys who miss high. Coaches can also narrow the distance to help guys tighten up their breaking stuff. 


Moving hitters closer to and farther away from the thrower is a great tool to simulate variances in timing. Moving them closer to the pitcher can simulate higher velocities while moving them further away can create the feel of adjusting to a breaking pitch. A popular drill for this is the three plate drill where hitters take a swing at three different plates which vary in distance from the thrower. Progressions include further distances, less pitches to move between plates, and different bats for different plates (ex: using a heavier bat when closer to the thrower, lighter bat when further away).  


  • Fatigue induced learning


Inducing fatigue in your training sessions can be a great way to create awareness for specific parts of a movement pattern. It can also simulate moments late in games when athletes are competing with higher levels of fatigue. If your bullpens are only executed when you feel freshest, don’t be surprised if your stuff starts to fall apart later in the game. Be careful with this one – patterns will break down under fatigue. Your brain is more concerned about task completion over task efficiency. Use this with athletes that have a more refined skill set and higher training maturity. 


  • Hitting plyo balls

Using heavy/plyo balls for hitting can help athletes get a better feel for positions at contact and overall swing plane. Different sizes and weights can also add another element of variable practice to the mix.

  • Random Pitching Machine Sequences 

The variance in pitch location from basic machine work can create an element of variable practice, but the overall structure of it represents more of a blocked practice style. To make it variable, eliminate predictability in pitch sequences. Some more advanced machines can program variable pitch sequences. If you don’t have one, you can create variable machine practice by using multiple machines or by varying the tempo in which you feed baseballs. 

In a multiple machine set up, you would have one person feeding both machines. The two machines would be set up from slightly different positions and can simulate either the same pitch or different pitches. The person feeding would pretend to feed both machines simultaneously but would ultimately drop the baseball into one machine. The batter is forced to adapt to the incoming pitch with no knowledge of what is coming. The variance in pitches, angles, and the unpredictability of the task creates a chaotic environment that better simulates a game. 


If working with one machine, the person feeding can vary the tempo of how the baseballs are fed through the machine. Use a normal tempo for a fastball and use a slight hesitation for an offspeed pitch. Have the hitter gear up for a fastball and adjust if faced with the simulated breaking ball. Vary the sequence in which you feed fastballs and offspeed pitches.  


  • Competition 


Competition is the ultimate form of variable practice. The arousal levels athletes experience when competing against others are unparalleled. Being able to confront an opponent, take punches, and return punches is unpredictable, difficult, and demands a high level of focus and concentration. This is exactly what variable practice demands. 


For more information on how to maximize competition in your practices, see our previous blog post “Compete!” 

Feel free to reach out with any questions or concerns. Keep learning and growing.