See part one for context on what biotensegity is and why it’s important here.
If we want to train baseball athletes using the principles of biotensegrity, we need to understand how elite players move and produce force. Since baseball is a rotary sport, we have to start the conversation by defining good rotation.
Below are some guidelines:
- Positioning
- Good rotation starts by getting into good positions. When it’s time to stop and rotate, we need to be closed, centered, and connected. Any leaks here are going to make it difficult to transfer energy up the chain.
- Small windows
- Good rotation is quiet: We need tight turns in small windows. A common analogy we use is thinking about rotating in a phone booth. Elite rotation happens inside the phone booth. Bad rotation shifts out of it.
- Proximal Initiation
- We need to turn from the middle of our body. The pelvis and trunk should drive rotation and pull the extremities (arms, legs) along for the ride. For this to happen, the middle needs to brace and stabilize so the arms and legs can capture energy. Proximal stability creates distal mobility.
- Sequencing
- The sequence of when and how things get up to speed is critical for maximizing rotational force output. Don’t just look at acceleration, either. Deceleration patterns give you a ton of information about the transfer of energy up the chain. You can’t crack the whip if you never stop your hand.
- Closing the Gaps
- The shoulder line must cross the pelvic line to create rotational force. The quicker you can do this, the more force you can produce. When you get this cross-body stretch, the torso should be facing home plate/center field. This is directional energy.

When it comes to training the fascial system to create good rotation, there are a number of different things we do. The first is the easiest: Practice the skill. Hitting and throwing are the ultimate fascial driven activities. We’re moving submaximal loads (bat/ball) omnidirectionally through space using all three planes of motion. Nothing in the body is working in isolation. Everything from head to toe is working as an integrated system to move an external load through space as efficiently as possible.
If you’ve ever been around an athlete with some serious juice but no lifting background, this is why: All the time they spent playing their sport helped them get really strong in the positions they needed for their sport. This is sport specific training. Instead of focusing on the muscular system, they put their energy into the system that helps us move: The fascial system. If we want to teach players how to move better, we need to start here.
Movement Work
The purpose of movement work isn’t to get good at movement work. It’s to get good at throwing or hitting. For this to happen, each exercise must elicit a specific sensation that the athlete can feel and replicate. Don’t chase positions. Chase feelings that create desirable positions.
All of our training sessions at 108 start with what we call “movement work.” This work is done without a bat or ball, is specific to each player, and gives us a foundation from which we can start building better movement patterns by tapping into the power of the fascial system.
Some guidelines for prescribing movement work include:
- Start with the root cause of the movement inefficiency.
- If you never figure out what’s actually causing the problem, you’re just going to play a constant game of wack-a-mole. Find the virus and carefully craft exercises that are designed to eradicate it.
- You can use any tool, thought, cue, or exercise: It just has to work.
- Everything is on the table when you’re making long term movement changes. The only requirement is it has to help them move better.
- Treat it like Skill Acquisition
- The learning curve for movement work mirrors the skill acquisition process: Start simple, build competency, blend it, and eventually progress it to maximize transfer. Each athlete will pick up things at different rates, but don’t force your hand if they’re not ready for it. Long term changes take time.
- Feel the Difference (Most Important)
- The purpose of movement work isn’t to get good at movement work. It’s to get good at throwing or hitting. For this to happen, each exercise must elicit a specific sensation that the athlete can feel and replicate. Don’t chase positions. Chase feelings that create desirable positions.
If you’ve never implemented movement work or understood how to build out a progression, this article is going to coach you up on how you can do both. We’ll use two of our favorite implements as examples: PVC pipes and Waterbags.
PVC Pipes
Teaching someone how to move better often starts by getting something new and fresh into their hands that doesn’t have any previous learned associations. PVC pipes are something we often use to accomplish this. In order to break a bad habit, you have to introduce a new habit and pattern it until it eventually becomes unconscious. Executing familiar tasks with a fresh implement creates the perfect environment to learn something new. You’re no longer fighting the old pattern. The new implement makes it a new task.
Below is a PVC progression you can use to blend better patterns to the mound:
Feet in Cement
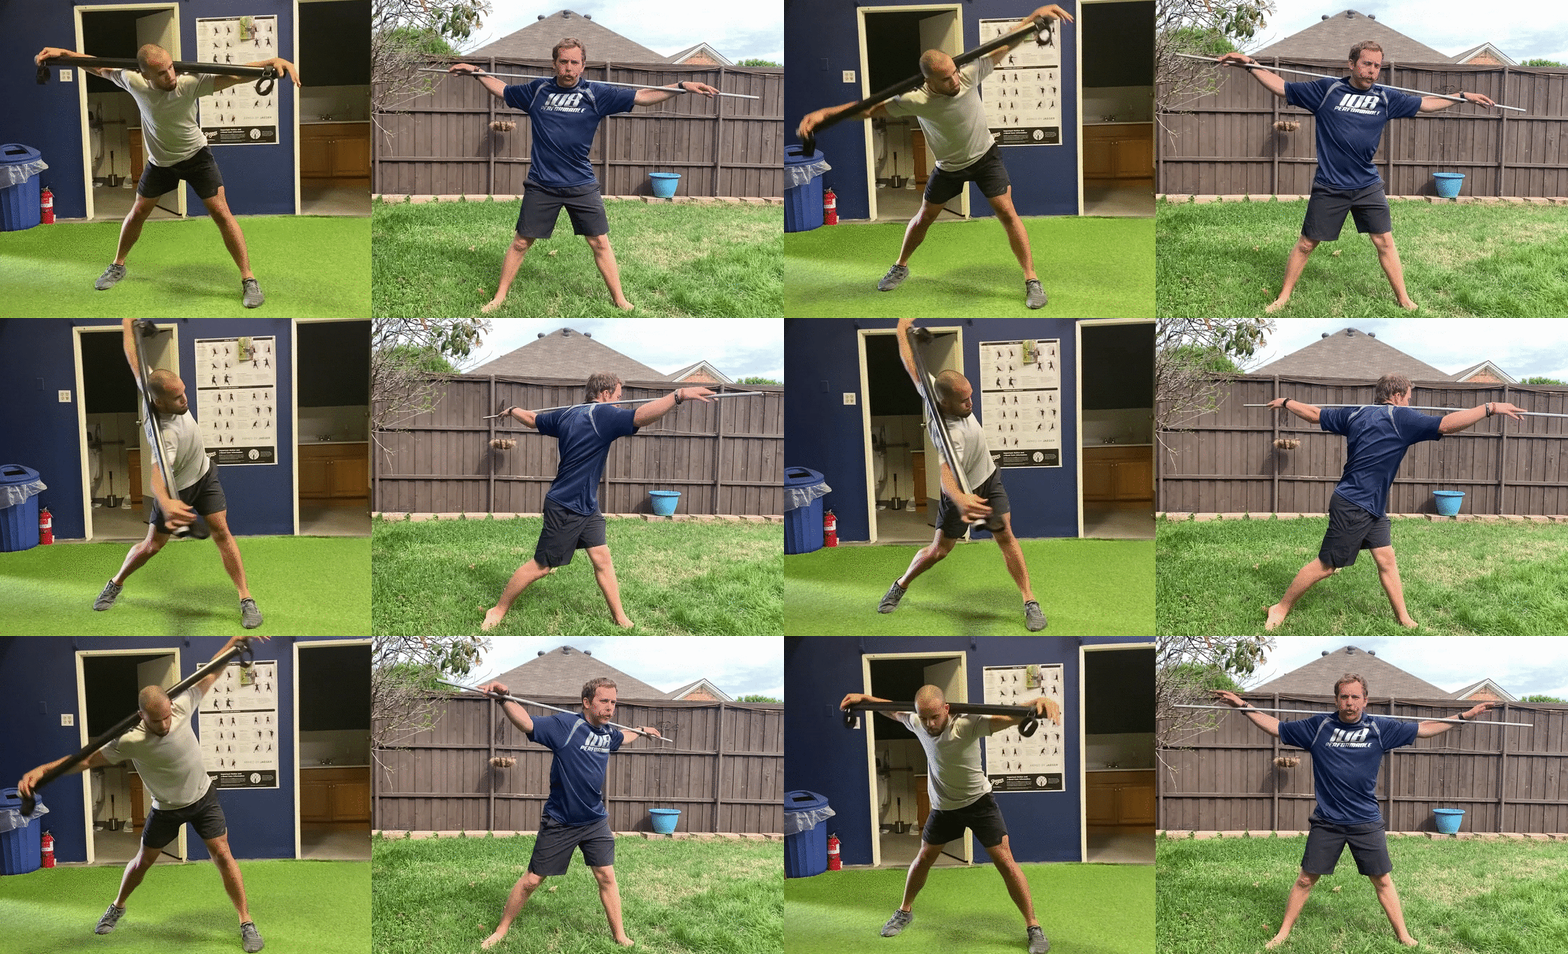
The swing or throw are complex movements that require a lot of different things to sync up at high rates of speed. If you’re trying to make significant movement changes, don’t attack the entire thing all at once. Break it into chunks and learn how to master each piece.
We’ll often start our PVC work in constrained positions where the feet are “cemented” into the ground. This takes the forward move out of the equation and helps us focus exclusively on rotation. Below are some pointers when you’re coaching up kids during PVC rotations:
- Rotate in a phone booth
- Watch for shifting, yanking, or any other movement that isn’t assisting rotation. You need to stop well to rotate well.
- Match shoulder angles
- Pitching: Shoulders should mirror throwing slot (throwing above non-throwing).
- Hitting: Rear shoulder should work underneath lead shoulder with posture (chest over toes). Watch for early side bend. Side bend should be created through rotation.
- Keep the feet anchored
- Don’t let the feet turn. Use them as anchors and hold the ground.
- Some athletes don’t have the range of motion to keep both feet flat on the ground during rotations. This is completely normal.
- To free up some space, you can move back foot behind front foot (where they “kick back” into) or start with the back heel off the ground.
- Move from the middle
- Start with pelvis and torso closed and centered. Brace the middle to initiate rotation. Trunk and pelvis should be connected during the turn.
- Pelvis should pull an anchored femur. The legs shouldn’t turn before the pelvis does.
- Shoulders need to cross pelvic line and close gaps of separation.
- Explore angles
- The shoulders need to cross the hips for rotation to stop (should get to point where you can’t rotate anymore). If the athlete can’t get to this point with direction (chest facing towards center field/home), play around with angles of legs and feet.
- Ex: Players who feel stuck can benefit from more angle (closing off) with legs.
- Ex: Players who don’t feel stable on front foot (e.g. rolling over side) can benefit from more angle (opening up) with front foot. The pelvis needs to be closed, but the foot can be angled open and the pelvis can still remain closed.
- The shoulders need to cross the hips for rotation to stop (should get to point where you can’t rotate anymore). If the athlete can’t get to this point with direction (chest facing towards center field/home), play around with angles of legs and feet.
When players can get a good feel for this, try adding in a forward move.
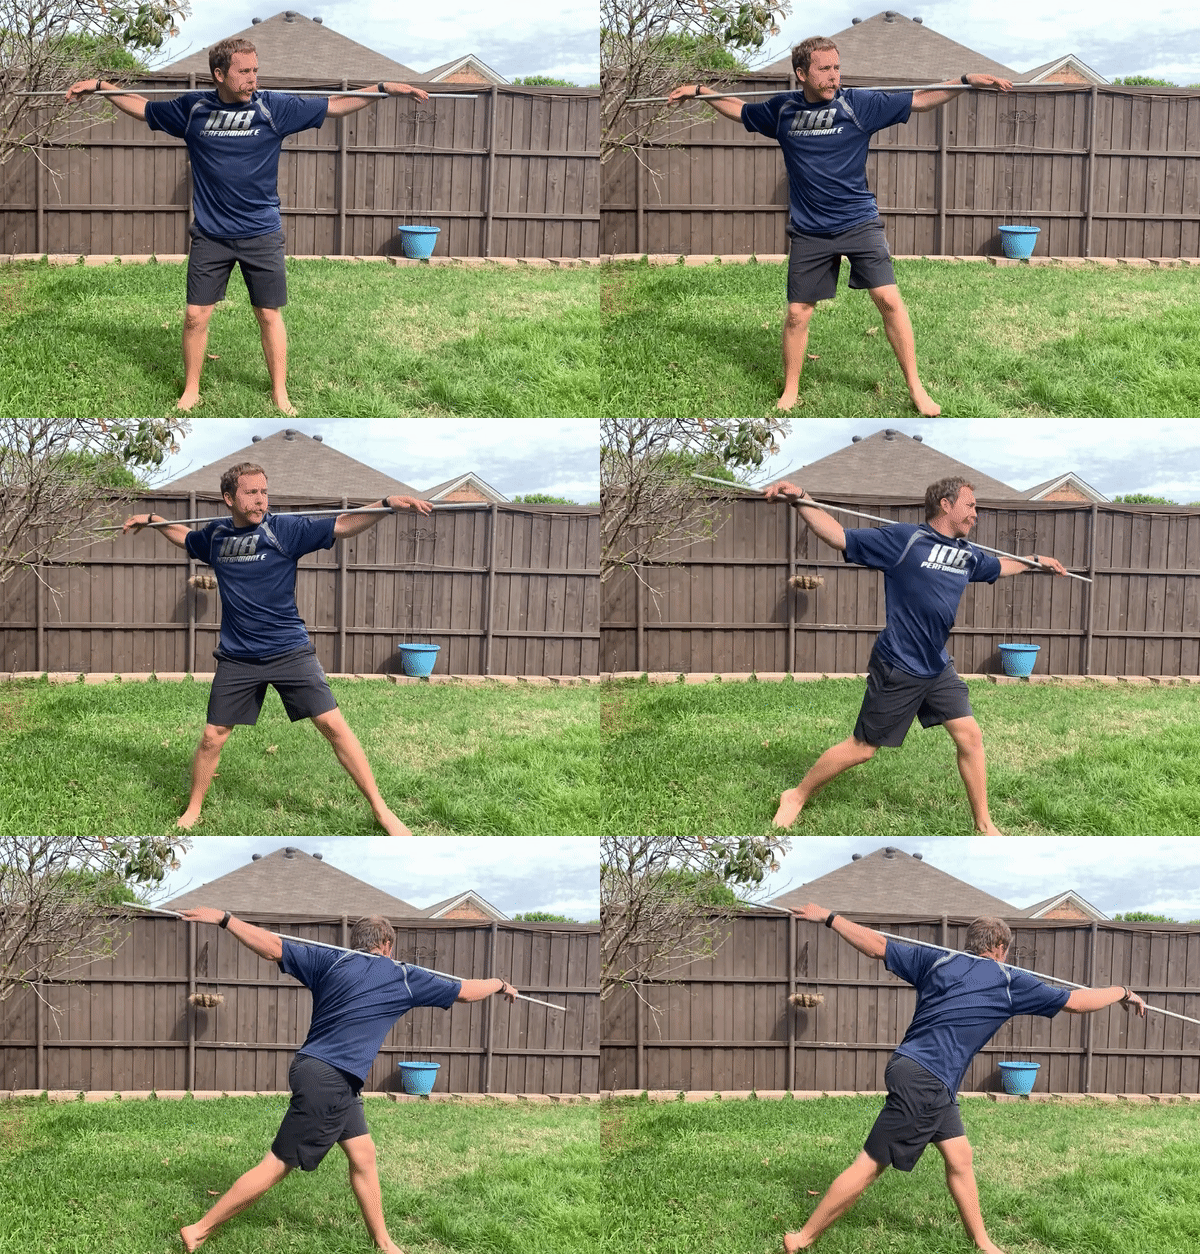
Some things to keep in mind, along with the pointers we’ve already discussed:
- Stay Centered
- Keep head over the belly button as the feet spread apart. You shouldn’t see any stacking or lunging.
- Rotate against firm front side
- Pitchers need to rotate down and around front side. If the player is uncomfortable releasing their backside during rotation, have them keep their back foot anchored to start. Eventually progress to where they can rotate the PVC pipe just the way they’d throw a ball.
- Hitters need to rotate down and into their front side. Weight should be in front side when rep has been completed. Back foot works as anchor.
- Turn, don’t fold
- The objective is to turn around your spine – not bend at the waist. There’s a big difference between rotating and folding. Don’t confuse the two.
- Throw it from deep
- The pelvis and torso should stay closed into landing. Don’t let athletes yank, open up too soon, or create tension before they need it. We need the most amount of tension at release – not before our front foot lands.
From here, you can progress the pattern by making it as close to the delivery as possible. Examples include advancing from a slidestep into a full leg lift, doing it off the mound, or adding in decel moves like “pimping the finish.”

As you start to challenge it, pay close attention to where the pattern breaks down. If you lose the pattern, regress it and find it again. Once you find it, blend it so it starts to stick. Don’t rush this process. It takes time to get sensations to transfer to new tasks. The worst thing you can do is progress it when the pattern is falling apart.
Waterbags
Waterbags are a tool we use every single day with our athletes at the shop at 108. We love them for a multitude of reasons:
- Helps us train plane specific power in the positions we need for sport
- Adds instability to system which forces us to naturally find more stable positions
- Facilitates co-contractions of key muscles along fascial lines
- Teaches athletes how to create proximal stiffness, pull out slack, and produce force in small windows of time and space
- Light (only 7-10 pounds), prevents athletes from “muscling up” and creating the wrong kind of tension too soon
If you move to and through unstable positions, waterbags are going to make your inefficiencies really obvious. You’re either going to learn how to find stability or you’re going to get yanked all over the place. For these reasons, waterbags are a great tool to repattern inefficient movement solutions. Adding instability forces the system to become much more stable. The more stable you are, the more efficient your movements are going to become.
Below is an example of a waterbag progression you can use to get the right areas activated for throwing or hitting:
In and out of Posture
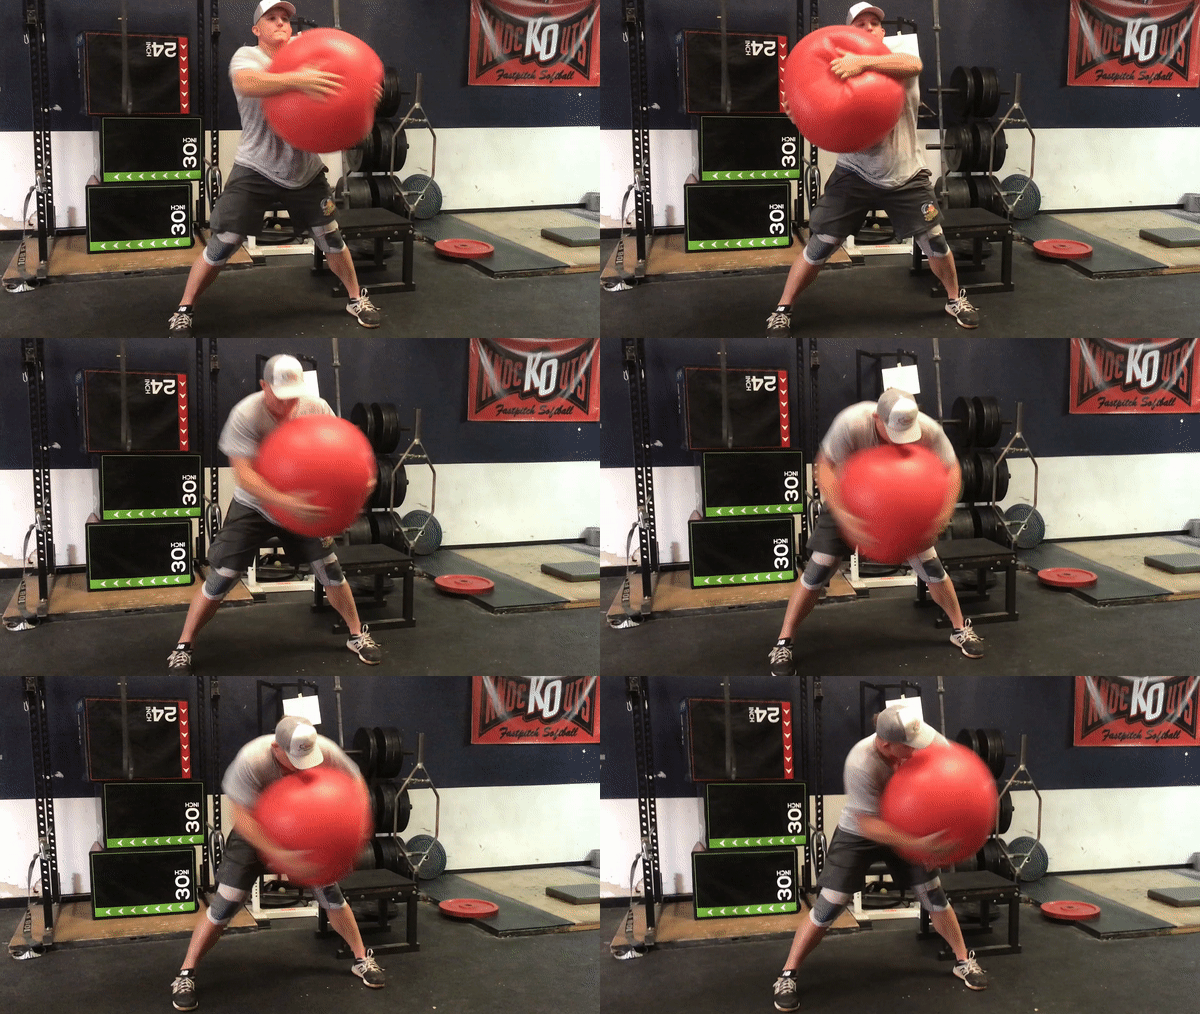
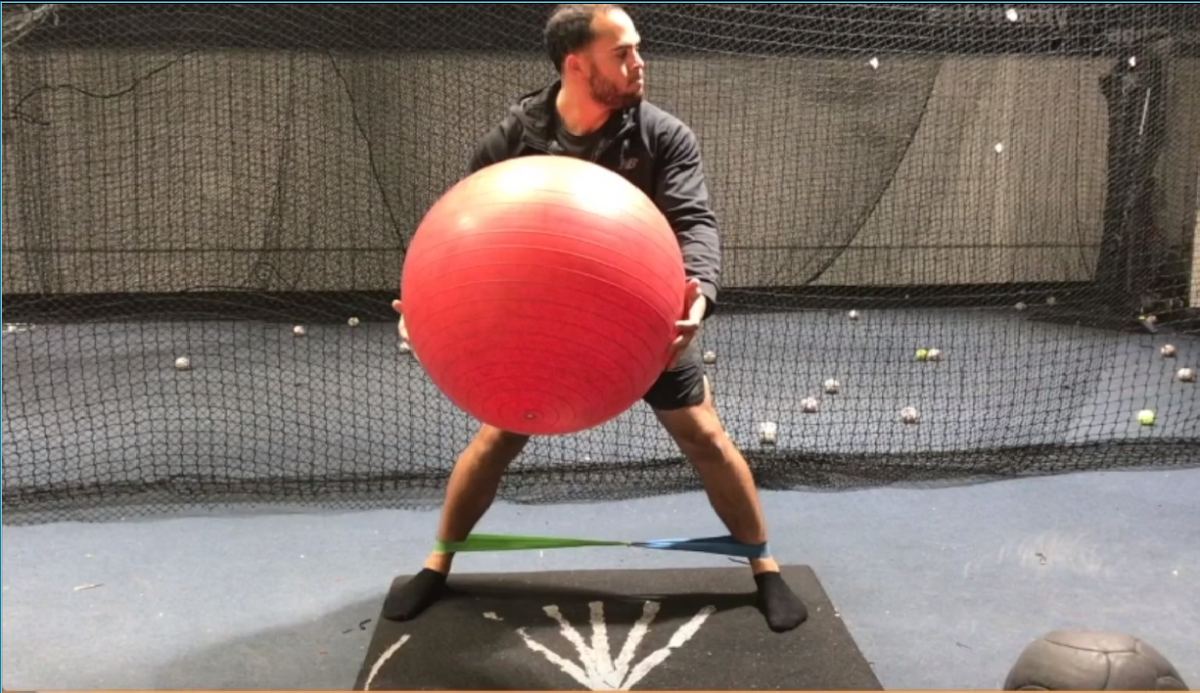
Have athletes start in a constrained position with an athletic base and both feet cemented into the ground. You can either have a waterbag on your back or a waterball bear hugged between your chest and arms. Have the athlete rotate back and forth as fast as possible controlling the move from the trunk. As this is happening, they should slowly work through various angles of posture.
Below are some coaching points:
- Brace and turn from the middle. Feet should stay cemented.
- Rotations should be as fast as possible but stable. Athletes shouldn’t be all over the place when they try to turn.
- Rotate from the trunk. The legs should be slavish to what’s going on up top.
- Don’t rush going up and down. Control the movement as you work in and out of posture.
- Can go for time (10-15 seconds) or reps (go up and down 3 times).
Feet Cement
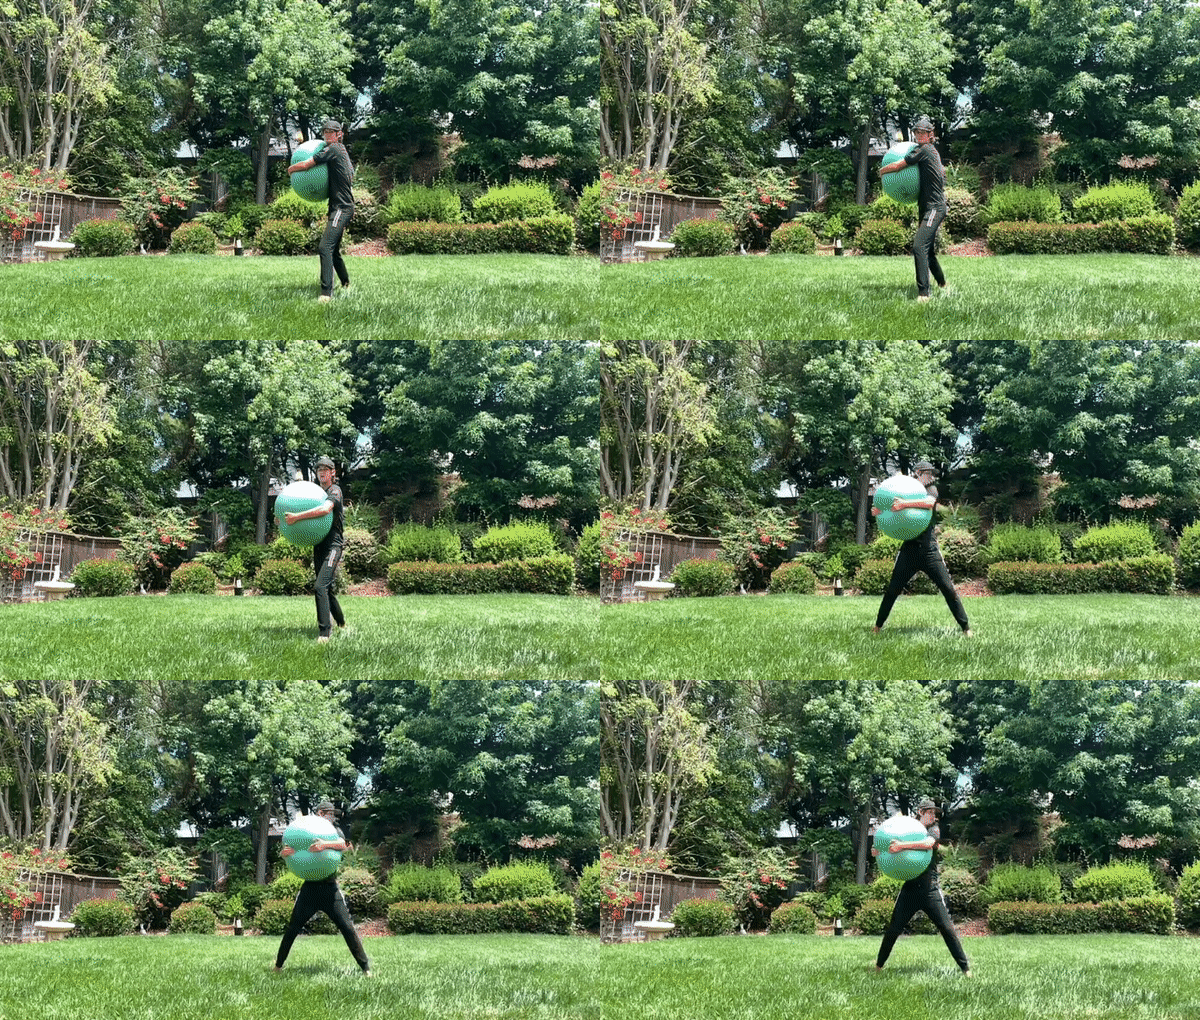
Similar to the PVC pipes, a great way to blend waterbags into throwing/hitting is to start from a wide base constrained position. This puts the emphasis on rotating and producing force in small windows. The water adds strategic resistance in the planes of motion required for producing force. This helps improve plane specific power.
Some coaching points include:
- Brace from the middle to turn. You shouldn’t see yanking or moves where the trunk is turning but the ball or bag is not.
- Stop well to rotate well. Turn in a phone booth.
- Rotations should be quick but controlled/stable.
- Set posture based on the targeted skill (throwing vs. hitting)
- Keep feet anchored. Don’t let them rotate.
When athletes become more comfortable with this variation, you can add in a forward move to make it more specific to their swing or delivery. The same principles from the PVC rotations apply here.
Shuffle Throws
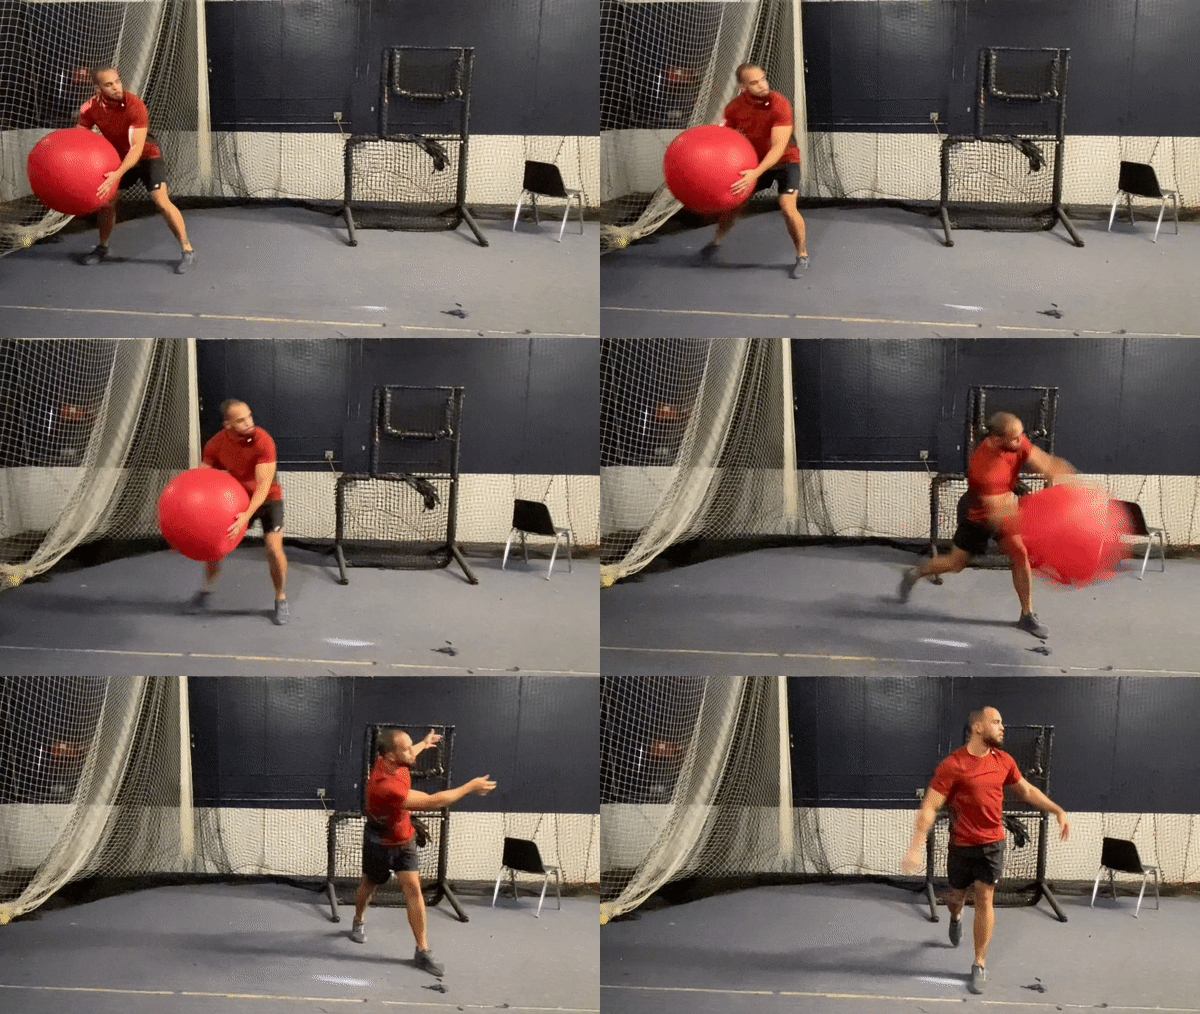
Dynamic waterbag variations are a great way to prep athletes prior to their skill sessions for a number of reasons:
- Prevents over analyzers from getting domed about constantly getting to specific positions or angles
- Teaches players how to control their center of mass and stay centered while executing different tasks
- Proximal stability, moving from the middle
- Pulling out slack, producing force in small windows of time and space
Shuffles are a waterbag variation we’ll often use for kids who:
- Get stuck on their backside
- Open up their pelvis and/or trunk too soon
- Never get to their front side
- Don’t stop well
- Need to feel cross-body sensations
Tips for these are pretty simple: Make sure athletes stay centered, stop, and rotate. Postures, angles, and other nuances depend on what they need for the skill. You can also use variations where the athlete holds on to the waterbag when they rotate. This reinforces the need to stop and turn in a small window of space.

Starting with something constrained, progressing to something more specific, and mixing in something dynamic is a great way to warm up the body to hit or throw. You don’t swing or throw to warm up. You warm up to swing or throw. Waterbags help you do just that.
Interested in learning more exercises? There are hundreds in the 108 Performance Mentorship portal you can start implementing today.

